ESP32 Tutorial: Serial Print and Debugging with Serial Communication
Abstract
Serial communication is the most fundamental method for debugging, monitoring, and receiving data from your ESP32 microcontrollers. This tutorial covers how to initialize the ESP32’s hardware UART (Universal Asynchronous Receiver-Transmitter) using the Arduino Core, how to use the Serial functions to send data back to your computer, and how to configure the Serial Monitor in the Arduino IDE to view the output.
1. Introduction
When developing embedded applications with the ESP32, you often need to check the status of variables, confirm program flow, or report sensor readings. The Serial Console is the dedicated channel for this feedback.
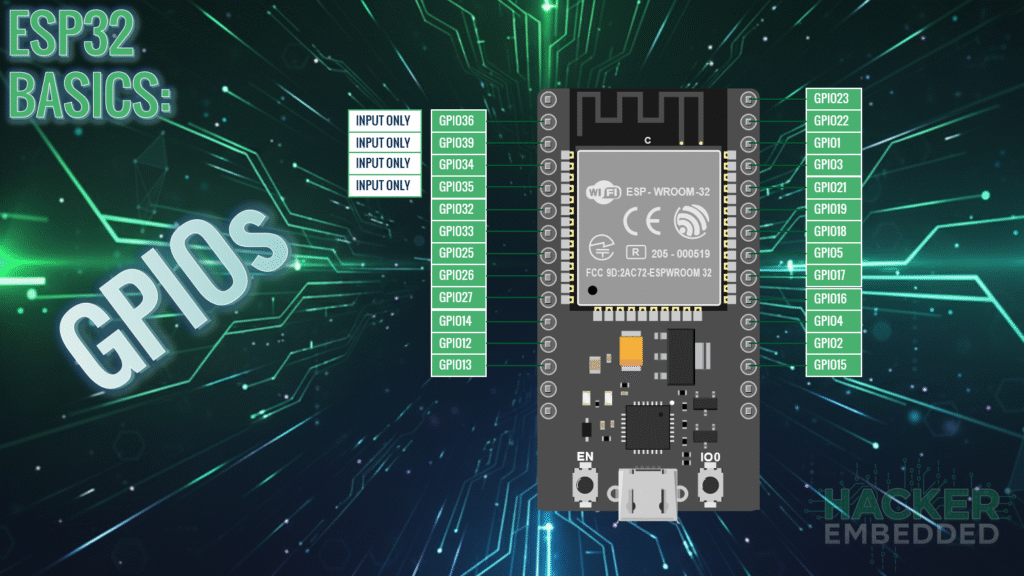
The ESP32 chip provides three hardware UART interfaces (UART0, UART1, and UART2). One of these, typically UART0, is hard-wired to the USB-to-TTL converter chip on your development board (like the popular 30-pin ESP32 DEVKIT v1). This connection is used both for uploading (flashing) firmware and for the primary Serial Communication channel you will use for printing data.
In this tutorial, you will learn:
- How to initialize the Serial connection using a Baud Rate.
- The difference between print() and Serial.println().
- How to view the ESP32’s output in the Arduino Serial Monitor.
2. Prerequisites
To execute this simple monitoring lab, you only need:
- ESP32 Development Board.
- Micro-USB cable to connect the board to your computer.
- Arduino IDE with the ESP32 Core installed.
3. Key Serial Communication Functions
Serial communication requires two steps: initialization in the setup() function and data transmission in the loop() function. All standard Arduino serial functions are available on the ESP32.
3.1 Initialization: Serial.begin(baudrate)
This function initializes the primary UART port (UART0) on the ESP32, setting the data transmission speed.
- The baudrate is the speed at which data is transferred (bits per second). For the ESP32, the standard, reliable rate is 115200. Both the ESP32 and the Serial Monitor must be set to the exact same rate.
3.2 Data Transmission: Serial.print() / Serial.println()
These functions send data from the ESP32 to the connected Serial Monitor.
- print(data): Prints data to the console without a newline character. Subsequent prints will continue on the same line.
- println(data): Prints data to the console and adds a carriage return/newline character at the end, moving the cursor to the next line. This is typically preferred for readable debugging messages.
- Supported Data: Both functions can print strings, character arrays, integer variables, floating-point numbers, and other data types.
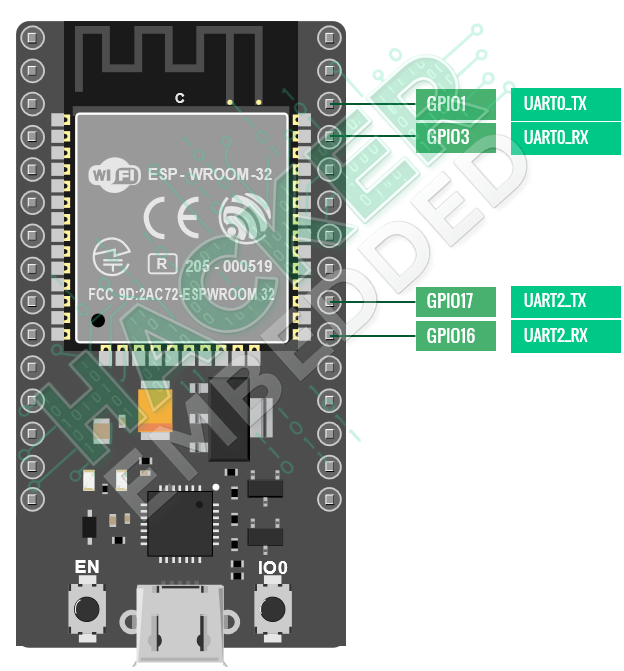
3.3 UART Pins
The 30-pin ESP32 DEVKIT V1 has three UART interfaces, UART0, UART1, and UART2, that support asynchronous communication (RS232 and RS485) and IrDA at up to 5 Mbps.
- UART0 pins are connected to the USB-to-Serial converter and are used for flashing and debugging. Which will be used for this example.
- As reference, UART1 pins are reserved for the integrated flash memory chip and UART2 is not hardware independent and is a great option for connecting to the external world.
In addition, UART provides hardware management of the CTS and RTS signals and software flow control (XON and XOFF) as well.
4. Hands-On Lab: ESP32 Serial Print
We will write a simple sketch to repeatedly print a message to the Serial Monitor, demonstrating the basic usage of the key functions.
ESP32 Serial Print Code Example
This code initializes the Serial port and prints a counter value and a fixed message every second.
// Variable to store the number of times the message has been printed
int counter = 0;
void setup() {
// 1. Initialize the Serial connection at a speed of 115200 bits per second
Serial.begin(115200);
// Wait a moment for the Serial port to initialize
delay(100);
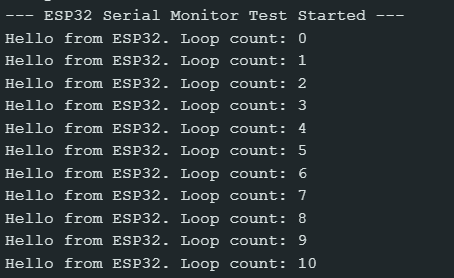
Serial.println("--- ESP32 Serial Monitor Test Started ---");
}
void loop() {
// 2. Print a fixed string to the console
Serial.print("Hello from ESP32. Loop count: ");
// 3. Print the counter variable's value, followed by a newline
Serial.println(counter);
// Increment the counter for the next loop
counter++;
// Wait for 1000 milliseconds (1 second) before running the loop again
delay(1000);
}
Execution Steps
- Compile & Upload: Upload the sketch to your ESP32 board using the process established in the previous tutorial (using the BOOT button if required).
- Open Serial Monitor: After uploading, open the Serial Monitor tool in the Arduino IDE (Ctrl+Shift+M or Tools > Serial Monitor).
- Set Baud Rate: Crucially, ensure the baud rate selection box in the bottom right corner of the Serial Monitor window is set to 115200 baud.
- Observe: Press the EN (Reset) button on the ESP32. You should immediately see the messages beginning to print, with the counter value increasing every second.
Expected Output
5. Lab Recap
You’ve successfully implemented and tested serial communication on your ESP32:
- You used begin(115200) to open the communication channel.
- You used print() and Serial.println() to send text and variable data.
- You learned to configure the Serial Monitor to match the program’s baud rate to receive the output correctly.