Arduino Tutorial: Interfacing the KY-005 IR Transmitter
Abstract
Learn how to use the KY-005 Infrared Transmitter Module with Arduino to send digital signals via infrared light. This tutorial focuses on configuring Arduino digital output pins and using the IRremote Library to generate the specific pulsed signals required to control consumer electronics like TVs, air conditioners, or media players.
1. Introduction
The KY-005 module is a basic Infrared (IR) LED emitter. It allows your Arduino to wirelessly communicate with devices that use the common 38kHz IR communication protocol (like NEC, Sony, RC-5, etc.). To make the LED flash at the exact frequency and pattern required, we must use a specialized library, as simple digitalWrite() commands are too slow and lack the necessary timing precision.
In this episode, you’ll learn:
- The fundamentals of IR communication protocols.
- How to install and use the IRremote Library.
- How to read and re-transmit an IR code.
- How to configure a digital pin for high-frequency pulsing.
This project opens up your Arduino to the world of universal remote control and home automation.
2. Prerequisites
Make sure you have:
- An Arduino Uno or compatible board.
- One KY-005 Infrared Transmitter Module.
- One KY-022 Infrared Receiver Module (or any other IR receiver) for testing/code acquisition.
- Jumper Wires.
- Arduino IDE
- IRremote Library installed (Go to Sketch > Include Library > Manage Libraries… and search for “IRremote” by Shirriff or Rafi).
3. Wiring and Setup for Arduino
The KY-005 module is a simple digital output device.
Step 1 – Identify Pins
The module typically has three pins: Signal (S), VCC (+), and Ground (− or GND).
Step 2 – Connect the Module
Wire the module to the Arduino as follows. The signal pin will be connected to a standard digital pin that the IRremote library will control.
- Connect the – / GND pin of the KY-005 to the GND pin on the Arduino.
- Connect the + / VCC pin of the KY-005 to the 5V pin on the Arduino.
- Connect the S / Signal pin of the KY-005 to Arduino Digital Pin 2.
Note: The IRremote Library often requires specific pins for optimal performance, as it uses internal timers for the 38kHz modulation. Pin 2 is a common choice for this on Arduino Uno.
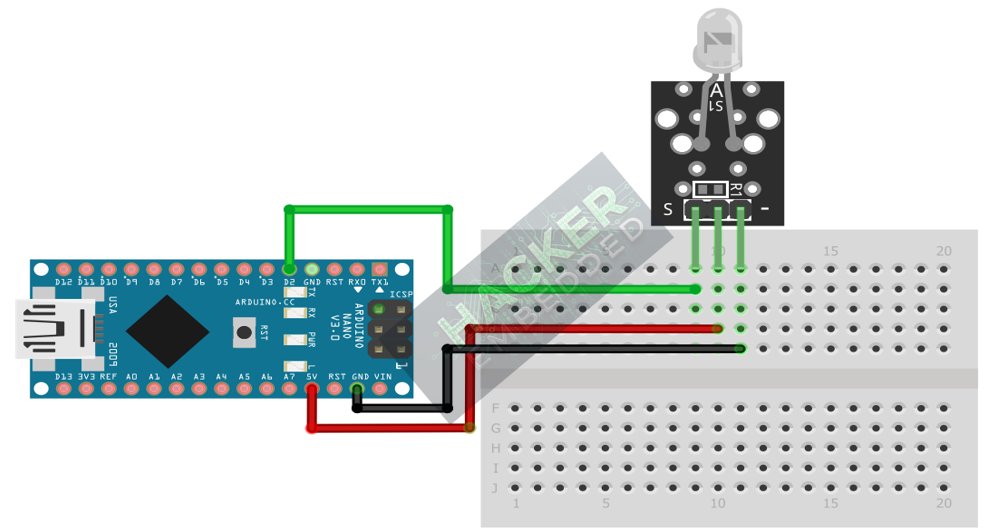
This image was created with Fritzing
Step 3 – Initialize Library and Pin Mode
The IRremote library handles pin configuration internally; you only need to define which pin to use.
4. Writing IR Transmission Code
Since you need a specific code to send, this example assumes you have already captured a code from a standard remote control (e.g., the power button from a TV) using an IR receiver.
Assumed IR Code (NEC Protocol):
- Protocol: NEC
- Address: 0x00FF
- Command: 0x30CF
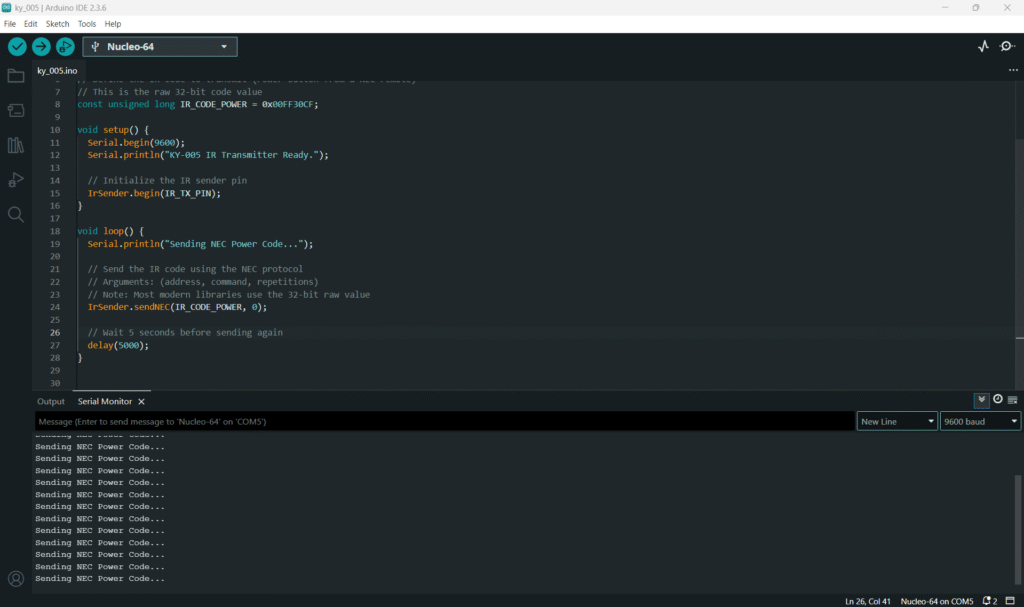
Open main.ino and implement the following code to send the “Power On/Off” command repeatedly.
					#include <IRremote.h>

// Define the pin the IR LED is connected to
const int IR_TX_PIN = 2;

// Define the IR code to transmit (Power button from a NEC remote)
// This is the raw 32-bit code value
const unsigned long IR_CODE_POWER = 0x00FF30CF;

void setup() {
  Serial.begin(9600);
  Serial.println("KY-005 IR Transmitter Ready.");

  // Initialize the IR sender pin
  IrSender.begin(IR_TX_PIN);
}

void loop() {
  Serial.println("Sending NEC Power Code...");

  // Send the IR code using the NEC protocol
  // Arguments: (address, command, repetitions)
  // Note: Most modern libraries use the 32-bit raw value
  IrSender.sendNEC(IR_CODE_POWER, 0);

  // Wait 5 seconds before sending again
  delay(5000);
}
Code Explanation
- #include <IRremote.h>: Includes all necessary functions for sending and receiving IR signals.
- begin(IR_TX_PIN): Initializes the specific digital pin for transmission.
- sendNEC(IR_CODE_POWER, 0): This library function automatically creates the required 38kHz pulse pattern, including the lead-in, data bits, and lead-out specific to the NEC protocol, based on the 32-bit code provided.
5. Acquiring an IR Code (Prerequisite Step)
To use your KY-005 module to control a specific device, you must first determine the code that device expects. This requires the KY-022 IR Receiver module (or similar).
Steps (Using an IR Receiver on Pin 3):
- Wire the IR Receiver to a separate pin (e.g., Pin3) on your Arduino.
- Upload the IRremote Library example sketch: File > Examples > IRremote > IRrecvDumpV2.
- Open the Serial Monitor.
- Point your commercial remote at the receiver and press a button.
- The Serial Monitor will display the Protocol (e.g., NEC), Address, and Command (often combined into a Value: 0x… 32-bit code).
- Copy that 32-bit hexadecimal value and replace 0x00FF30CF in the sender sketch (Section 4).
6. Uploading and Running the Project
Step 1 – Build
Click the Verify button (checkmark icon) in the Arduino IDE to compile the sketch.
Step 2 – Upload
- Connect your Arduino board via USB.
- Select the correct board and COM port.
- Click the Upload (arrow icon) button.
Step 3 – Test
- Point the KY-005 module towards the IR sensor of the device you want to control (e.g., TV or DVD player).
- The device should react (e.g., turn on/off) every five seconds as the code is repeatedly sent.
- The Serial Monitor will confirm when each code transmission begins.
7. Hands-On Lab Recap
You’ve learned:
● How to send pulsed digital signals using the KY-005.
● The importance of the IRremote Library for precise timing.
● The basic process of acquiring and transmitting a commercial IR code.
This skill is a foundation for wireless device control using your Arduino.
8. Common Issues & Fixes
| Issue | Cause | Solution |
|---|---|---|
| Device does not respond. | Incorrect IR code or wrong protocol used. | Use the IR Receiver (Section 5) to verify the exact protocol (NEC, RC5, etc.) and code expected by your target device. |
| Code transmits but range is very poor. | The IR LED is underpowered. | If the device doesn't use the standard 5V supply, you may need a transistor circuit to drive the IR LED with more current (e.g., 50mA to 100mA) from an external power supply. |
| Code compiles but shows a timer error. | Using the wrong digital pin for the IR library. | On Arduino Uno, ensure you are using Pin 3, Pin 9, or Pin 10, as these are often tied to timers used by the library. |

