
Arduino Tutorial: KY-006 Passive Buzzer Module
Abstract
Learn how to generate sound tones using the KY-006 Passive Buzzer Module with an Arduino Uno. This tutorial introduces the concept of Pulse Width Modulation (PWM) for audio generation and demonstrates how to use the built-in tone() function to create an audible alarm signal.
1. Introduction
Now that we know how to read input (KY-018), it’s time to move to an output device that provides audible feedback—a fundamental requirement for alarms, notifications, or simple musical projects.
The KY-006 is a Passive Piezo Buzzer module. Unlike an active buzzer, which produces a single tone when DC voltage is applied, a passive buzzer requires an external square wave (PWM) signal to vibrate and produce sound. This ability to accept variable frequencies allows it to generate a range of different tones and melodies.
In this episode, you’ll learn:
- The difference between active and passive buzzers.
- How to connect the KY-006 to a digital output pin.
- How to use the tone() and noTone() Arduino functions to generate specific sound frequencies.
- How to program a simple beeping alarm.
2. Prerequisites
Make sure you have:
- An Arduino Uno board (or similar Arduino board).
- A KY-006 Passive Buzzer Module.
- Jumper wires for connections.
- Arduino IDE
3. Wiring and Setup for Arduino
The KY-006 module is a simple circuit board featuring a piezoelectric disc.
- Type: Passive Piezoelectric Buzzer.
- Control Method: Requires a PWM Signal (square wave).
- Operating Voltage: 1.5V to 15V (Compatible with 5V Arduino logic).
- Tone Range: Optimized for 1.5 kHz to 2.5 kHz.
Step 1 – Identify Pins
The module typically has three pins: Signal (S), VCC (+), and Ground (− or GND).
Step 2 – Connect the Module
Wire the module to the Arduino as follows. The signal pin will be connected to a standard digital pin that the IRremote library will control.
- Connect the – / GND pin of the KY-006 to the GND pin on the Arduino.
- Connect the S / Signal pin of the KY-006 to Arduino Digital Pin 8.
- Leave VCC Unconnected (The signal pin often provides enough power)
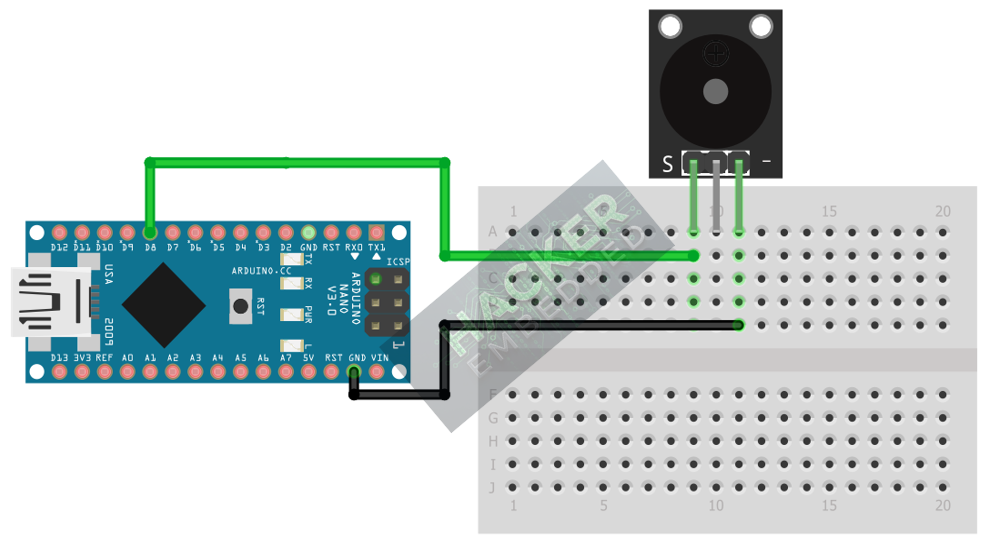
This image was created with Fritzing
4. Writing the Alarm Beep Code
The Arduino environment provides the convenient tone() function, which automatically generates a square wave of a specified frequency on any digital pin, eliminating the need for manual PWM looping.
Open the Arduino IDE and copy the following sketch:
					// KY-006 Passive Buzzer Module Example Code
// Generates a simple, repetitive alarm beep

const int BUZZER_PIN = 2; // Buzzer connected to Digital Pin 8
const int FREQUENCY = 1000; // Tone frequency in Hertz (Hz)
const int DURATION = 200; // Duration of the tone in milliseconds (ms)

void setup() {
  // Pin mode declaration is optional when using tone(), but good practice.
  pinMode(BUZZER_PIN, OUTPUT);
}

void loop() {
  // 1. Play a tone (1000 Hz) for a set duration (200 ms)
  tone(BUZZER_PIN, FREQUENCY, DURATION);

  // 2. Wait for the tone to finish plus a small pause
  delay(DURATION + 10);

  // 3. Stop the tone (though tone() with duration does this automatically,
  //  it's good practice for variable tones)
  noTone(BUZZER_PIN);

  // 4. Pause before the next beep
  delay(800);
}
Code Explanation
- const int BUZZER_PIN = 8;: Defines the digital pin the buzzer is connected to.
- tone(pin, frequency, duration);: This function generates a square wave.
- frequency: The pitch of the sound in Hertz (Hz). We use 1000 Hz for a loud beep.
- duration: The length of time the tone is played in milliseconds (ms).
- noTone(pin);: This function stops the square wave signal on the pin.
- delay(800);: Creates a silent pause between the beeps, establishing the rhythm of the alarm.
5. Compiling and Running the Project
Step 1 – Upload
- In the Arduino IDE, select the correct Board (e.g., Arduino Uno) and Port.
- Click the Upload button.
Step 2 – Test
- Once the code is uploaded, the buzzer should immediately begin producing a repetitive beeping sound.
- Experiment: Try changing the FREQUENCY value (e.g., to 500 Hz for a lower pitch or 2000 Hz for a higher one) and the DURATION or delay() values to change the tone and rhythm.
6. Hands-On Lab Recap
You’ve successfully learned:
- The distinction between Passive and Active
- How to configure a digital pin to drive an audio device.
- How to use the powerful tone() function to generate precise, custom-frequency square waves.
- How to create an audible output for your projects.
This adds a critical communication capability to your Arduino systems, preparing you for logic-based alarming.
7. Common Issues & Fixes
| Issue | Cause | Solution |
|---|---|---|
| No Sound | Signal pin not connected to a Digital Pin. | Ensure the S pin is connected to a numbered Digital Pin and the - pin is connected to GND. |
| Buzzer makes a single click, then silence | The buzzer is Active, not Passive. | Active buzzers only need DC power (HIGH signal), not a specific frequency. Verify your module is KY-006 (Passive). |
| Very Low Volume or Distorted Sound | Frequency is outside optimal range. | Ensure your frequency is within the 1.5 kHz to 2.5 kHz range for best performance. |

