Arduino Tutorial: KY-013 Analog Temperature Sensor
Abstract
Learn how to use the KY-013 Analog Temperature Sensor Module (which uses a Thermistor) with Arduino. This is the first deep dive into Analog Input, focusing on configuring an Analog Pin to read a variable voltage signal. This tutorial covers using the Analog-to-Digital Converter (ADC) via analogRead(), calculating resistance, and converting the raw value into a meaningful temperature reading in Celsius.
1. Introduction
Up until now, we’ve dealt with digital signals (HIGH/LOW). The KY-013 contains an NTC Thermistor (Negative Temperature Coefficient), a type of resistor whose resistance decreases significantly as its temperature increases. This variable resistance is converted into a variable voltage by placing it in a voltage divider circuit on the module.
In this episode, you’ll learn:
- The fundamentals of the Analog-to-Digital Converter (ADC).
- How to use the key function analogRead().
- The steps to convert a 0-1023 raw ADC value into a precise resistance
- How to apply the B-parameter equation to convert resistance into temperature (K and ∘C).
This project is essential for any application requiring continuous, quantitative monitoring of environmental conditions.
2. Prerequisites
Make sure you have:
- An Arduino Uno or compatible board.
- One KY-013 Analog Temperature Sensor Module.
- Jumper Wires.
- Arduino IDE
3. Wiring and Setup for Arduino
The KY-013 module typically has three pins and requires analog input.
Step 1 – Identify Pins
The module has three pins: Signal (S or OUT), VCC (+), and Ground (− or GND).
Step 2 – Connect the Module
Wire the module to the Arduino as follows. The signal pin must be connected to one of the Analog Input Pins (A0-A5).
- Connect the – / GND pin of the KY-013 to the GND pin on the Arduino.
- Connect the + / VCC pin of the KY-013 to the 5V pin on the Arduino.
- Connect the S / Signal pin of the KY-013 to Arduino Analog Pin A0.
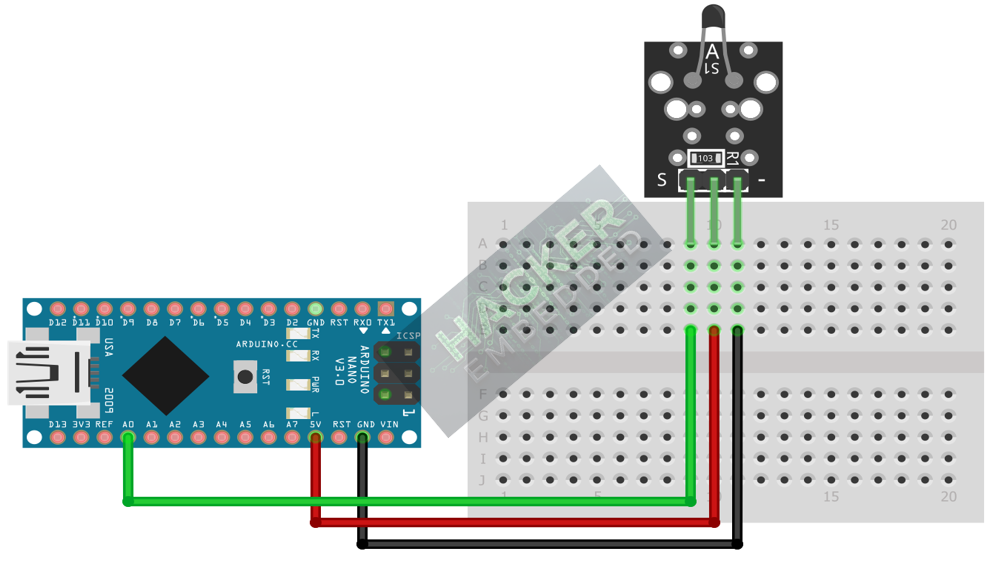
This image was created with Fritzing
Step 3 – Understanding analogRead()
The Arduino’s ADC converts the input voltage (which ranges from 0V to 5V) into a digital number between 0 and 1023 (a 10-bit resolution).
4. Writing Temperature Conversion Code
The KY-013 typically uses an NTC 10kΩ Thermistor in series with another fixed 10kΩ resistor (the voltage divider). We must use a formula based on these constants to get an accurate reading.
Open main.ino and implement the following code.
					// --- Constants for Thermistor Calculation ---
const int ANALOG_PIN = A0;
const float SERIES_RESISTOR = 10000; // Resistance of the fixed resistor in the voltage divider (R1)
const float NOMINAL_RESISTANCE = 10000; // Thermistor nominal resistance at 25C (R0)
const float NOMINAL_TEMP = 25; // Nominal temperature (T0) in Celsius
const float B_COEFFICIENT = 3950; // B-parameter of the thermistor

void setup() {
  Serial.begin(9600);
  Serial.println("KY-013 Thermistor Test Ready!");
}

void loop() {
  // 1. Read Raw ADC Value (0-1023)
  int adcValue = analogRead(ANALOG_PIN);

  // 2. Convert ADC Value to Thermistor Resistance (Ohms)
  // R_thermistor = R_series / ((1023 / ADC_value) - 1)
  float resistance = SERIES_RESISTOR / ((1023.0 / adcValue) - 1.0);

  // 3. Convert Resistance to Temperature using the B-parameter equation (Steinhart-Hart simplification)

  // R / R0 (R/R_nominal ratio)
  float steinhart = resistance / NOMINAL_RESISTANCE;

  // ln(R/R0)
  steinhart = log(steinhart);

  // 1/B * ln(R/R0)
  steinhart /= B_COEFFICIENT;

  // 1/T0 + 1/B * ln(R/R0)
  steinhart += 1.0 / (NOMINAL_TEMP + 273.15); // Add 1/T0 (T0 must be in Kelvin)

  // T = 1 / [1/T0 + 1/B * ln(R/R0)]
  steinhart = 1.0 / steinhart; // Final result in Kelvin

  // 4. Convert Kelvin to Celsius and print
  float temp_C = steinhart - 273.15;

  Serial.print("Raw ADC: ");
  Serial.print(adcValue);
  Serial.print("\tResistance: ");
  Serial.print(resistance);
  Serial.print(" Ohms\tTemperature: ");
  Serial.print(temp_C);
  Serial.println(" C");

  delay(500);
}
Code Explanation
- analogRead(ANALOG_PIN): Reads the voltage and returns an integer from 0 to 1023.
- Resistance Calculation: This formula accurately calculates the unknown resistance of the thermistor based on the known fixed resistor and the voltage divider principle.
- B-Parameter Equation: The core conversion formula. It accurately translates the highly non-linear resistance of the NTC thermistor into a linear temperature value in Kelvin (K).
- Final Conversion: Subtracting 273.15 converts the Kelvin temperature to Celsius (∘C).
					int ThermistorPin = A0;
int Vo;
float R1 = 10000; // value of R1 on board
float logR2, R2, T;
float c1 = 0.001129148, c2 = 0.000234125, c3 = 0.0000000876741; //steinhart-hart coeficients for thermistor
void setup() {
  Serial.begin(9600);
}
void loop() {
  Vo = analogRead(ThermistorPin);
  R2 = R1 * (1023.0 / (float)Vo - 1.0); //calculate resistance on thermistor
  logR2 = log(R2);
  T = (1.0 / (c1 + c2*logR2 + c3*logR2*logR2*logR2)); // temperature in Kelvin
  T = T - 273.15; //convert Kelvin to Celcius
 // T = (T * 9.0)/ 5.0 + 32.0; //convert Celcius to Farenheit
  Serial.print("Temperature: ");
  Serial.print(T);
  Serial.println(" C");
  delay(500);
}
5. Uploading and Testing the Project
Step 1 – Build
Click the Verify (checkmark icon) button in the Arduino IDE to compile the sketch.
Step 2 – Upload
- Connect your Arduino board via USB.
- Select the correct board and COM port.
- Click the Upload (arrow icon) button.
Step 3 – Test
- Open the Serial Monitor (Tools > Serial Monitor).
- The output should display continuous temperature readings.
- Test the response: Pinch the thermistor element between your fingers (your body temperature is warmer than ambient) and observe the Resistance decrease and the Temperature increase in the Serial Monitor.
7. Hands-On Lab Recap
You’ve learned:
- The importance of the Analog-to-Digital Converter (ADC) for reading sensors.
- How to use analogRead() to capture a voltage level.
- The calculation steps required to convert a raw reading into a Resistance
- How to use the B-parameter equation to convert resistance into a precise temperature reading.
This is the foundation for reading any analog sensor, such as potentiometers, light sensors, or pressure sensors.
8. Common Issues & Fixes
| Issue | Cause | Solution |
|---|---|---|
| Temperature reading is fixed or 0∘C. | Signal pin not connected to an Analog pin. | Ensure the signal pin is connected to A0, A1, A2, etc. |
| Reading is extremely inaccurate (e.g., 100∘C off). | Incorrect Thermistor Constants (e.g., B-parameter or R0). | The listed constants (10kΩ,3950) are common. If inaccurate, search for the actual specifications of your specific KY-013 sensor. |
| Reading jumps wildly between cycles. | Power supply noise or poor connection. | Add a small capacitor (0.1μF) across the 5V and GND pins. Take an average of several readings (for (int i=0; i<10; i++) { sum += analogRead(A0); }). |

