Arduino Tutorial: KY-022 Infrared Receiver Module
Abstract
Learn how to use the KY-022 Infrared Receiver Module with Arduino. This module detects the pulsed 38kHz infrared light signals emitted by standard remote controls. This tutorial focuses on configuring a digital input pin and using the IRremote Library to decode and display the specific command codes, enabling your Arduino to act as a receiver for commercial remote controls.
1. Introduction
The KY-022 contains an integrated IR receiver and demodulator, typically operating at the standard 38kHz carrier frequency. When it detects an encoded IR signal (like those from a TV or DVD remote), it outputs a stream of digital pulses. The Arduino, using the specialized IRremote Library, interprets these pulses and translates them back into a meaningful hexadecimal code (e.g., NEC or Sony protocol).
In this episode, you’ll learn:
- The fundamentals of IR communication protocols and the 38kHz carrier.
- How to install and use the IRremote Library for decoding.
- How to read the encoded signal and display the resulting data code.
- How to use the decoded codes to trigger an Arduino action (e.g., turning on an LED).
This project adds wireless control capability to your Arduino, enabling interaction with consumer devices.
2. Prerequisites
Make sure you have:
- An Arduino Uno or compatible board.
- One KY-022 Infrared Receiver Module.
- Any standard remote control (TV, DVD, etc.) for testing.
- Jumper Wires.
- Arduino IDE
- IRremote Library installed (Go to Sketch > Include Library > Manage Libraries… and search for “IRremote” by Shirriff or Rafi).
3. Wiring and Setup for Arduino
The KY-022 module is a digital input device.
Step 1 – Identify Pins
The module typically has three pins: Signal (S or OUT), VCC (+), and Ground (− or GND).
Step 2 – Connect the Module
Wire the module to the Arduino as follows. The library often dictates the preferred pin, as IR reception benefits from the Arduino’s hardware interrupts.
- Connect the – / GND pin of the KY-022 to the GND pin on the Arduino.
- Connect the + / VCC pin of the KY-022 to the 5V pin on the Arduino.
- Connect the S / Signal pin of the KY-022 to Arduino Digital Pin 2 (preferred interrupt pin on Uno).
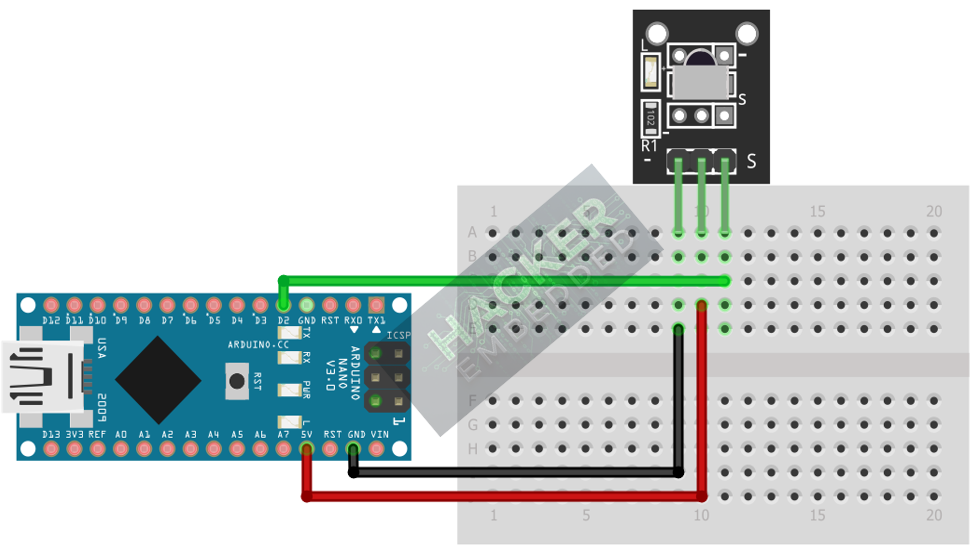
This image was created with Fritzing
Step 3 – Initialize Library
The IRremote library handles the pin configuration and interrupt setup internally. We only need to tell it which pin is being used for receiving.
4. Writing IR Decoding Code
We will use the IRremote library functions to continuously listen for an incoming signal and display the decoded code and protocol when a signal is found.
Open main.ino and implement the following code.
#include <IRremote.h>
// Define the pin the IR Receiver is connected to
const int IR_RX_PIN = 2;
const int LED_PIN = 13;
void setup() {
pinMode(LED_PIN, OUTPUT);
Serial.begin(9600);
Serial.println("KY-022 IR Receiver Ready.");
// Initialize the IR receiver pin and start listening for a signal
IrReceiver.begin(IR_RX_PIN, ENABLE_LED_FEEDBACK); // ENABLE_LED_FEEDBACK is optional
Serial.println("Waiting for IR signal...");
}
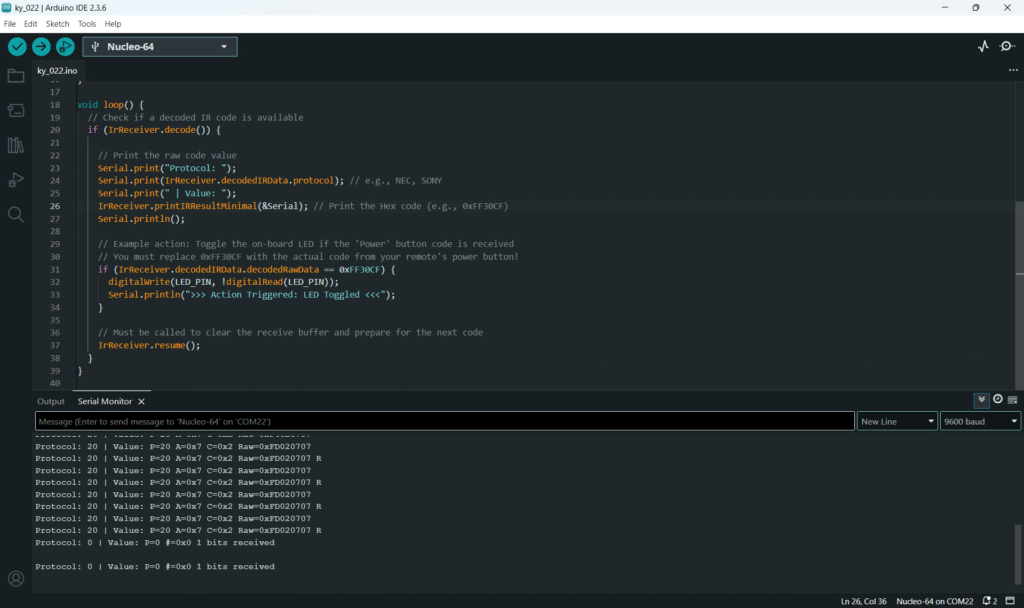
void loop() {
// Check if a decoded IR code is available
if (IrReceiver.decode()) {
// Print the raw code value
Serial.print("Protocol: ");
Serial.print(IrReceiver.decodedIRData.protocol); // e.g., NEC, SONY
Serial.print(" | Value: ");
IrReceiver.printIRResultMinimal(&Serial); // Print the Hex code (e.g., 0xFF30CF)
Serial.println();
// Example action: Toggle the on-board LED if the 'Power' button code is received
// You must replace 0xFF30CF with the actual code from your remote's power button!
if (IrReceiver.decodedIRData.decodedRawData == 0xFF30CF) {
digitalWrite(LED_PIN, !digitalRead(LED_PIN));
Serial.println(">>> Action Triggered: LED Toggled <<<");
}
// Must be called to clear the receive buffer and prepare for the next code
IrReceiver.resume();
}
}
Code Explanation
- decode(): This is the core function. It returns true if a full, valid IR command sequence has been successfully received and decoded.
- decodedIRData: A structure containing the decoded information, including the protocol (e.g., NEC) and the hexadecimal Value (the actual command code).
- resume(): This is essential. It tells the library to reset the system and start listening for the next incoming signal.
5. Capturing Remote Codes
The first step when using the KY-022 is to capture the codes from your own remote control.
- Upload the code from Section 4.
- Open the Serial Monitor.
- Point your remote control directly at the KY-022 and press a button (e.g., Volume Up).
- Copy the Value: 0x… that appears. This is the code you will use in your if statements to trigger actions.
Example: If pressing ‘1’ on your remote yields Value: 0xFF18E7, you would use: if (IrReceiver.decodedIRData.decodedRawData == 0xFF18E7) { … }
6. Uploading and Running the Project
Step 1 – Build
Click the Verify button (checkmark icon) in the Arduino IDE to compile the sketch.
Step 2 – Upload
- Connect your Arduino board via USB.
- Select the correct board and COM port.
- Click the Upload (arrow icon) button.
Step 3 – Test
- Open the Serial Monitor (Tools > Serial Monitor).
- Point your remote control at the KY-022 and press various buttons.
- The Serial Monitor should display the unique Hexadecimal Code and Protocol for each button press. If the power button is pressed, the on-board LED should toggle.
7. Hands-On Lab Recap
You’ve learned:
- How to use the KY-022 to detect 38kHz IR signals.
- The necessity of the IRremote Library for signal decoding.
- How to capture and use specific hexadecimal codes from a commercial remote.
- How to trigger a basic digital output based on a received code.
This adds wireless remote control functionality to your Arduino projects.
8. Common Issues & Fixes
| Issue | Cause | Solution |
|---|---|---|
| No codes are ever received/decoded. | Sensor is receiving too much ambient IR noise (sunlight, fluorescent lights) or not enough power. | Move the setup away from strong light sources. Check that 5V and GND are secure. |
| Codes display incorrectly or randomly. | Using a non-standard IR protocol or an old library version. | Ensure you have the latest IRremote Library installed. Try using a different, simpler remote (e.g., old DVD player). |
| Code is received once, then stops. | Forgetting to reset the receiver buffer. | Ensure IrReceiver.resume() is called at the end of the if (IrReceiver.decode()) block. |

