
ESP32 Tutorial: EEPROM Memory | Emulating Persistent Storage
Abstract
Traditional microcontrollers like the Arduino Uno use dedicated Electrically Erasable Programmable Read-Only Memory (EEPROM) for storing small amounts of configuration data that persist through power cycles. The ESP32 does not have dedicated EEPROM hardware. Instead, it emulates the EEPROM functionality by using a reserved section of its much larger Flash memory via the Non-Volatile Storage (NVS) system. This tutorial explains how to use the Arduino EEPROM library on the ESP32 to mimic traditional byte-level storage for configuration and calibration data.
1. Introduction: The Need for EEPROM Emulation
While the ESP32’s Preferences library (which directly uses NVS) is the recommended modern way to store key-value pairs, the classic EEPROM library is often used for:
- Code Portability: Easier migration of existing code written for other Arduino boards.
- Simple Byte-Level Access: For applications that only need to read/write a few bytes or specific structured data blocks.
- Specific Use Cases: Storing calibration settings or counters that need to be updated frequently and sequentially.
ESP32 EEPROM Emulation Details
- Underlying System: The ESP32’s EEPROM library is an abstraction layer that uses the NVS Flash partition to save data.
- Size: Unlike the small, fixed size of real EEPROM (e.g., 1KB on Arduino Mega), the ESP32 allows you to define a virtual EEPROM size up to the limits of the NVS partition. A typical size used is ≈512 bytes.
- Write Cycle Limitation: Although Flash memory is resilient, it has a finite number of write/erase cycles (typically ≈100,000 cycles). The NVS system is designed to use wear-leveling techniques, distributing writes across the physical Flash sectors to prolong the lifespan of the memory.
2. Core Functions for Emulated EEPROM
Using the EEPROM library on the ESP32 is a three-step process: defining the size, writing/reading data, and committing the changes.
2.1 Initial Setup and Sizing
- Include: #include <EEPROM.h>
- Allocation: EEPROM.begin(size)
Function | Purpose |
EEPROM.begin(size) | Allocates the specified number of bytes (size) in the Flash memory for the virtual EEPROM. Must be called once in setup() |
2.2 Read and Write Operations
The data is accessed by its specific address (index) within the allocated size (0 to size-1).
Function | Purpose |
EEPROM.write(address, value) | Writes a single byte (0-255) to the specified address. |
EEPROM.read(address) | Reads a single byte from the specified address. Returns a byte value. |
EEPROM.put(address, data_type) | Writes complex data types (int, float, structs) to Flash. Automatically handles multiple bytes. |
EEPROM.get(address, data_type) | Reads complex data types (int, float, structs) from Flash. |
2.3 Saving Changes
Unlike true EEPROM, the data written via EEPROM.write() or EEPROM.put() is buffered in RAM and not immediately saved to Flash. To save the changes permanently, you must call EEPROM.commit().
EEPROM.commit(): Flushes the internal buffer and writes all pending data to the physical Flash memory. This is when the wear-leveling and physical write occur.
3. Hands-On Lab: Storing a Calibration Float
This lab uses the EEPROM.put() and EEPROM.get() functions to store and retrieve a multi-byte data type (a float) which might represent a sensor calibration offset.
ESP32 EEPROM Code Example
					#include <EEPROM.h>

// Define the size of the virtual EEPROM partition and the memory address
#define EEPROM_SIZE 512       // Allocate 512 bytes
#define CALIBRATION_ADDR 0    // Start address for the float data

// Default/Initial calibration value
const float initialCalibration = 1.05;

void setup() {
  Serial.begin(115200);
  delay(1000);
  Serial.println("\n--- ESP32 EEPROM Emulation Test ---");

  // 1. Allocate the EEPROM space
  if (!EEPROM.begin(EEPROM_SIZE)) {
    Serial.println("Failed to initialize EEPROM!");
    return;
  }
  Serial.print("EEPROM initialized with ");
  Serial.print(EEPROM_SIZE);
  Serial.println(" bytes.");

  float storedValue = 0;

  // 2. Read the calibration value
  EEPROM.get(CALIBRATION_ADDR, storedValue);

  // --- FIX APPLIED HERE ---
  // The value is likely uninitialized if it reads as NaN.
  // We also check for 0.0 just in case.
  if (isnan(storedValue) || storedValue == 0.0) {
    // 3. Write the initial value if memory is empty or invalid
    Serial.println("Memory uninitialized or invalid (read as NaN). Writing default calibration...");

    // Write the initial value
    EEPROM.put(CALIBRATION_ADDR, initialCalibration);

    // 4. Commit the changes to Flash
    bool success = EEPROM.commit();
    if (success) {
      Serial.println("Write committed successfully.");
    } else {
      Serial.println("Error committing write!");
    }

    // Update the storedValue for subsequent logic and printing
    storedValue = initialCalibration;

    Serial.print("Wrote and now using: ");
    Serial.println(storedValue, 3);
  } else {
    // Value was read successfully (and is not NaN)
    Serial.print("Successfully read calibration value: ");
    Serial.println(storedValue, 3);
  }

  // 5. Example update: If the current value is 1.05, change it to 1.10
  // Note: We check against the storedValue, which is now guaranteed to be valid.
  if (storedValue == initialCalibration) {
    float newValue = 1.10;
    Serial.print("Current value matches initial value (");
    Serial.print(initialCalibration, 2);
    Serial.print("). Updating calibration to ");
    Serial.print(newValue, 2);
    Serial.println("...");

    EEPROM.put(CALIBRATION_ADDR, newValue);

    bool success = EEPROM.commit();
    if (success) {
      Serial.println("Update committed successfully.");
    } else {
      Serial.println("Error committing update!");
    }
  }
}

void loop() {
  // Main program runs here.
  delay(5000);
  Serial.println("A reset will be issued to confirm data persistence...");
  ESP.restart();
}
Code Explanation: EEPROM Emulation for Calibration Data
This code demonstrates how to use the EEPROM library on the ESP32 to store a multi-byte data type (float) persistently in the Flash memory, simulating traditional EEPROM functionality.
Core Mechanism
The sketch uses the virtual EEPROM space to store a sensor calibration offset (initialCalibration = 1.05). Since a float is four bytes, the EEPROM.put() and EEPROM.get() functions are used to handle the multi-byte read/write operation.
The program runs two sequential tests:
Initialization Test: Checks if a valid
floatis already stored in Flash. If not (first run or invalid data likeNaN), it writes the default calibration value.Update Test: If the value read from Flash matches the initial default, it updates the value to a new one (
1.10) to confirm the write process works.
Execution Steps & Persistence Proof
| Action | Serial Monitor Output (First Run) | Serial Monitor Output (Second Run/Reset) | Persistence Demonstrated |
| Initial Upload/Run | Read:
Write:
Update:
| Read:
Update: Skips update section | The EEPROM.put() and EEPROM.commit() successfully write the initial data (1.05) and then the updated data (1.10) to Flash. |
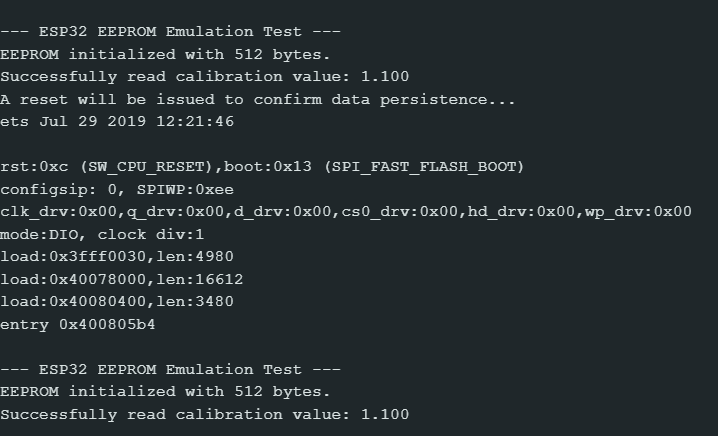
| Press EN (Reset) or Power Cycle | The sketch restarts | Read: Successfully read calibration value: 1.100 | Proof of Persistence: The ESP32 correctly reads the last saved value (1.10) after a full reset/power loss, confirming that the data stored via the EEPROM library is non-volatile (saved in Flash). |
4. Lab Recap
You’ve successfully implemented EEPROM functionality on the ESP32:
- The ESP32 emulates EEPROM using a portion of its Flash memory (via the NVS system).
- You must call begin(size) in setup() to allocate the required memory space.
- The functions put() and EEPROM.get() are used for writing and reading multi-byte data types (like int, long, or float).
- The essential function commit() is required to flush the RAM buffer and write the changes permanently to the non-volatile Flash memory.

