ESP32 Tutorial: Wi-Fi Scan, Select, and Connect Interactive Terminal
Abstract
This tutorial demonstrates basic Wi-Fi functionality on the ESP32, combining the Wi-Fi scanning feature with an interactive terminal input. The ESP32 will scan for nearby Wi-Fi networks, display the available SSIDs, and then use the Serial.readStringUntil() function (a safer alternative to scanf in the Arduino environment) to prompt the user to input the desired SSID and password via the Serial Monitor.
1. Introduction to Interactive Wi-Fi Setup
Most Internet of Things (IoT) projects require the device to connect to a Wi-Fi network. While the standard method involves hardcoding the SSID and password into the sketch, this is inflexible and requires re-flashing the device whenever the network changes.
This tutorial provides a more dynamic and user-friendly solution suitable for beginner ESP32 projects: an interactive terminal-based Wi-Fi setup. This approach combines three core networking capabilities of the ESP32:
Scanning: The ability to discover and list nearby Wi-Fi networks.
Interactive Input: Using the Serial Monitor as a simple terminal to allow the user to input data in real-time.
Dynamic Connection: Using the user-provided credentials to initiate a Wi-Fi connection attempt.
By leveraging the robust WiFi.h library and utilizing the reliable Serial.readStringUntil() function for string input, this method eliminates the need for hardcoded credentials, making the ESP32 code versatile and easier to deploy in various environments. This project forms a foundation for creating more complex captive portals or configuration routines in future applications.
2. Code Structure and Logic
The core logic involves three phases: Wi-Fi scan, interactive prompt, and connection attempt. We use Serial.readStringUntil() because the standard C scanf is often poorly supported or complex to use reliably on the ESP32’s Arduino core for string input.
2.1 Libraries and Global Variables
					#include <WiFi.h>

// Variables for user input
String inputSSID = "";
String inputPassword = "";

// Timeouts for user input
const long INPUT_TIMEOUT = 30000; // 30 seconds
2.2 Wi-Fi Scan Function
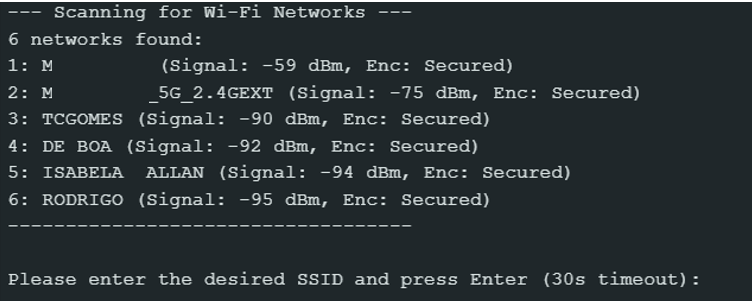
This function initiates the Wi-Fi scan and prints the list of available networks.
					void scanNetworks() {
  Serial.println("\n--- Scanning for Wi-Fi Networks ---");

  // Wi-Fi.scanNetworks returns the number of networks found
  int n = WiFi.scanNetworks();

  if (n == 0) {
    Serial.println("No networks found.");
  } else {
    Serial.print(n);
    Serial.println(" networks found:");
    for (int i = 0; i < n; ++i) {
      // Print network details
      Serial.print(i + 1);
      Serial.print(": ");
      Serial.print(WiFi.SSID(i));
      Serial.print(" (Signal: ");
      Serial.print(WiFi.RSSI(i)); // Received Signal Strength Indicator
      Serial.print(" dBm, Enc: ");
      // Check for security type (not detailed here, but good for context)
      if (WiFi.encryptionType(i) == WIFI_AUTH_OPEN) {
        Serial.println("Open)");
      } else {
        Serial.println("Secured)");
      }
      delay(10);
    }
  }
  Serial.println("-----------------------------------");
  // Clean up the scan results
  WiFi.scanDelete();
}
2.3 Interactive Terminal Input
This function prompts the user for the SSID and password using Serial.readStringUntil(‘\n’), which reads characters until a newline is received (when the user presses Enter).
bool getCredentialsFromUser() {
// --- Get SSID ---
Serial.println("\nPlease enter the desired SSID and press Enter (30s timeout):");
// Set the timeout for reading the string
long startTime = millis();
while (millis() - startTime < INPUT_TIMEOUT) {
if (Serial.available()) {
// Read the string until a newline ('\n') character
inputSSID = Serial.readStringUntil('\n');
inputSSID.trim(); // Remove any leading/trailing whitespace
if (inputSSID.length() > 0) {
break;
}
}
delay(100);
}
if (inputSSID.length() == 0) {
Serial.println("SSID input timed out.");
return false;
}
// --- Get Password ---
Serial.println("SSID received. Now enter the password and press Enter (30s timeout):");
startTime = millis();
while (millis() - startTime < INPUT_TIMEOUT) {
if (Serial.available()) {
// Read the string until a newline ('\n') character
inputPassword = Serial.readStringUntil('\n');
inputPassword.trim(); // Remove any leading/trailing whitespace
// Note: We allow empty password for open networks
break;
}
delay(100);
}
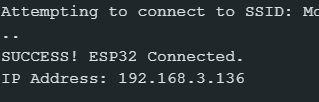
Serial.print("\nAttempting to connect to SSID: ");
Serial.println(inputSSID);
return true;
}
2.4 Connection Logic
					void attemptConnection() {
  // Disconnect any previous connection
  WiFi.disconnect();

  // Set ESP32 to Wi-Fi Station mode
  WiFi.mode(WIFI_STA);

  // Begin connection attempt
  WiFi.begin(inputSSID.c_str(), inputPassword.c_str());

  int attempts = 0;
  // Wait for connection, up to 20 attempts (20 seconds)
  while (WiFi.status() != WL_CONNECTED && attempts < 20) {
    delay(1000);
    Serial.print(".");
    attempts++;
  }

  // Check final status
  if (WiFi.status() == WL_CONNECTED) {
    Serial.println("\nSUCCESS! ESP32 Connected.");
    Serial.print("IP Address: ");
    Serial.println(WiFi.localIP());
  } else {
    Serial.println("\nCONNECTION FAILED after 20 attempts.");
    Serial.println("Please reset the board to try again.");
  }
}
2.5 Setup and Loop
					void setup() {
  Serial.begin(115200);
  delay(1000);

  // 1. Scan for networks and display the list
  scanNetworks();

  // 2. Get credentials from the user via the Serial Monitor
  if (getCredentialsFromUser()) {
    // 3. Attempt to connect using the received credentials
    attemptConnection();
  } else {
    Serial.println("Failed to get valid credentials. Program halting.");
  }
}

void loop() {
  // Nothing needs to run constantly in the loop for this demo
}
3. Code Explanation and Logic Breakdown
The code is structured into four main functional blocks: the network scanner, the input handler, the connection attempt, and the setup() function that orchestrates them.
3.1 The Wi-Fi Scan Function (scanNetworks)
This function discovers available networks and displays the necessary information to the user.
WiFi.scanNetworks(): This function performs the actual scan and returns the number of networks found (an integern).Looping and Display: A
forloop iterates from0ton-1to display details for each network.WiFi.SSID(i): Retrieves the network name (SSID).WiFi.RSSI(i): Retrieves the Received Signal Strength Indicator (RSSI) in dBm, useful for selecting the strongest signal.
WiFi.scanDelete(): Called after printing the results to free up memory used by the stored scan results.
3.2 The Interactive Input Handler (getCredentialsFromUser)
This function manages the user interaction via the Serial Monitor.
Serial.readStringUntil('\n'): This is the key function. It blocks (but allows thedelay(100)to execute for responsiveness) and waits to read all incoming characters until the newline character (\n) is detected, which occurs when the user presses Enter in the Serial Monitor. This reliably captures multi-character input.Timeout: A
whileloop checks the elapsed time againstINPUT_TIMEOUT(30 seconds). This prevents the program from hanging indefinitely if the user fails to provide input.inputSSID.trim(): Used to remove any leading or trailing whitespace that the user might unintentionally enter, ensuring a clean SSID for the connection attempt.Password Handling: The code explicitly allows for an empty password (
inputPassword.trim()) to support connecting to open (unsecured) networks.
3.3 The Connection Logic (attemptConnection)
This function uses the credentials obtained from the user to establish a connection.
WiFi.disconnect(): Ensures a clean state before starting, terminating any previous or lingering connections.WiFi.mode(WIFI_STA): Sets the ESP32 to Station mode, necessary for connecting to an existing Wi-Fi network.WiFi.begin(inputSSID.c_str(), inputPassword.c_str()): Initiates the connection. The.c_str()method is used to convert the ArduinoStringobjects into the required C-style character arrays expected by theWiFi.begin()function.Connection Loop: A
whileloop monitors the connection status (WiFi.status()) for up to 20 attempts (20 seconds). It prints dots to provide visual feedback to the user during this period.Status Reporting: Upon connection success, the local IP address (
WiFi.localIP()) is printed for verification.
3.4 Setup Orchestration
The setup() function dictates the sequence of operations:
Initialize Serial Communication.
Call
scanNetworks()to list local access points.Call
getCredentialsFromUser()to prompt the user for input.If credentials are successfully received, call
attemptConnection(). If input times out, the program halts gracefully. Theloop()remains empty as the entire connection process is handled at startup.
4. Source Code
					#include <WiFi.h>

// Variables for user input
String inputSSID = "SSID";
String inputPassword = "PASSWORD";

// Timeouts for user input
const long INPUT_TIMEOUT = 30000; // 30 seconds
void scanNetworks() {
  Serial.println("\n--- Scanning for Wi-Fi Networks ---");

  // Wi-Fi.scanNetworks returns the number of networks found
  int n = WiFi.scanNetworks();

  if (n == 0) {
    Serial.println("No networks found.");
  } else {
    Serial.print(n);
    Serial.println(" networks found:");
    for (int i = 0; i < n; ++i) {
      // Print network details
      Serial.print(i + 1);
      Serial.print(": ");
      Serial.print(WiFi.SSID(i));
      Serial.print(" (Signal: ");
      Serial.print(WiFi.RSSI(i)); // Received Signal Strength Indicator
      Serial.print(" dBm, Enc: ");
      // Check for security type (not detailed here, but good for context)
      if (WiFi.encryptionType(i) == WIFI_AUTH_OPEN) {
        Serial.println("Open)");
      } else {
        Serial.println("Secured)");
      }
      delay(10);
    }
  }
  Serial.println("-----------------------------------");
  // Clean up the scan results
  WiFi.scanDelete();
}

bool getCredentialsFromUser() {

  // --- Get SSID ---
  Serial.println("\nPlease enter the desired SSID and press Enter (30s timeout):");
  // Set the timeout for reading the string
  long startTime = millis();
  while (millis() - startTime < INPUT_TIMEOUT) {
    if (Serial.available()) {
      // Read the string until a newline ('\n') character
      inputSSID = Serial.readStringUntil('\n');
      inputSSID.trim(); // Remove any leading/trailing whitespace
      if (inputSSID.length() > 0) {
        break;
      }
    }
    delay(100);
  }

  if (inputSSID.length() == 0) {
    Serial.println("SSID input timed out.");
    return false;
  }

  // --- Get Password ---
  Serial.println("SSID received. Now enter the password and press Enter (30s timeout):");
  startTime = millis();
  while (millis() - startTime < INPUT_TIMEOUT) {
    if (Serial.available()) {
      // Read the string until a newline ('\n') character
      inputPassword = Serial.readStringUntil('\n');
      inputPassword.trim(); // Remove any leading/trailing whitespace
      // Note: We allow empty password for open networks
      break;
    }
    delay(100);
  }

  Serial.print("\nAttempting to connect to SSID: ");
  Serial.println(inputSSID);
  return true;
}

void attemptConnection() {
  // Disconnect any previous connection
  WiFi.disconnect();

  // Set ESP32 to Wi-Fi Station mode
  WiFi.mode(WIFI_STA);

  // Begin connection attempt
  WiFi.begin(inputSSID.c_str(), inputPassword.c_str());

  int attempts = 0;
  // Wait for connection, up to 20 attempts (20 seconds)
  while (WiFi.status() != WL_CONNECTED && attempts < 20) {
    delay(1000);
    Serial.print(".");
    attempts++;
  }

  // Check final status
  if (WiFi.status() == WL_CONNECTED) {
    Serial.println("\nSUCCESS! ESP32 Connected.");
    Serial.print("IP Address: ");
    Serial.println(WiFi.localIP());
  } else {
    Serial.println("\nCONNECTION FAILED after 20 attempts.");
    Serial.println("Please reset the board to try again.");
  }
}

void setup() {
  Serial.begin(115200);
  delay(1000);

  // 1. Scan for networks and display the list
  scanNetworks();

  // 2. Get credentials from the user via the Serial Monitor
  if (getCredentialsFromUser()) {
    // 3. Attempt to connect using the received credentials
    attemptConnection();
  } else {
    Serial.println("Failed to get valid credentials. Program halting.");
  }
}

void loop() {
  // Nothing needs to run constantly in the loop for this demo
}
5. Hands-On Lab Results
5.1 Execution Steps
- Upload the Code: Upload the complete sketch to your ESP32.
- Open Serial Monitor: Open the Arduino Serial Monitor and set the baud rate to 115200.
- Scan Output: The ESP32 will first output the list of available Wi-Fi networks.
- Enter SSID: When prompted, type the exact SSID of your network and press Enter.
- Enter Password: When prompted, type the password (or leave it blank for an open network) and press Enter.
- Connection: The ESP32 will display dots as it attempts to connect. Upon success, it will print the confirmation and the assigned IP address.