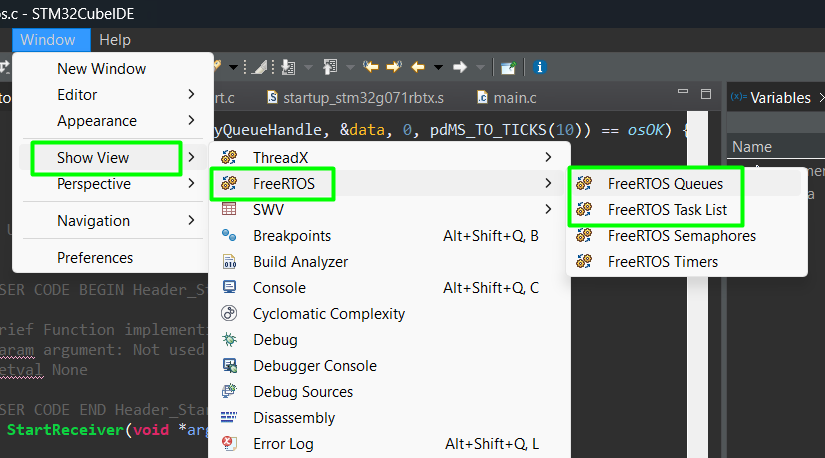
STM32 Tutorial: Managing FreeRTOS Queues
Abstract
Stop using global variables to pass data between your threads, you’re inviting race conditions and data corruption into your firmware. This tutorial breaks down FreeRTOS Queues, the industry-standard mechanism for thread-safe communication on STM32. We dive into the FIFO (First-In-First-Out) architecture, showing you how to leverage the RTOS scheduler to put tasks into a low-power Blocked state while waiting for data. From basic uint32_t streams to complex custom struct payloads using the CMSIS-RTOS v2 wrapper, we provide the raw code and logic needed to build decoupled, scalable embedded systems. If you want to move from “simple loops” to professional-grade multitasking, mastering the queue is your next step.
1. Introduction
In our previous exploration of FreeRTOS: – Hacker Embedded FreeRTOS Heap Methods and Tasks STM32 Tutorial, we looked at how to create tasks and manage memory using different heap methods. However, in any real-world embedded system, tasks rarely live in isolation. A sensor task needs to send data to a display task, or a processing task needs to receive commands from a UART task.
Using global variables for this can be dangerous, as it might lead to race conditions and data corruption. This is where Queues come in. In FreeRTOS, a queue is a thread-safe “First-In-First-Out” (FIFO) buffer that allows tasks to exchange data without clashing. In this tutorial, we will dive deep into how queues work, why they are superior to global variables, and how to implement them in your STM32 projects.
2. Prerequisites
To get the most out of this tutorial, you should have a few tools ready:
- STM32CubeIDE & CubeMX: Basic familiarity with project generation.
- FreeRTOS Task Management: Understanding how to create tasks and set priorities. (See our FreeRTOS Tasks & Heap Methods Tutorial for a refresher).
- C Programming: Comfort with pointers and custom struct types.
- Hardware: Any STM32 development board (e.g., Nucleo boards or BluePill).
3. What is a FreeRTOS Queue
Think of a FreeRTOS Queue as a physical pipe.
- FIFO Logic: Data enters at the “back” and is read from the “front.”
- Data Copying: Unlike some RTOSs that only pass pointers, FreeRTOS queues copy the actual data into the queue. This means the sender can overwrite its local variable immediately after sending without affecting the queue’s content.
- Blocking Mechanism: This is the “magic” of RTOS. If a task tries to read from an empty queue, it doesn’t have to waste CPU cycles in a while() loop. Instead, it enters a Blocked state, allowing other tasks to run until data arrives.
This diagram illustrates the FIFO (First-In-First-Out) lifecycle of a FreeRTOS queue, showing how data moves safely between a Sender Task and a Receiver Task. The send and receive functions are pseudo names:
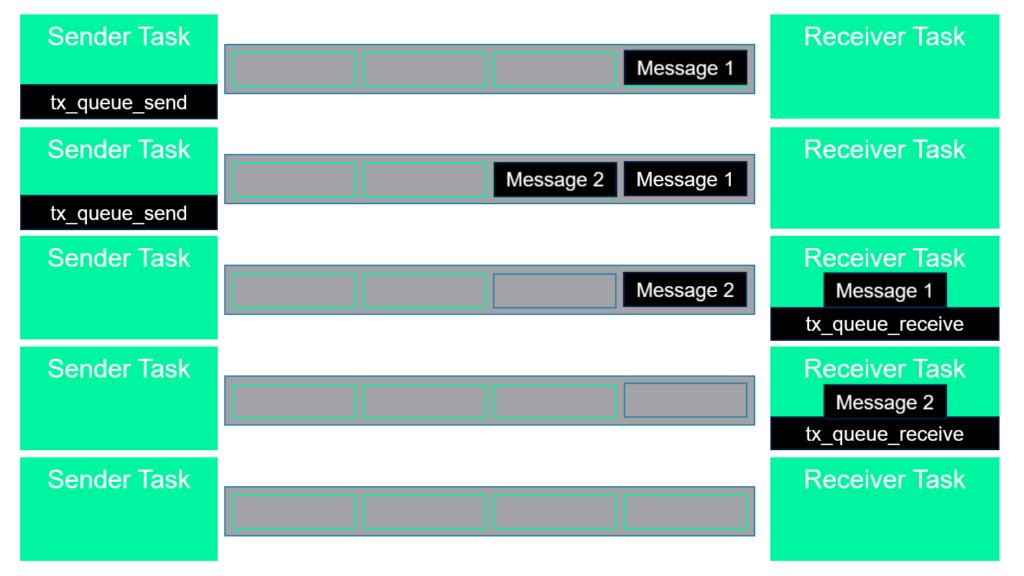
Here is a breakdown of the process shown in the image:
- Data Entry (The Top Two Rows)
- xQueueSend: The Sender Task initiates the communication. When it sends “Message 1,” the data is copied into the first available slot in the queue.
- Filling the Buffer: As the Sender Task produces more data (shown by “Message 2”), the new message enters the back of the queue. Note that “Message 1” remains at the front, ready to be read first.
- The Blocking & Receiving Mechanism (Middle Rows)
- xQueueReceive: The Receiver Task pulls data from the front of the queue. As shown in the third row, “Message 1” is the first to be removed because it was the first one in (FIFO).
- Dynamic Updating: Once a message is received, the remaining items in the queue shift forward (or the read pointer moves), making “Message 2” the next item in line.
- Queue Depletion (Bottom Two Rows)
- Sequential Processing: The Receiver Task continues to pull data until the queue is empty. In the fourth row, “Message 2” is successfully received.
- Empty State: The final row shows the queue in an empty state. At this point, if the Receiver Task attempts another xQueueReceive with a block time (like portMAX_DELAY), it will enter a Blocked state, consuming zero CPU cycles until the Sender Task pushes new data.
The actual API function names depends on the selection, which can be one of the following:
Action | FreeRTOS API | CMSIS-RTOS v1 | CMSIS-RTOS v2 |
Object Handle | QueueHandle_t | osMessageQId | osMessageQueueId_t |
Create Queue | xQueueCreate() | osMessageCreate() | osMessageQueueNew() |
Send Data | xQueueSend() | osMessagePut() | osMessageQueuePut() |
Receive Data | xQueueReceive() | osMessageGet() | osMessageQueueGet() |
Wait (Full) | xTicksToWait | millisec | timeout |
Reset/Flush | xQueueReset() | Not standard | osMessageQueueReset() |
Delete | vQueueDelete() | Not standard | osMessageQueueDelete() |
Query Space | uxQueueSpacesAvailable() | Not standard | osMessageQueueGetSpace() |
Key Differences to Note
- The Native API gives you specific control, such as xQueueSendToFront or xQueueOverwrite. CMSIS wrappers generalize these into “Put” and “Get” to ensure code can run on other kernels like RTX, ThreadX or Zephyr.
- CMSIS v1 vs. v2: CMSIS v1 is largely deprecated in newer STM32CubeIDE versions. If you are starting a new project, CMSIS v2 is the standard. It adds essential features that were missing in v1, like the ability to delete a queue or check its remaining space.
- Timeout Units: Always related to Native FreeRTOS “Ticks.”
Which one should you use?
If you are strictly using STM32 and want the most efficient code with the best debugging support, stick to the Native FreeRTOS API. If you are writing a driver or library that might need to be ported to a different ARM-based operating system later, use CMSIS v2.
4. Hands-On Lab: Simple FreeRTOS Queue creation
In this first case, we send a simple uint32_t counter from one task to another.
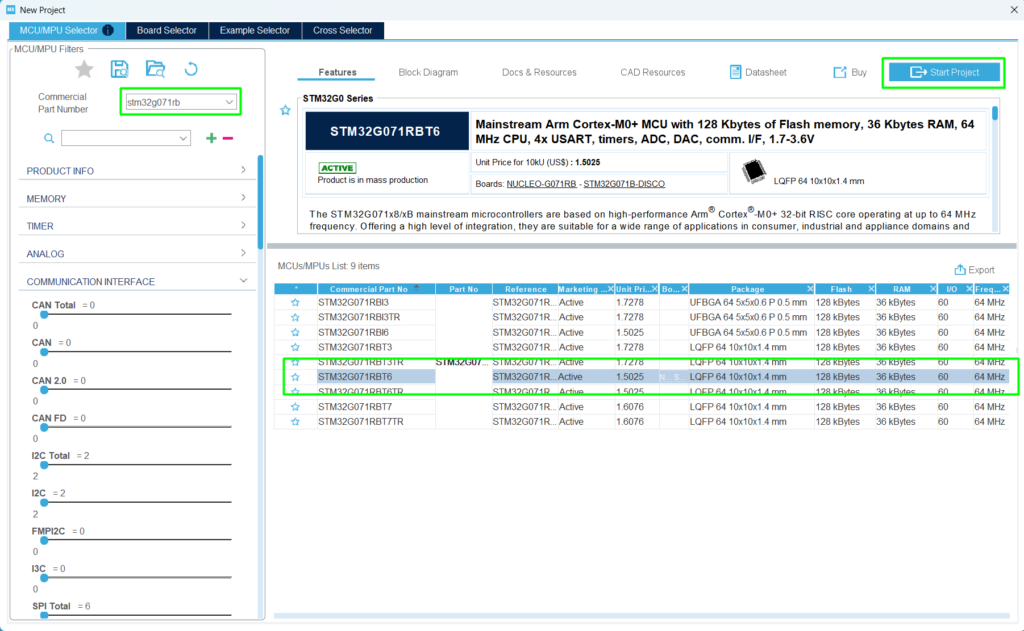
Step 1:
Create your project based on your board. In this case, the NUCLEO-G071RB will be used:
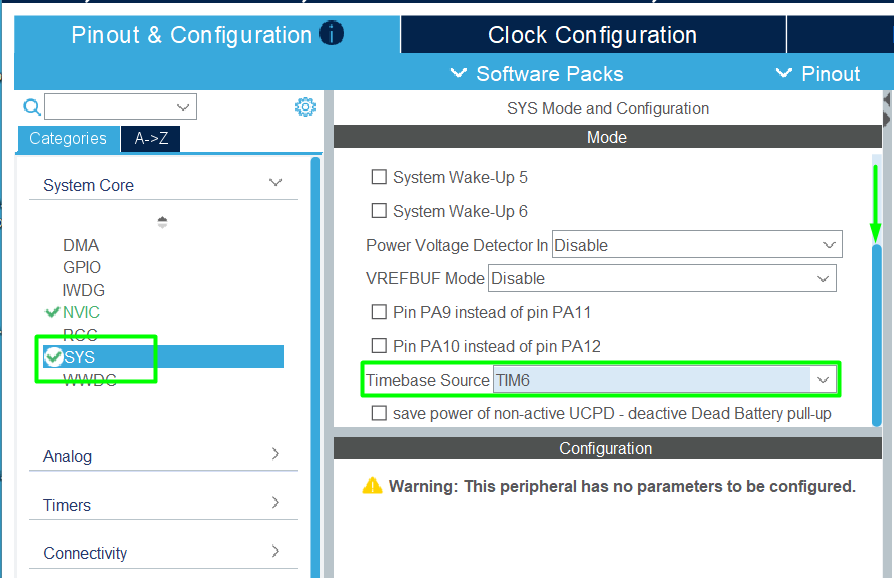
Step 2:
Change the HAL driver time base, from Systick to TIM6 (or any other unused timer by your application):
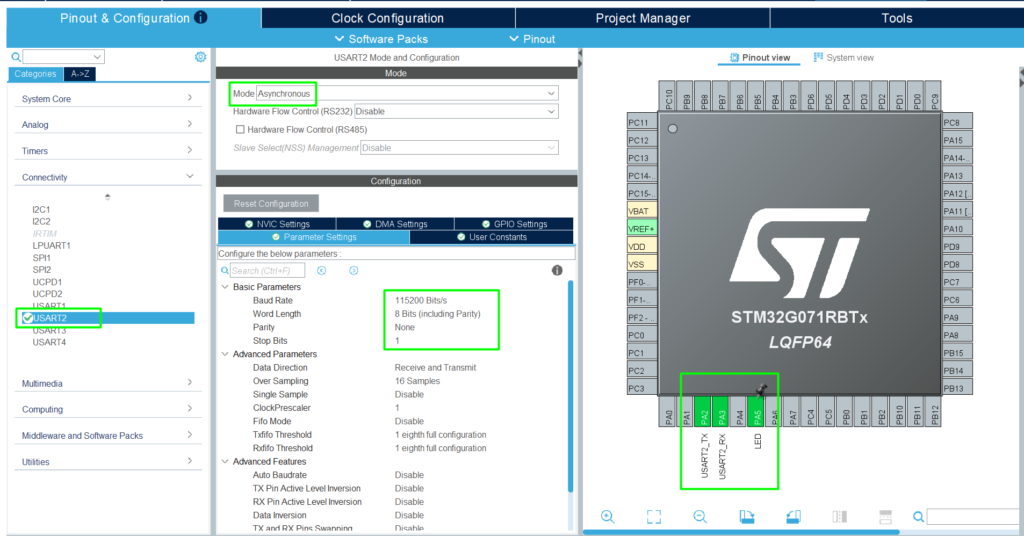
Step 3:
Add the USART2 (PA2 and PA3) for simple printf and PA5 for the LED available on the board:
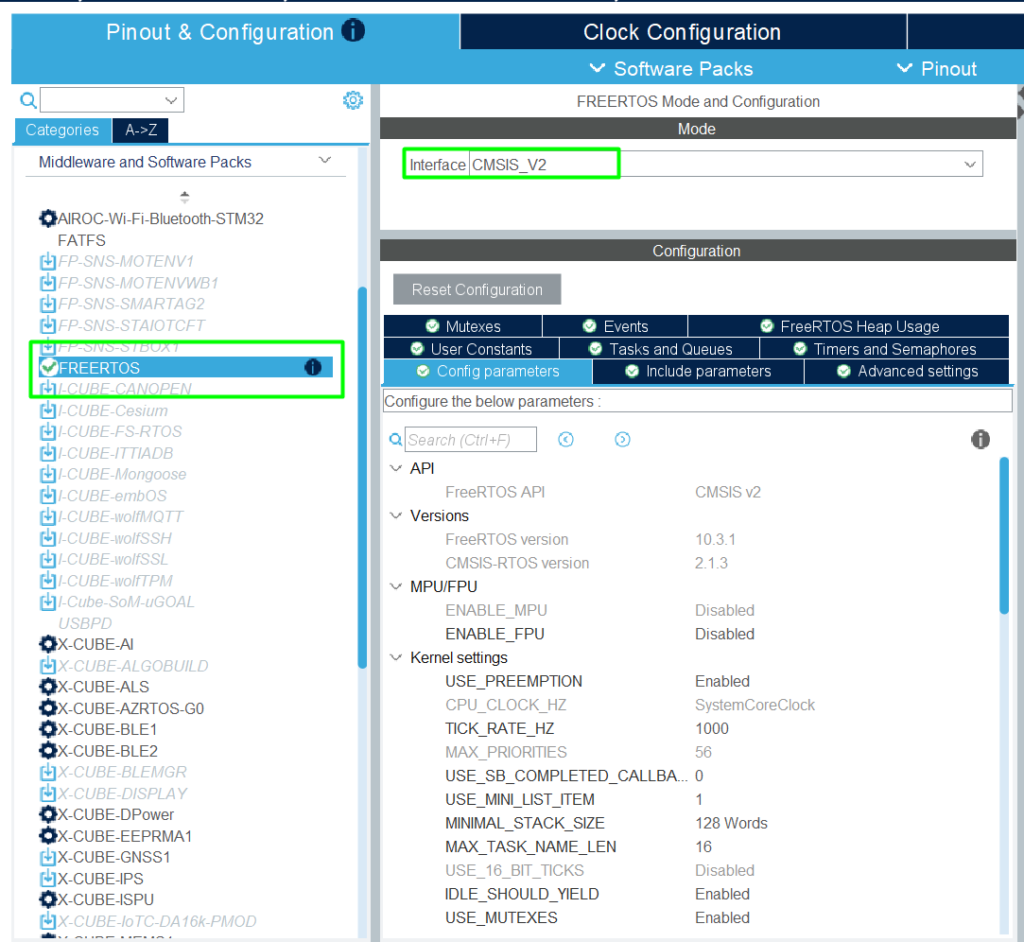
Step 4:
Add the FreeRTOS Middleware:
Step 5:
Create the two tasks: Sender and Receiver:
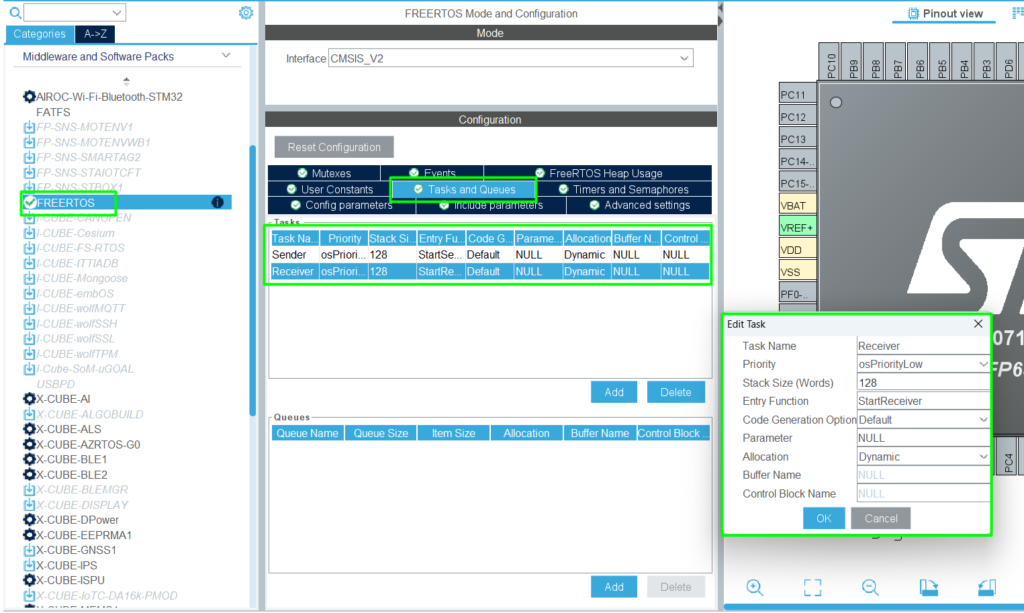
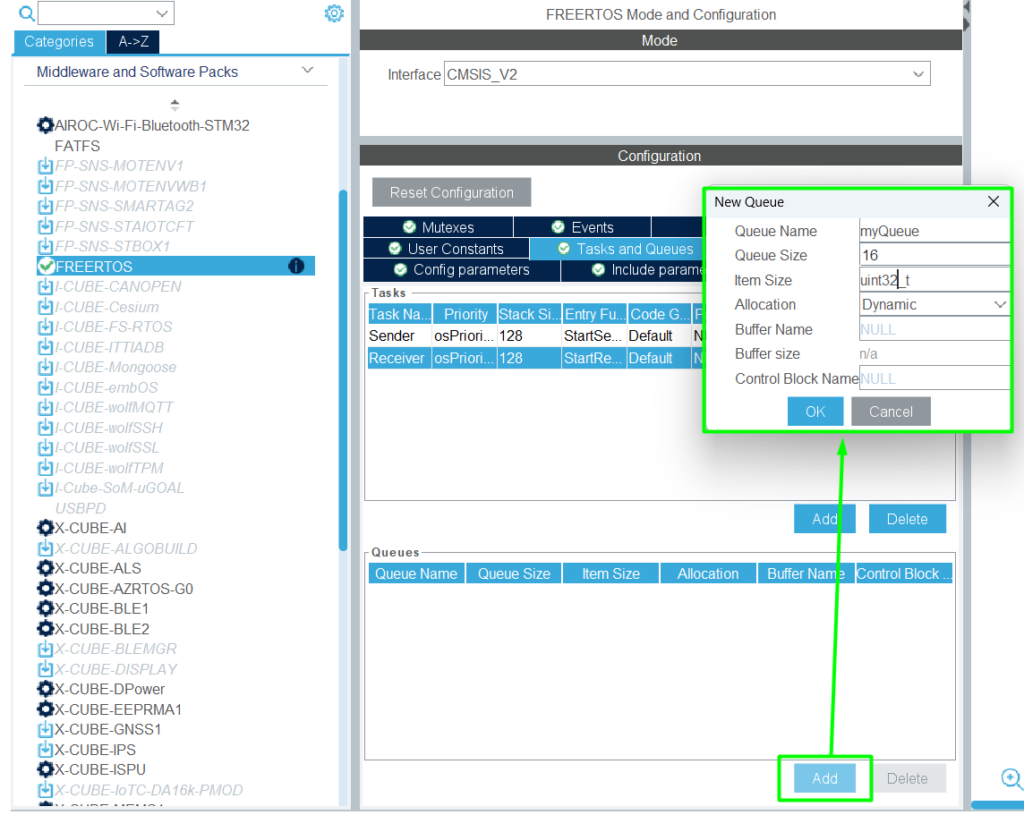
Step 6:
Create the “myQueue” with 16 in size and as uint32_t:
Step 7:
Generate the code and Open it in STM32CubeIDE.
Step 8: Code Implementation:
This code implements a really trivial pattern using the CMSIS-RTOS v2 wrapper, where it uses printf with UART2 via macro (__io_putchar), as detailed here> – Hacker Embedded How to implement printf with STM32: Setup for STM32CubeIDE and VS Code.
After that, once the kernel starts and the two tasks are created (Sender and Receiver), alongside a 16-slot message queue named myQueueHandle.
Inside the StartSender task, a 32-bit counter is incremented and pushed into the queue every 500ms using osMessageQueuePut, while the StartReceiver task remains in a Blocked state via osMessageQueueGet until data arrives, at which point it wakes up to output the received value to the console.
Use the USER CODE regions to guide your copy and paste:
					/* USER CODE BEGIN Includes */
#include "stdio.h"
#include "usart.h"
/* USER CODE END Includes */
					/* USER CODE BEGIN PM */
int __io_putchar(int ch)
{
	HAL_UART_Transmit(&huart2,(uint8_t *)&ch, 1, 100);
	return ch;
}
/* USER CODE END PM */
					/* USER CODE END Header_StartSender */
void StartSender(void *argument)
{
  /* USER CODE BEGIN StartSender */
	uint32_t value = 0;
  /* Infinite loop */
  for(;;)
  {
      if(osMessageQueuePut(myQueueHandle, &value, 0, pdMS_TO_TICKS(10)) == osOK) {
          value++;
      }
      osDelay(pdMS_TO_TICKS(500)); // Send every 500ms
  }
  /* USER CODE END StartSender */
}

/* USER CODE BEGIN Header_StartReceiver */
/**
* @brief Function implementing the Receiver thread.
* @param argument: Not used
* @retval None
*/
/* USER CODE END Header_StartReceiver */
void StartReceiver(void *argument)
{
  /* USER CODE BEGIN StartReceiver */
	uint32_t received;
  /* Infinite loop */
  for(;;)
  {
      // Block indefinitely until data is available
      if(osMessageQueueGet(myQueueHandle, &received,  0, portMAX_DELAY) == osOK) {
          printf("Received Counter: %lu\n", received);
      }

  }
  /* USER CODE END StartReceiver */
}
Debug demo:

5. Advanced Case: Custom Type FreeRTOS Queues
Eventually, you need to send more than just a number. You might want to send a “packet” containing a sensor ID, a timestamp, and a reading.
So here is an example with Struct 🙂
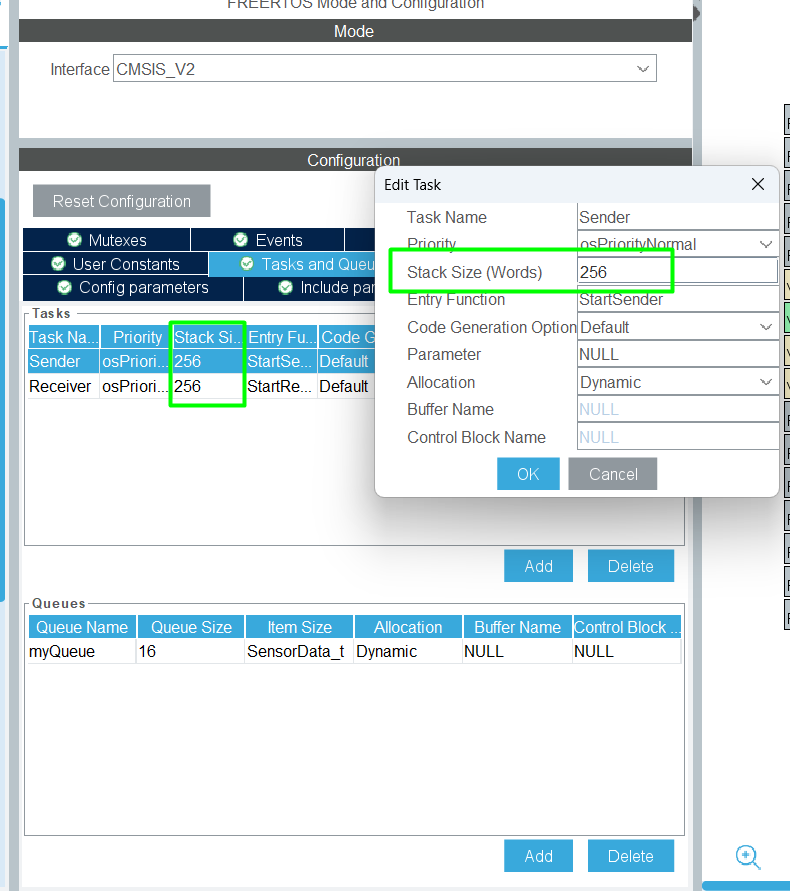
Go back to CubeMX and adjust the item size:

Given the size of the structure and the fact it will use floating, let’s increase the stack used for the tasks, moving from 128 to 256:
Re-generate the code and implement the following changes, starting by the creation of the structure via typedef:
					/* USER CODE BEGIN PTD */
typedef struct {
    uint8_t sensorID;
    float temperature;
} SensorData_t;
/* USER CODE END PTD */
/* USER CODE BEGIN Header_StartSender */
/**
  * @brief  Function implementing the Sender thread.
  * @param  argument: Not used
  * @retval None
  */
/* USER CODE END Header_StartSender */
void StartSender(void *argument)
{
  /* USER CODE BEGIN StartSender */
	   SensorData_t data = { .sensorID = 1, .temperature = 25.5f };
  /* Infinite loop */
  for(;;)
  {
      if(osMessageQueuePut(myQueueHandle, &data, 0, pdMS_TO_TICKS(10)) == osOK) {
          data.temperature += 0.1f; // Simulate heat
      }
      osDelay(pdMS_TO_TICKS(1000)); // Send every 1000ms
  }
  /* USER CODE END StartSender */
}

/* USER CODE BEGIN Header_StartReceiver */
/**
* @brief Function implementing the Receiver thread.
* @param argument: Not used
* @retval None
*/
/* USER CODE END Header_StartReceiver */
void StartReceiver(void *argument)
{
  /* USER CODE BEGIN StartReceiver */
	SensorData_t rxData;
  /* Infinite loop */
  for(;;)
  {
      // Block indefinitely until data is available
      if(osMessageQueueGet(myQueueHandle, &rxData,  0, portMAX_DELAY) == osOK) {
          printf("ID: %d | Temp: %.2f\n", rxData.sensorID, rxData.temperature);
      }

  }
  /* USER CODE END StartReceiver */
}
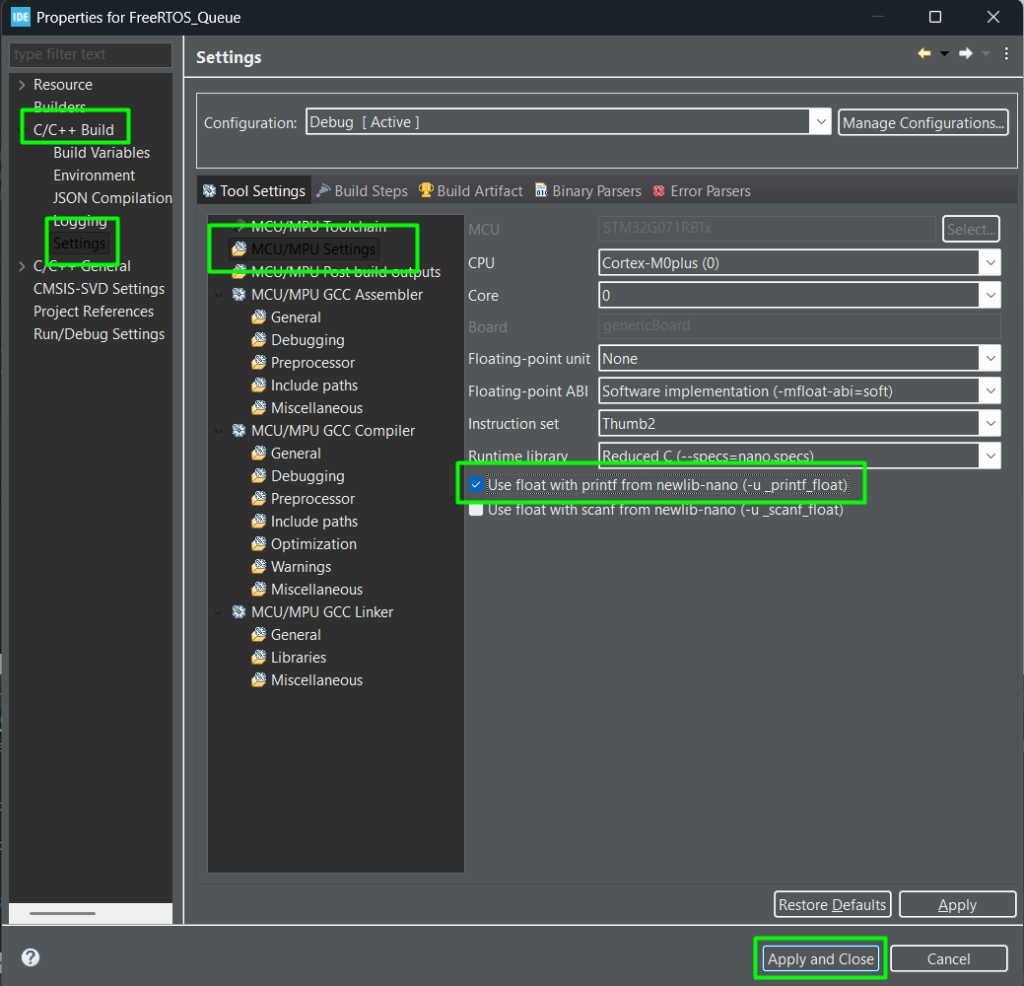
Before building, go to the project settings to enable float printf:
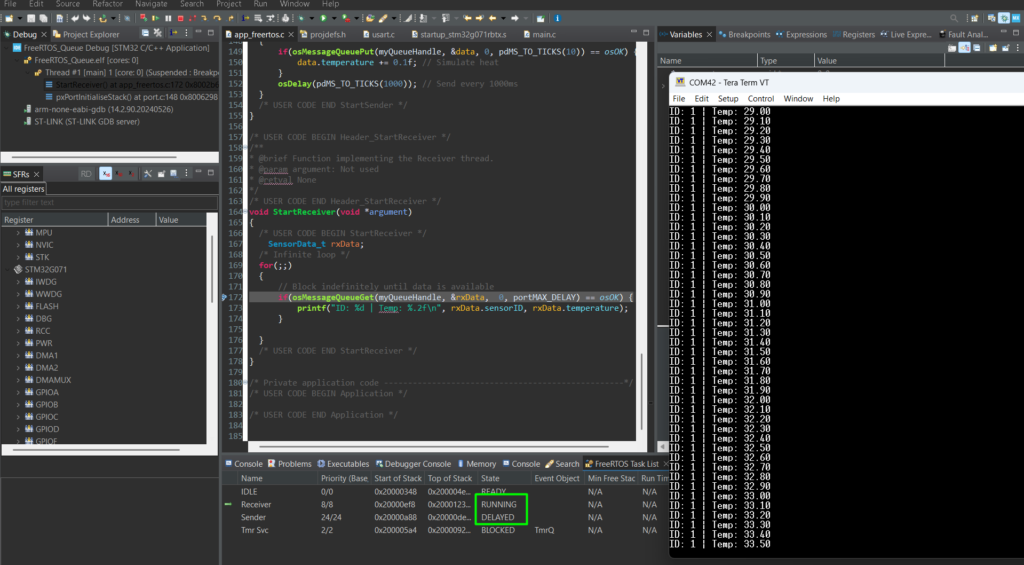
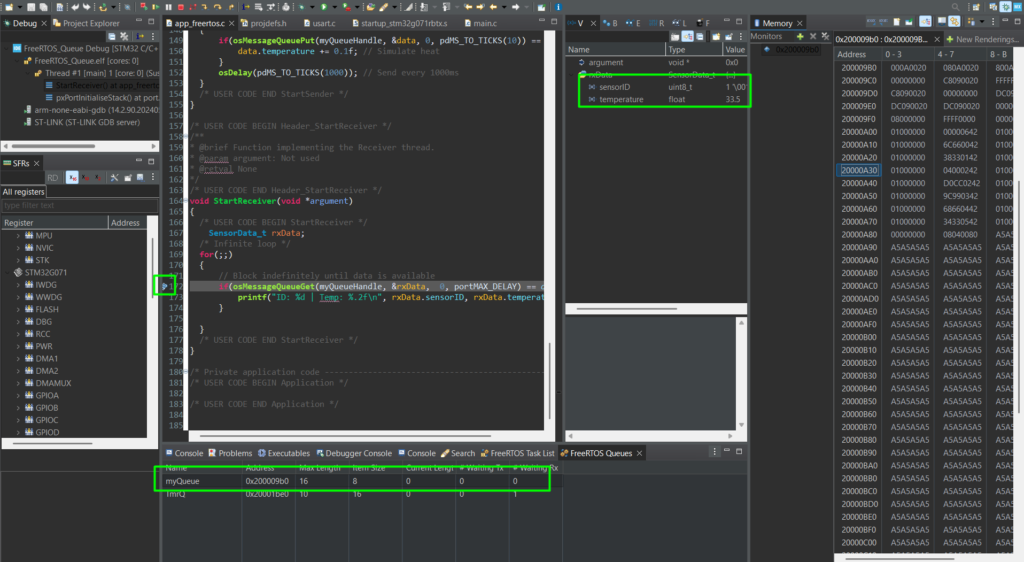
Build the application, enter in debug mode with your terminal open to see the results. It is also possible to monitor the task and queue status:
6. Conclusion
Queues are the fundamental for robust multitasking. They allow you to decouple your tasks, one task can focus on reading sensors for example, while another focuses on processing data, without worrying about timing conflicts, as one will be notified by the kernel once new content on the queue is added/available.
By using portMAX_DELAY, you ensure your CPU isn’t spinning its wheels on empty buffers, leading to higher efficiency and lower power consumption.
In our next episode, we will look at Semaphores and how they differ from Queues in signaling events!