AI Tutorial: AI Project on STM32
Summary
Hardcoded math libraries are a classic approach, but in the era of Edge AI, we can do better. In this tutorial, we ditch sin(x) and instead train a tiny neural network to “learn” the behavior of a sine wave. We will take that trained “brain,” optimize it using STMicroelectronics’ X-CUBE-AI, and flash it onto an STM32 to control a pulsating LED. This is the professional entry point into the TinyML deployment pipeline.
Abstract
This article demonstrates the end-to-end process of deploying a machine learning model onto an STM32 microcontroller using the X-CUBE-AI ecosystem. We define a regression problem, train a Deep Neural Network (DNN) in Python via TensorFlow Keras to approximate the sine function, and convert it to a .tflite format. Unlike generic implementations, we utilize the STM32Cube expansion pack to generate highly optimized C code for ARM Cortex-M cores, executing real-time inference to drive an LED via PWM.
1. Introduction
When getting started with embedded systems, you blink an LED. When getting started with AI, you train a model to recognize handwritten digits or the IRIS dataset, that we covered in this other article> https://hackerembedded.com/tinyml-lab-simple-mlp-for-stm32-tinyml-deployment-with-x-cube-ai/ . When you combine them into TinyML, or following great books, such as the TinyML: Machine Learning with TensorFlow Lite on Arduino and Ultra-Low-Power Microcontrollers, the “Hello World” is the Sine Wave approximation.
Why? Because it forces you to navigate the entire deployment pipeline—from high-level Python training to low-level C firmware—without the complexity of external sensors. As we’ve explored in our Human Activity Recognition lab, the bridge between a “data model” and “working hardware” is where the magic happens. On the STM32, we move away from generic wrappers and use professional-grade optimization tools that make your code run faster and leaner.
2. Prerequisites
Hardware:
- STM32 Nucleo or Discovery Board.
- 1x LED and 1x 220Ω Resistor, typically available on the board.
- Breadboard and jumper wires.
Software:
- STM32CubeIDE: The all-in-one development tool for STM32.
- STM32CubeMX: With the X-CUBE-AI expansion pack installed.
- Google Colab: For training the model in the cloud without local setup.
Entire source code: https://github.com/hackerembedded/STM32_Workspace/tree/main/STM32_AI_Sine_TF
3. How this AI Model Works
We are dealing with a regression problem. We want to map a single input value (a number between 0 and 2π) to a continuous output value (a number between -1 and 1, following a sine curve).
We won’t use complex convolutional networks here. We will use a simple “Feed-Forward” Deep Neural Network. It will look roughly like this:
- Input Layer: Takes one value x.
- Hidden Layers: A few layers of “neurons” (perhaps two layers of 16 neurons each) that apply weights, biases, and activation functions (like ReLU) to transform the data. This is where the “thinking” happens.
- Output Layer: A single neuron that spits out the final predicted y value.
During training, we show the network thousands of examples of real (x,sin(x)) pairs. The network adjusts its internal weights to minimize the difference between its guess and the real answer.
The Workflow: From Python to STM32
While you can use the Arduino IDE with STM32 boards using the TensorFlow Lite for Microcontrollers (TFLM) library, at HackerEmbedded, we prefer the professional X-CUBE-AI workflow.
The Comparison:
- Arduino IDE Path: Uses a generic interpreter. It’s easier to set up but less efficient.
X-CUBE-AI Path: Converts the model into optimized C code specifically for the STM32’s ARM architecture. It provides memory analysis, validation on target, and significant performance boosts.
4. Hands On: AI project on STM32
Part 1: The Data Science (Python)
Open Google Colab and run the following code to generate the model.
import tensorflow as tf
import numpy as np
import matplotlib.pyplot as plt
import math
from sklearn.metrics import r2_score
# 1. Generate Data
SAMPLES = 1000
np.random.seed(1337)
x_values = np.random.uniform(low=0, high=2*math.pi, size=SAMPLES)
y_values = np.sin(x_values)
y_values += 0.01 * np.random.randn(SAMPLES) # Add noise
# Split datasets
train_split = int(0.6 * SAMPLES)
test_split = int(0.2 * SAMPLES + train_split)
x_train, x_test, x_validate = np.split(x_values, [train_split, test_split])
y_train, y_test, y_validate = np.split(y_values, [train_split, test_split])
# 2. Build a "Better" Model Architecture
# Increased complexity (64 neurons) to ensure high fidelity to the curve
model = tf.keras.Sequential([
tf.keras.layers.Dense(64, activation='relu', input_shape=(1,)),
tf.keras.layers.Dense(64, activation='relu'),
tf.keras.layers.Dense(1)
])
# 3. Compile and Train
# Using Adam optimizer with a slightly tweaked learning rate for faster convergence
model.compile(optimizer=tf.keras.optimizers.Adam(learning_rate=0.01),
loss='mse',
metrics=['mae'])
print("Training Model...")
history = model.fit(x_train, y_train, epochs=200, batch_size=32,
validation_data=(x_validate, y_validate), verbose=0)
print("Training Finished!")
# 4. Evaluation and "Accuracy" Calculation
predictions = model.predict(x_test)
# Calculate R^2 Score (The Regression equivalent of Accuracy)
score = r2_score(y_test, predictions)
print(f"Test R^2 Score (Model 'Accuracy'): {score:.4f} ({score*100:.2f}%)")
print(f"Mean Absolute Error: {np.mean(np.abs(y_test - predictions.flatten())):.4f}")
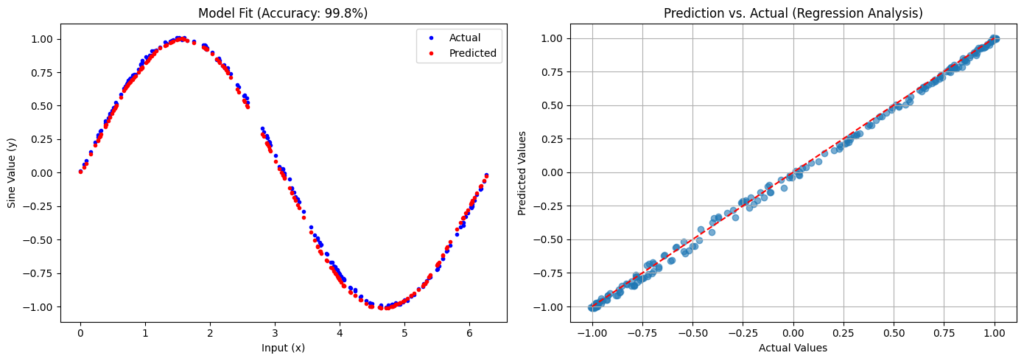
# 5. Visualization
plt.figure(figsize=(14, 5))
# Plot A: The Sine Wave Fit
plt.subplot(1, 2, 1)
plt.title(f"Model Fit (Accuracy: {score*100:.1f}%)")
plt.plot(x_test, y_test, 'b.', label='Actual')
plt.plot(x_test, predictions, 'r.', label='Predicted')
plt.legend()
plt.xlabel('Input (x)')
plt.ylabel('Sine Value (y)')
# Plot B: Prediction vs Actual (The Regression "Confusion Matrix")
# A perfect model will show a straight diagonal line.
plt.subplot(1, 2, 2)
plt.title("Prediction vs. Actual (Regression Analysis)")
plt.scatter(y_test, predictions, alpha=0.6)
plt.plot([-1, 1], [-1, 1], 'r--') # The line of perfect prediction
plt.xlabel('Actual Values')
plt.ylabel('Predicted Values')
plt.grid(True)
plt.tight_layout()
plt.show()
This will generate your model and a simple score and behavioral view of the predictions:
Add this other code to export the mode and then download the sine_model.tflite file to your computer.
					# Assuming 'model' is your trained Keras model from the previous step
import tensorflow as tf


# 1. Convert the model
converter = tf.lite.TFLiteConverter.from_keras_model(model)
tflite_model = converter.convert()


# 2. Save the model
with open('sine_model.tflite', 'wb') as f:
   f.write(tflite_model)


print("TensorFlow model exported to sine_model.tflite")
5. X-Cube-AI Deployment
STMicroelectronics’ X-CUBE-AI is an expansion package for the STM32CubeMX environment that optimizes and deploys trained ML models (including those from frameworks like scikit-learn, TensorFlow, and PyTorch) onto STM32 microcontrollers.
- Model Conversion and Optimization: X-CUBE-AI converts the trained model (e.g., an ONNX file) into highly optimized, platform-independent C code tailored for the target STM32 device.
- Analysis and Profiling: The tool provides detailed reports on the model’s memory footprint (Flash/RAM) and estimated execution time, which is critical for selecting the right microcontroller and ensuring real-time performance.
X-CUBE-AI simplifies the process of getting the Python-trained MLP model onto the STM32, automatically managing the necessary C implementation of the mathematical operations.
Deployment via STM32CubeMX
To integrate the model:
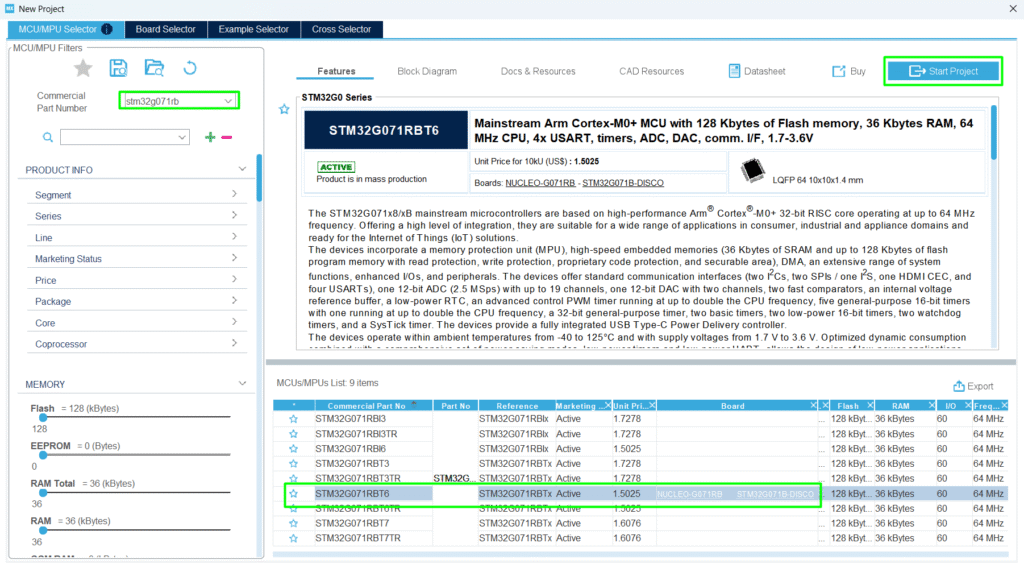
1. Generate a Project: Start your embedded project using the STM32CubeMX tool.
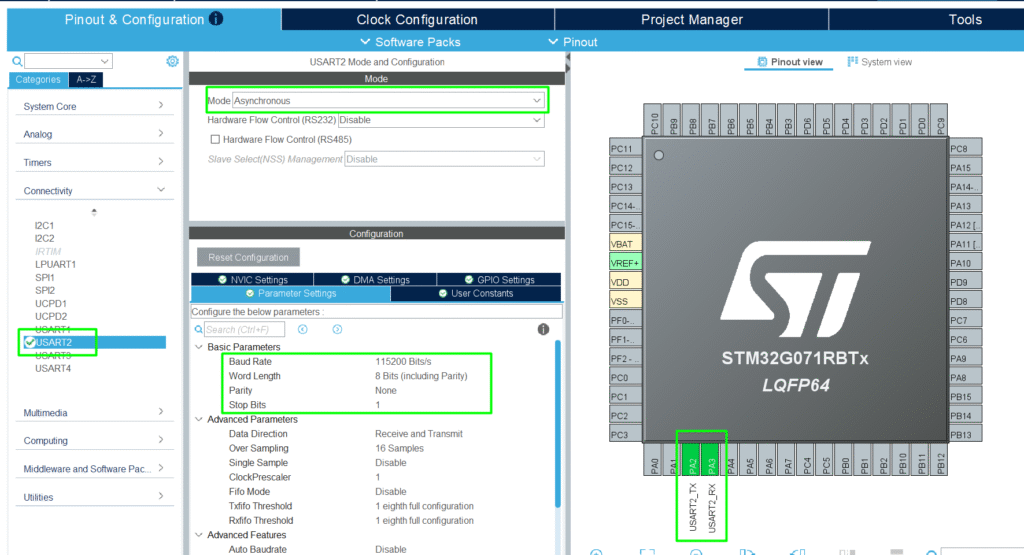
Add the UART on PA2/PA3 for a simple debug logging:
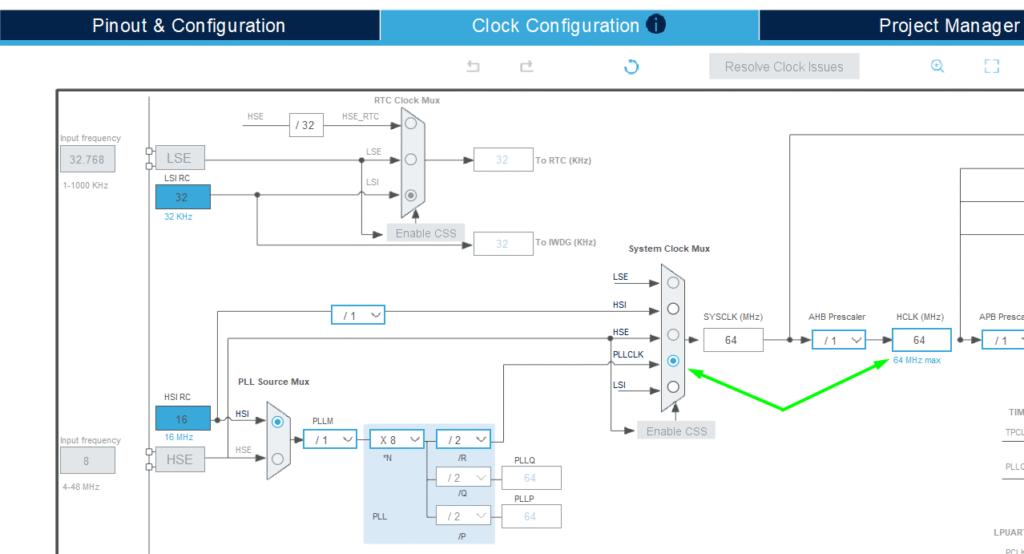
Adjust the clock for improved performance:
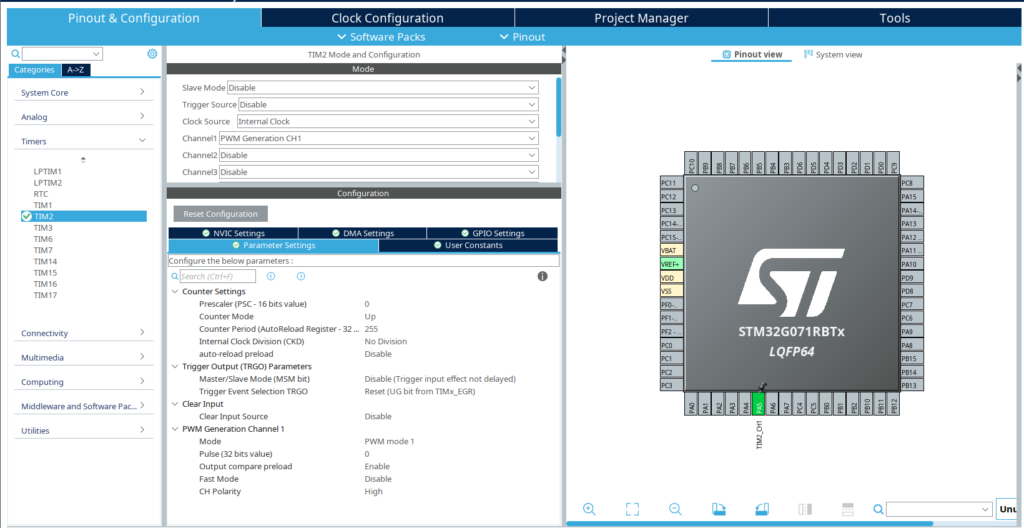
Peripherals: Enable the TIM2_CH1 at PA5 (LED) in PWM Generation mode for your LED pin.
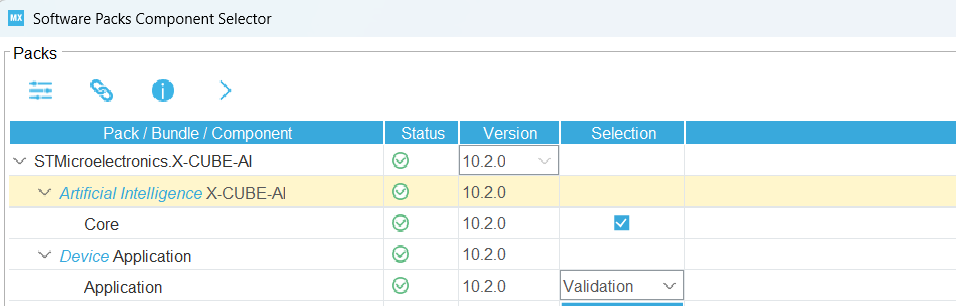
2. Activate X-CUBE-AI: Within STM32CubeMX, select the X-CUBE-AI software package.
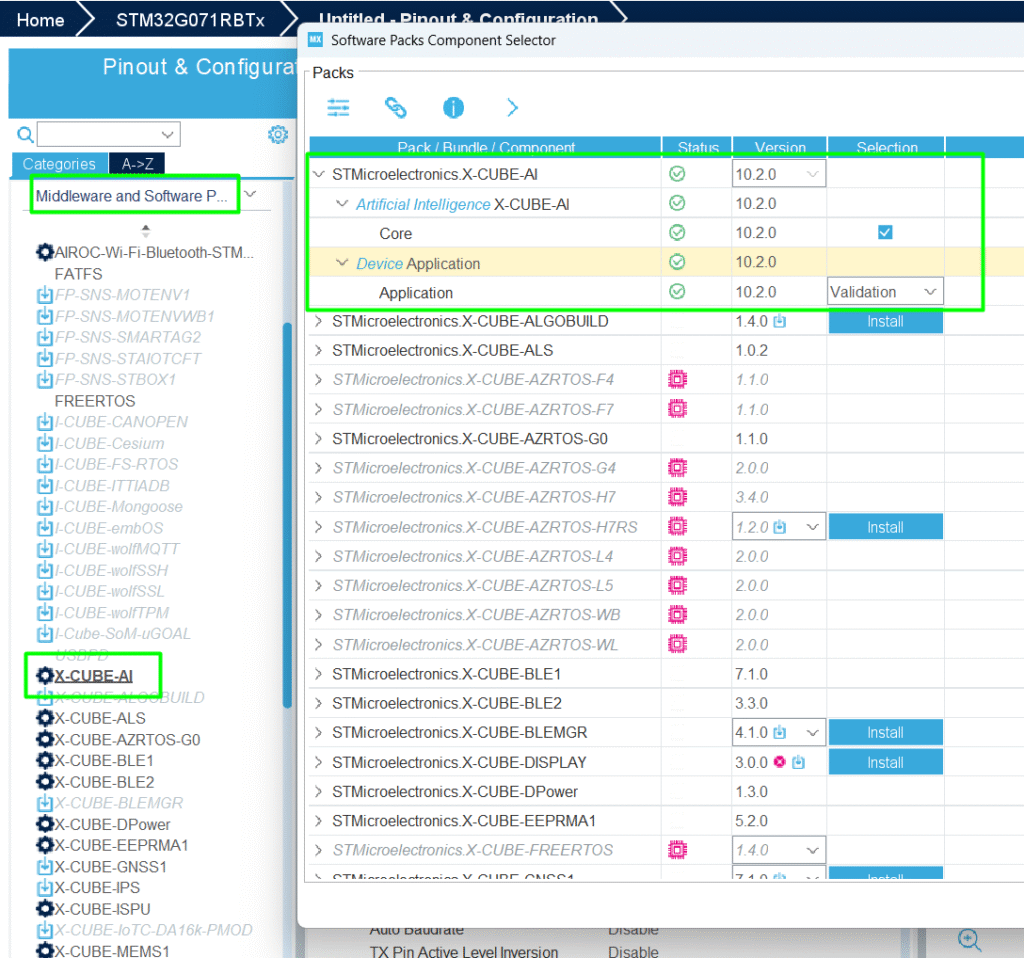
Change from Validation to Application Template:

Model Import: In the X-CUBE-AI tab, click Add network, select TFLite, and upload your sine_model.tflite.
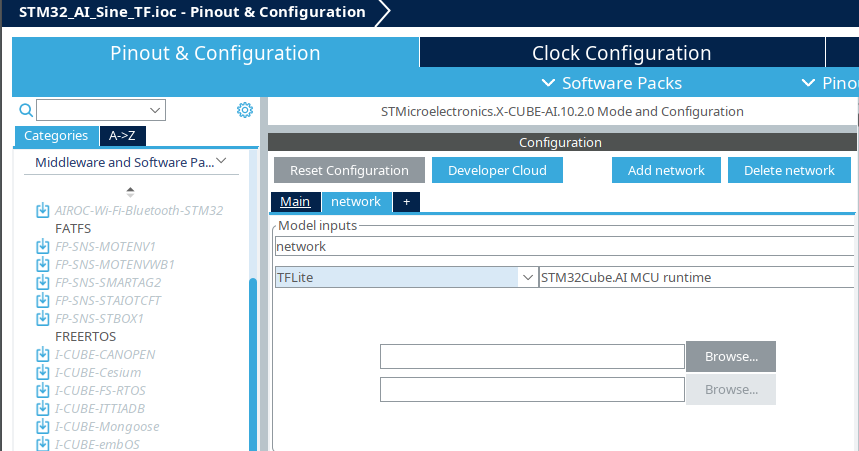
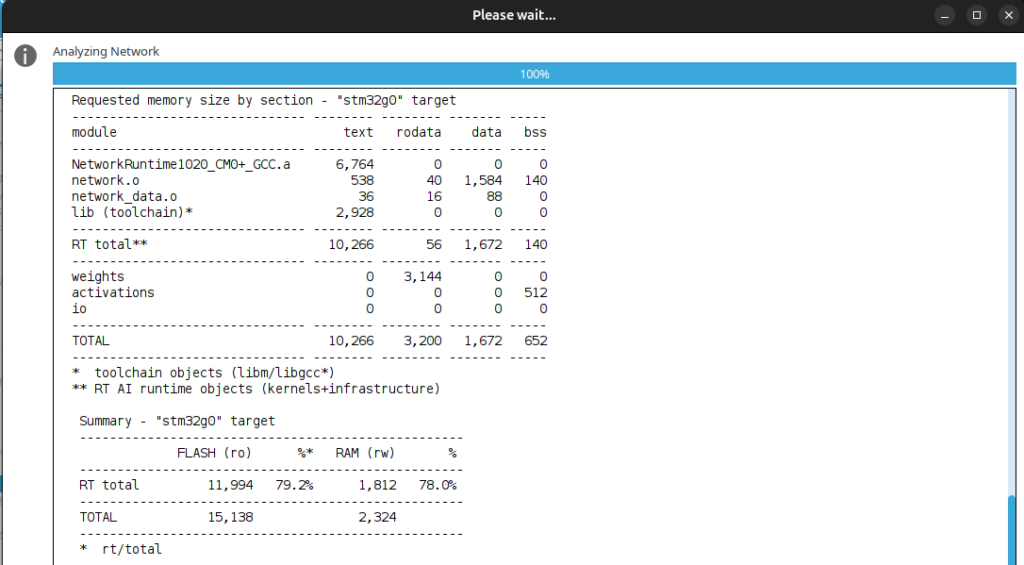
Analyze: Click Analyze. Note the RAM and Flash usage—usually just a few KBs!
3. Generate Code: Generate the project code for the desired IDE, in this case, STM32CubeIDE, and X-CUBE-AI will output the necessary C files (ai_platform.c, ai_network.c, etc.) containing the model and inference functions, ready to be compiled and run on the STM32.
Open the project in STM32CubeIDE.
6. Code editing
X-Cube-AI generates its one syscalls.c, but for STM32CubeIDE, that is not the ideal one, so the recommendation is to create your custom and name it as syscalls_.c, adding it in the User/Core’s folder. This is a good example of the syscalls_.c> STM32_EP2/STM32CubeIDE/Application/User/Core/syscalls.c at main · hackerembedded/STM32_EP2
Now the project should be built properly and it’s time to create our minor adjustments. Since the objective is to simply showcase the model running.
In main.c, we need to initialize the AI and run it in the loop.
					/* USER CODE BEGIN Header */
/**
******************************************************************************
* @file           : main.c
* @brief          : Main program body
******************************************************************************
* @attention
*
* Copyright (c) 2026 STMicroelectronics.
* All rights reserved.
*
* This software is licensed under terms that can be found in the LICENSE file
* in the root directory of this software component.
* If no LICENSE file comes with this software, it is provided AS-IS.
*
******************************************************************************
*/
/* USER CODE END Header */
/* Includes ------------------------------------------------------------------*/
#include "main.h"
#include "app_x-cube-ai.h"
/* Private includes ----------------------------------------------------------*/
/* USER CODE BEGIN Includes */
#include "network.h"
#include "network_data.h"
#include <stdio.h>
/* USER CODE END Includes */
/* Private typedef -----------------------------------------------------------*/
/* USER CODE BEGIN PTD */
/* USER CODE END PTD */
/* Private define ------------------------------------------------------------*/
/* USER CODE BEGIN PD */
/* USER CODE END PD */
/* Private macro -------------------------------------------------------------*/
/* USER CODE BEGIN PM */
/* USER CODE END PM */
/* Private variables ---------------------------------------------------------*/
TIM_HandleTypeDef htim2;
UART_HandleTypeDef huart2;
/* USER CODE BEGIN PV */
ai_handle network;
float aiInData[AI_NETWORK_IN_1_SIZE];
float aiOutData[AI_NETWORK_OUT_1_SIZE];
ai_u8 activations[AI_NETWORK_DATA_ACTIVATIONS_SIZE];
ai_buffer * ai_input;
ai_buffer * ai_output;
/* USER CODE END PV */
/* Private function prototypes -----------------------------------------------*/
void SystemClock_Config(void);
static void MX_GPIO_Init(void);
static void MX_TIM2_Init(void);
static void MX_USART2_UART_Init(void);
/* USER CODE BEGIN PFP */
int _write(int fd, char * ptr, int len)
{
	HAL_UART_Transmit(&huart2, (uint8_t *) ptr, len,    HAL_MAX_DELAY);
	return len;
}
/* USER CODE END PFP */
/* Private user code ---------------------------------------------------------*/
/* USER CODE BEGIN 0 */
static void AI_Init(void)
{
	ai_error err;
	/* Create a local array with the addresses of the activations buffers */
	const ai_handle act_addr[] = { activations };
	/* Create an instance of the model */
	err = ai_network_create_and_init(&network, act_addr, NULL);
	if (err.type != AI_ERROR_NONE) {
		printf("ai_network_create error - type=%d code=%d\r\n", err.type, err.code);
		Error_Handler();
	}
	ai_input = ai_network_inputs_get(network, NULL);
	ai_output = ai_network_outputs_get(network, NULL);
}
static void AI_Run(float *pIn, float *pOut)
{
	ai_i32 batch;
	ai_error err;
	/* Update IO handlers with the data payload */
	ai_input[0].data = AI_HANDLE_PTR(pIn);
	ai_output[0].data = AI_HANDLE_PTR(pOut);
	batch = ai_network_run(network, ai_input, ai_output);
	if (batch != 1) {
		err = ai_network_get_error(network);
		printf("AI ai_network_run error - type=%d code=%d\r\n", err.type, err.code);
		Error_Handler();
	}
}
/* USER CODE END 0 */
/**
* @brief  The application entry point.
* @retval int
*/
int main(void)
{
	/* USER CODE BEGIN 1 */
	float x_pos = 0.0f;
	float prediction;
	/* USER CODE END 1 */
	/* MCU Configuration--------------------------------------------------------*/
	/* Reset of all peripherals, Initializes the Flash interface and the Systick. */
	HAL_Init();
	/* USER CODE BEGIN Init */
	/* USER CODE END Init */
	/* Configure the system clock */
	SystemClock_Config();
	/* USER CODE BEGIN SysInit */
	/* USER CODE END SysInit */
	/* Initialize all configured peripherals */
	MX_GPIO_Init();
	MX_TIM2_Init();
	MX_USART2_UART_Init();
	//MX_X_CUBE_AI_Init();
	/* USER CODE BEGIN 2 */
	AI_Init();
	HAL_TIM_PWM_Start(&htim2, TIM_CHANNEL_1);
	/* USER CODE END 2 */
	/* Infinite loop */
	/* USER CODE BEGIN WHILE */
	while (1)
	{
		/* USER CODE END WHILE */
		//MX_X_CUBE_AI_Process();
		/* USER CODE BEGIN 3 */
		aiInData[0] = x_pos;
		printf("Running inference\r\n");
		AI_Run(aiInData, aiOutData);
		/* Output results */
		printf("Input: %8.6f. Calculated sine value: %8.6f \r\n", x_pos, aiOutData[0]);
		prediction = aiOutData[0];
		int pwm_val = (int)((prediction + 1.0f) * 127.5f); // Map to 0-255
		__HAL_TIM_SET_COMPARE(&htim2, TIM_CHANNEL_1, pwm_val);
		x_pos += 0.05f;
		if (x_pos > (2.0f * 3.141516)) x_pos = 0;
		HAL_Delay(20);
	}
	/* USER CODE END 3 */
}
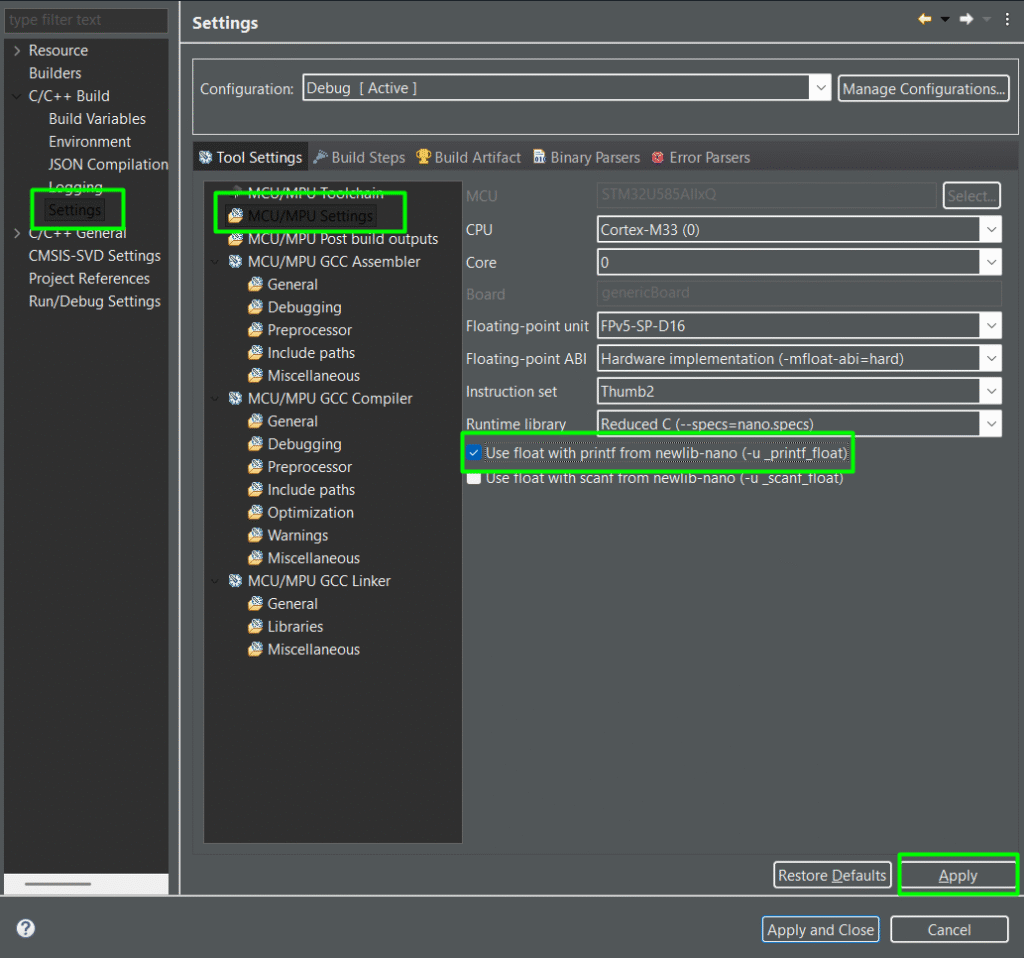
Before building, go the project settings and enable the float printf:
7. Results
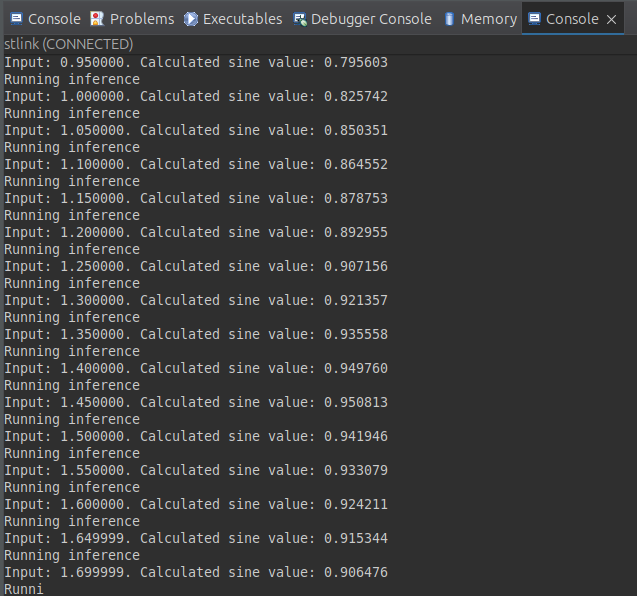
Build the application, load it into your STM32 board and you should see the AI model running. In this case, the CubeIDE console terminal was used:
Just to facilitate the interpretation of the input and output, remember this is the model input x output chart:

You`ll also notice the PWM acting on the onboard green LED, creating a nice fading effect.
Conclusion
Congratulations! You have successfully replaced a standard math function with a living neural network on your STM32. While a sine wave is simple, the workflow—Train > Optimize > Deploy—is exactly what you would use for complex vibration analysis or voice recognition.
By using X-CUBE-AI, you’ve moved past the “hobbyist” Arduino phase and into professional embedded AI development.
Happy Coding =)