Arduino Basics: KY-002 Vibration Switch Module
Abstract
Learn how to configure Arduino digital input pins to interface with the KY-002 Vibration Switch Module. This module acts as a simple digital switch (normally open) that closes its internal circuit upon detecting minor vibration. This tutorial covers wiring and programming to trigger an output based on movement.
1. Introduction
Unlike the KY-031 Knock Sensor (which requires a harder hit), the KY-002 uses a sensitive ball-bearing tilt or shock switch to detect minute vibrations or changes in position. This module is ideal for simple motion alarms or tilt detection.
In this episode, you’ll learn:
- The simple switch principle of the KY-002.
- How to safely wire the module for digital input.
- How to read the signal using digitalRead().
- How to use the input to toggle an LED status.
This project provides a fundamental understanding of converting mechanical movement into a digital signal for your Arduino applications.
2. Prerequisites and Hardware Setup
Make sure you have:
- An Arduino Uno or compatible board.
- One KY-002 Vibration Switch Module.
- Jumper Wires.
- Arduino IDE
- One external LED and a 220Ω resistor (Optional; we will primarily use the on-board LED).
3. Wiring and Setup for Arduino
The KY-002 module typically has three pins and operates on 5V.
Step 1 – Identify Pins
The module has three pins: Signal (S), VCC (+), and Ground (− or GND).
Step 2 – Connect the Module
Wire the module to the Arduino as follows:
- Connect the – / GND pin of the KY-002 to the GND pin on the Arduino.
- Connect the + / VCC pin of the KY-002 to the 5V pin on the Arduino.
- Connect the S / Signal pin of the KY-002 to Arduino Digital Pin 3.
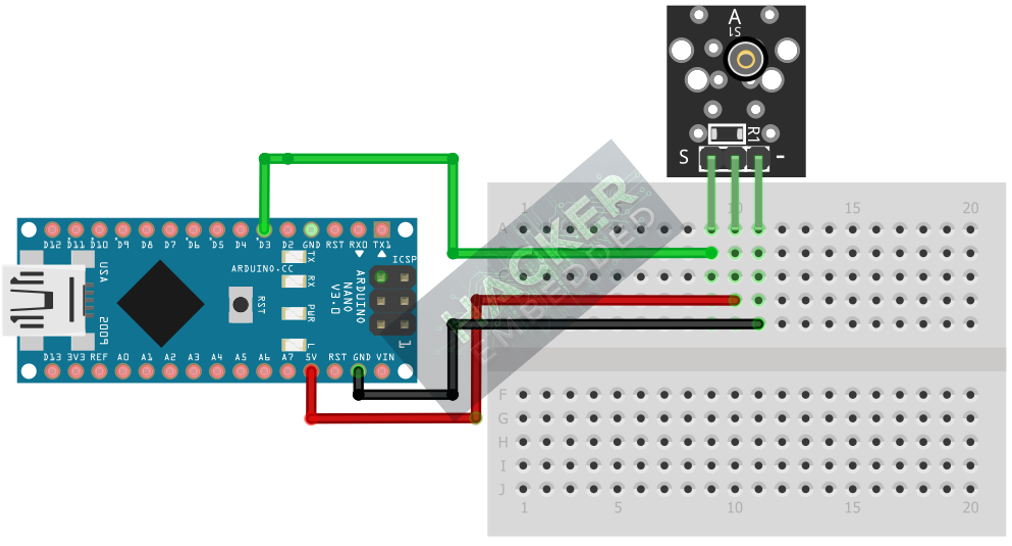
This image was created with Fritzing
Step 3 – Initialize Pin Mode
In the setup() function of your code, you must initialize the signal pin as an input:
pinMode(7, INPUT);
We will use the on-board LED (Pin 13) as our output indicator, which must be set to OUTPUT.
4. Writing Vibration Detection Code
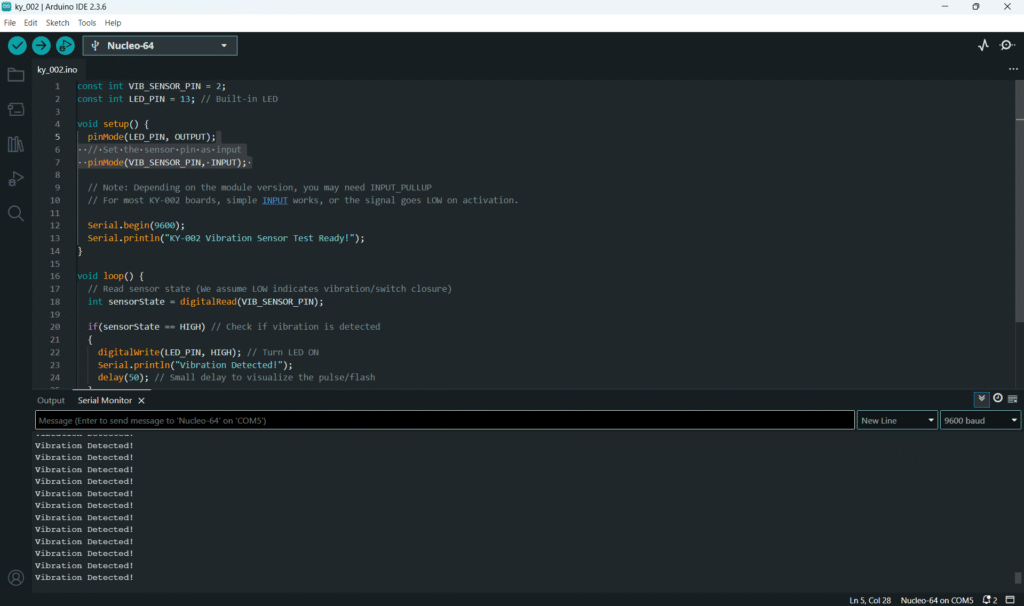
Open main.ino and implement the following code. This code will light the built-in LED (Pin 13) whenever the sensor detects vibration (which registers as LOW when the internal switch closes and shorts the pull-up resistor).
					const int VIB_SENSOR_PIN = 2;
const int LED_PIN = 13; // Built-in LED

void setup() {
  pinMode(LED_PIN, OUTPUT);
  // Set the sensor pin as input
  pinMode(VIB_SENSOR_PIN, INPUT);

  // Note: Depending on the module version, you may need INPUT_PULLUP
  // For most KY-002 boards, simple INPUT works, or the signal goes LOW on activation.

  Serial.begin(9600);
  Serial.println("KY-002 Vibration Sensor Test Ready!");
}

void loop() {
  // Read sensor state (We assume LOW indicates vibration/switch closure)
  int sensorState = digitalRead(VIB_SENSOR_PIN);

  if(sensorState == HIGH) // Check if vibration is detected
  {
    digitalWrite(LED_PIN, HIGH); // Turn LED ON
    Serial.println("Vibration Detected!");
    delay(50); // Small delay to visualize the pulse/flash
  }
  else
  {
    digitalWrite(LED_PIN, LOW); // Turn LED OFF when idle
  }
}
Code Explanation
- The if statement checks for a HIGH signal, which typically indicates the internal switch has closed due to vibration.
- digitalWrite(LED_PIN, HIGH) is executed only when motion is detected.
5. Handling Continuous Output vs. Momentary Switch
The KY-002 acts as a momentary switch; the signal is only active while the ball bearing is making contact, which can happen multiple times in quick succession (bouncing) or only for a very short duration.
Toggling the Output State
If you want the vibration to toggle the LED state (ON/OFF) instead of just flashing, you must manage the state and handle bouncing carefully:
					// Inside loop() - Requires adding a 'lastState' variable to the setup
if (sensorState == LOW && previousState == HIGH) {
    // A transition from non-vibration (HIGH) to vibration (LOW)
    ledStatus = !ledStatus; // Toggle the status (true to false, or vice-versa)
    digitalWrite(LED_PIN, ledStatus);
    Serial.print("Toggled! Status: ");
    Serial.println(ledStatus);

    // Add a debouncing delay, but ONLY read the state change after the delay
    delay(250);
}
previousState = sensorState; // Update state for the next loop iteration
Note: For basic testing (as in Section 4), the simple if/else logic is sufficient. The toggling method requires more complex state management variables.
6. Uploading and Running the Project
Step 1 – Build
Click the Verify (checkmark icon) button in the Arduino IDE to compile the sketch.
Step 2 – Upload
- Connect your Arduino board via USB.
- Select the correct board and COM port.
- Click the Upload (arrow icon) button.
Step 3 – Test
- Open the Serial Monitor (Tools > Serial Monitor).
- Gently shake or tap the KY-002 module.
- The on-board LED should flash or stay lit briefly, and “Vibration Detected!” should appear in the Serial Monitor.
7. Hands-On Lab Recap
You’ve learned:
- How the KY-002 switch translates motion into a digital signal.
- How to configure Digital pins as input and read them with digitalRead().
- How to create a motion alert using the on-board LED.
- The need to manage the momentary nature of switch-based sensors.
This adds basic motion sensing to your Arduino projects.
8. Common Issues & Fixes
| Issue | Cause | Solution |
|---|---|---|
| LED never lights up. | Incorrect power/signal wiring or logic. | Double-check 5V and GND. Try reversing the logic: change LOW to HIGH in the if statement. |
| LED is always ON. | The internal switch is stuck closed or pin logic is inverted. | Gently tap the module to see if the LED turns off. If not, try setting pinMode(3, INPUT_PULLUP) and changing the logic. |
| LED flashes multiple times per tap. | Sensor Bouncing (chatter) is occurring. | Increase the delay() value inside the activation block to 200ms or more, or implement software debouncing. |