ESP32 Tutorial: Change CPU Clock Speed | Power Management and Performance Tuning
Abstract
The ESP32 is a powerful dual-core microcontroller, typically running its CPU at 240 MHz for maximum performance. However, maximum speed consumes the most power, which is detrimental to battery-operated devices. The ESP32 allows the clock speed to be dynamically changed to optimize for either high-speed data processing or low-power efficiency. This tutorial details how to switch the CPU clock speed in the Arduino framework using the setCpuFrequencyMhz() function, balancing performance needs against energy consumption.
1. Introduction: Performance vs. Power
The ESP32 operates at several fixed clock frequencies, which are pre-configured stable speeds derived from the internal phase-locked loop (PLL) and crystal oscillator.
Frequency Option | Primary Use Case | Power Consumption |
240 MHz | Default, Maximum processing power. Ideal for complex algorithms, high-speed data acquisition, and intensive network tasks. | Highest |
160 MHz | Balanced performance and power. Suitable for many general IoT applications where fast Wi-Fi communication is needed but moderate power saving is desired. | Medium |
80 MHz | Maximum power saving while still running the full program. Ideal for low-activity, battery-powered devices that wake up periodically. | Lowest |
Changing the clock speed affects all core operations, including the speed of the loop() function and general instruction execution time. However, peripherals like timers, PWM, and I2C/SPI clocks are often configured independently and may not be affected, ensuring timing stability for those specific functions.
2. Core Function ESP32's Clock Control
The Arduino ESP32 Core provides two main functions for managing the CPU clock frequency.
2.1 Setting the Frequency: setCpuFrequencyMhz(freq_mhz)
This function attempts to switch the CPU clock to the requested frequency. It must be called in the setup() function before any critical timing is established.
- freq_mhz: An integer value, typically 80, 160, or 240. Only these supported frequencies will work reliably.
2.2 Reading the Frequency: getCpuFrequencyMhz()
This function is useful for verifying the current CPU speed, especially for debugging or conditional logic.
- Returns: The current CPU frequency in MHz as an integer.
3. Hands-On Lab: Measuring Clock Speed Impact
This lab demonstrates how to switch the clock speed to 80 MHz in setup() and use a simple benchmark to observe the performance difference compared to the default 240 MHz.
ESP32 Clock Speed Change Code Example
					#define NEW_CPU_FREQ 80 // Target CPU Frequency in MHz

void run_benchmark() {
  unsigned long start_time = micros();
  volatile int counter = 0; // 'volatile' prevents the compiler from optimizing the loop away
  long iterations = 5000000; // 5 million iterations

  // Run a heavy, CPU-intensive loop
  for (long i = 0; i < iterations; i++) {
    counter++;
  }

  unsigned long end_time = micros();
  unsigned long duration = end_time - start_time;

  Serial.print("Current CPU @ ");
  Serial.print(getCpuFrequencyMhz());
  Serial.println(" MHz:");
  Serial.print("Benchmark Time (5M loops): ");
  Serial.print(duration);
  Serial.println(" microseconds");
}

void setup() {
  Serial.begin(115200);
  Serial.println("--- CPU Clock Speed Test ---");
  delay(100);

  // --- TEST 1: Default 240 MHz (or current boot speed) ---
  Serial.println("\nRunning benchmark at initial speed...");
  run_benchmark();

  // --- Change the CPU Frequency ---
  if (setCpuFrequencyMhz(NEW_CPU_FREQ)) {
    Serial.print("\nSuccessfully changed CPU speed to ");
    Serial.print(NEW_CPU_FREQ);
    Serial.println(" MHz.");
    delay(100); // Allow time for clock stabilization
  } else {
    Serial.println("\nFailed to change CPU speed.");
  }

  // --- TEST 2: Lower Speed ---
  Serial.println("\nRunning benchmark at new speed...");
  run_benchmark();
}

void loop() {
  // Main loop is free
  delay(10000);
}
Expected Output Observation
- Test 1 (240 MHz): The benchmark loop should take the shortest time (e.g., around 200,000 – 250,000 microseconds).
- Test 2 (80 MHz): The benchmark loop should take approximately three times longer (e.g., around 600,000 – 750,000 microseconds), directly reflecting the 3x speed reduction (240 MHz/80 MHz=3).
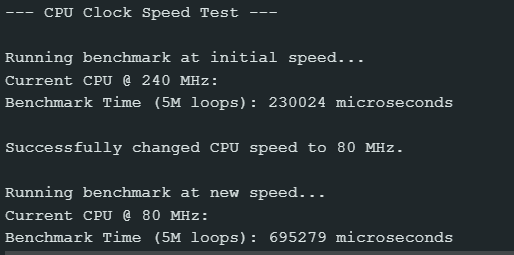
This measured increase in execution time directly correlates to a decrease in power consumption, making the 80 MHz mode essential for battery optimization.
4. Lab Recap
You’ve learned how to manage the ESP32’s core processing speed:
- The ESP32 offers selectable CPU speeds of 240 MHz, 160 MHz, and 80 MHz, allowing a trade-off between performance and power consumption.
- The function setCpuFrequencyMhz(freq) is used to change the clock speed at runtime, typically within setup().
- Lowering the speed (e.g., to 80 MHz) significantly reduces power draw, making it critical for battery-powered or low-activity IoT projects.
- getCpuFrequencyMhz() can be used to confirm the active CPU speed after the change.

