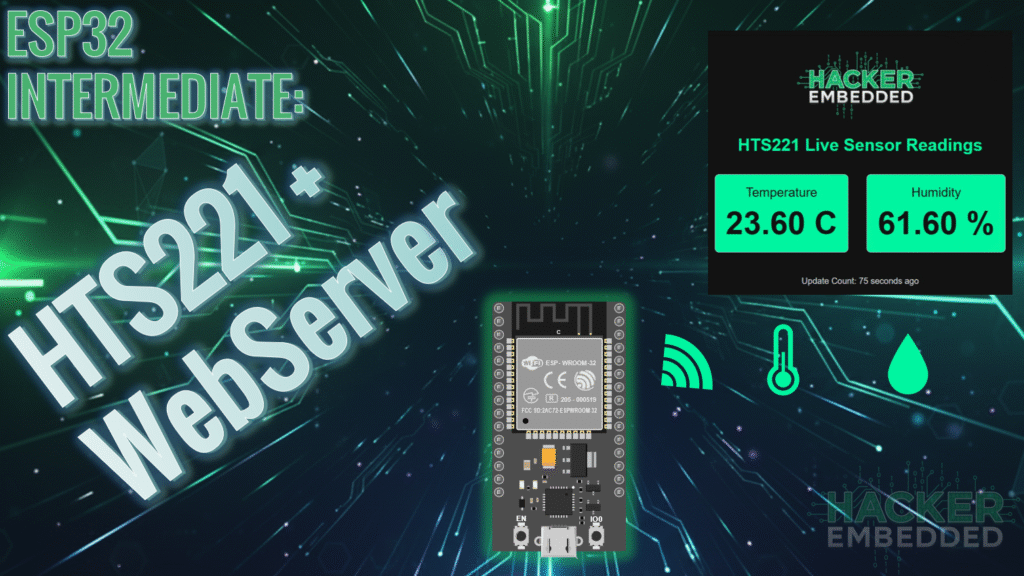
ESP32 Tutorial: I2C to HTS221 Web Dashboard
Abstract
This tutorial demonstrates how to interface the HTS221 digital humidity and temperature sensor with the ESP32 using the I²C protocol and display the live readings on a web server dashboard. The ESP32 acts as the I²C Master, communicating with the HTS221 Slave to retrieve calibrated data, which is then dynamically updated on a simple web page.
1. Introduction to I2C Sensor Web Monitoring
For effective Internet of Things (IoT) applications, microcontrollers like the ESP32 must often communicate with sophisticated digital sensors. The HTS221 is a high-accuracy sensor used for measuring temperature and relative humidity, and it utilizes the I²C (Inter-Integrated Circuit) protocol for data transfer.
This intermediate tutorial serves as a guide for bridging these two core components: I²C hardware interfacing and Wi-Fi web serving. The ESP32 is configured as the I²C Master, responsible for querying the HTS221 (the Slave) to retrieve its raw data. Crucially, the data from the HTS221 is calibrated internally by the library, providing accurate, ready-to-use floating-point values for temperature and humidity.
The primary goal is to transform the ESP32 into a live environmental monitoring station. We will host a simple, dynamic web dashboard that automatically updates using an HTML meta refresh tag. This allows any device connected to the same network to view the HTS221’s readings in real-time without needing a dedicated mobile app or constant manual page refreshes, creating a fully functional, network-enabled sensor solution.
2. Prerequisites and Wiring
2.1 Hardware and Libraries
- Hardware: ESP32 Dev Board, HTS221 Sensor Module (e.g., breakout board), Jumper Wires.
- Library: You will need the SparkFun HTS221 Arduino Library or similar library compatible with the HTS221. Install it via the Arduino Library Manager.
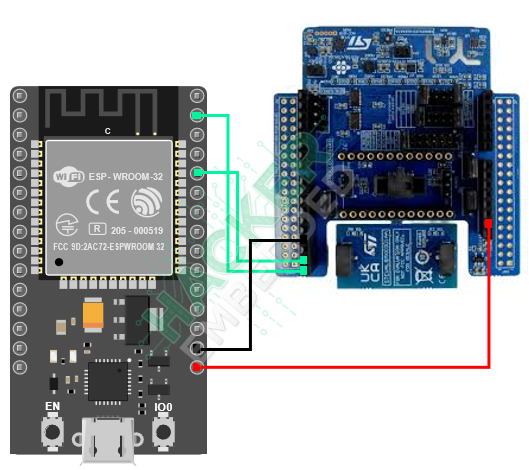
2.2 ESP32-to-HTS221 Wiring
The HTS221 uses the I²C protocol, requiring only four connections (assuming the module has on-board pull-up resistors).
ESP32 Pin | HTS221 Pin | Notes |
3.3V | VCC | Power Supply |
GND | GND | Ground |
GPIO 21 | SDA | I²C Data Line (ESP32 Default) |
GPIO 22 | SCL | I²C Clock Line (ESP32 Default) |
3. The ESP32 Arduino Sketch
The code initializes the I2C bus, sets up the web server, reads the HTS221 data in the loop, and updates the web page with the live values.
3.1 Libraries and Global Variables
					#include <WiFi.h>
#include <WebServer.h>
#include <Wire.h>
#include <HTS221Sensor.h>// STM32Duino HTS221 Sensor Library

// --- Network Credentials ---
const char* ssid = "YOUR_WIFI_SSID";
const char* password = "YOUR_WIFI_PASSWORD";

WebServer server(80);

// STM32Duino library approach often requires creating a pointer to the sensor object.
// The default address for the HTS221 is 0x5F (1011111 binary)
#define I2C2_SCL    22
#define I2C2_SDA    21

// Components.
HTS221Sensor  hts(&Wire);


// Global variables to hold sensor readings
float temperatureC = 0.0;
float humidity = 0.0;
3.2 HTS221 Setup
The I²C pins are initialized with Wire.begin(21, 22), and the sensor is set to its highest resolution mode.
					void setupHTS221() {
 Wire.begin(I2C2_SDA, I2C2_SCL); // Initialize I2C: GPIO 21 (SDA), GPIO 22 (SCL)


 // Power up the sensor and set output data rate (ODR)
 hts.begin();
 hts.Enable();
 // HTS221_ODR_1HZ (default) to HTS221_ODR_7HZ are common settings.
 hts.SetODR(HTS221_ODR_7HZ);

 Serial.println("HTS221 sensor initialized.");
}
3.3 Data Reading Function
This function handles the I²C communication to read the sensor and update the global variables.
void readSensorData() {
// The HTS221 library does not require a dataReady() check for simple reads.
// The library functions handle the I2C read and conversion internally.
// Note: ST libraries typically return a status code (0 = OK)
hts.GetHumidity(&humidity);
hts.GetTemperature(&temperatureC);
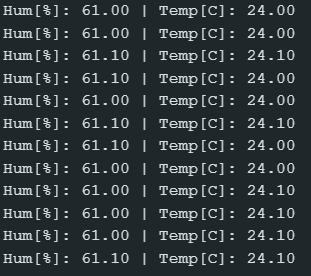
Serial.print("Hum[%]: ");
Serial.print(humidity, 2);
Serial.print(" | Temp[C]: ");
Serial.println(temperatureC, 2);
}
3.4 HTML Generation Function
The HTML includes a meta refresh tag to automatically update the dashboard every 5 seconds without manual intervention.
// --- UPDATED HTML Generation Function with Custom Styles and Logo ---
String getHtmlPage() {
String html = R"rawliteral(
<!DOCTYPE HTML>
<html>
<head>
<meta http-equiv="refresh" content="1">
<meta name="viewport" content="width=device-width, initial-scale=1">
<style>
body {
font-family: Arial, sans-serif;
text-align: center;
margin-top: 30px;
background-color: #121212; /* Dark Background */
color: #d1d5db; /* Light Gray Text */
}
.container {
background-color: #121212;
padding: 25px;
border-radius: 10px;
box-shadow: 0 4px 12px rgba(0,0,0,0.5);
display: inline-block;
}
.logo {
margin-bottom: 20px;
}
.logo img {
max-width: 250px; /* Logo Size */
height: auto;
}
h1 { color: #00f5a0; } /* Primary Green Accent for Heading */
p { color: #d1d5db; }
.metric {
display: inline-block;
margin: 15px;
padding: 20px;
border-radius: 8px;
font-size: 1.5em;
background-color: #00f5a0; /* Green Accent Background */
color: #121212; /* Dark text for high contrast */
border: 1px solid #d1d5db;
}
.value { font-size: 2.5em; font-weight: bold; margin-top: 10px; }
</style>
<title>HTS221 Dashboard</title>
</head>
<body>
<div class="container">
<div class="logo">
<img decoding="async" src="https://raw.githubusercontent.com/hackerembedded/STM32/main/Logo%20Hacker%20Embedded.png" alt="Hacker Embedded Logo">
</div>
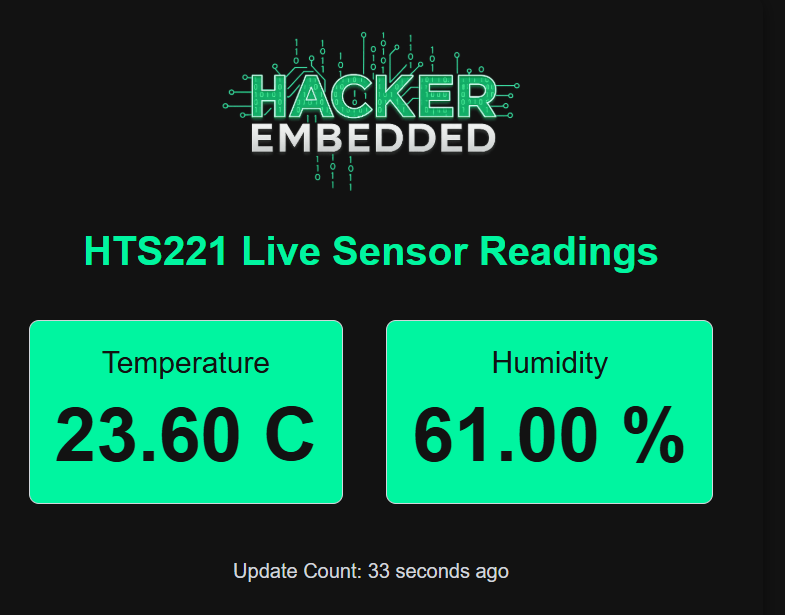
<h1>HTS221 Live Sensor Readings</h1>
<div class="metric">
Temperature
<div class="value">TEMP_VALUE C</div>
</div>
<div class="metric">
Humidity
<div class="value">HUMI_VALUE %</div>
</div>
<p style="margin-top: 30px;">Update Count: REFRESH_TIME</p>
</div>
</body>
</html>
)rawliteral";
// Format the float values to 2 decimal places
String tempStr = String(temperatureC, 2);
String humiStr = String(humidity, 2);
String timeStr = String(millis() / 1000); // Simple time since boot
// Replace placeholders with current data
html.replace("TEMP_VALUE", tempStr);
html.replace("HUMI_VALUE", humiStr);
html.replace("REFRESH_TIME", timeStr + " seconds ago");
return html;
}
3.5 Setup and Loop
					void handleRoot() {
 readSensorData(); // Read data just before serving the page
 server.send(200, "text/html", getHtmlPage());
}

void setup() {
 Serial.begin(115200);

 // 1. Setup HTS221 (I2C)
 setupHTS221();

 // 2. Connect to Wi-Fi
 WiFi.begin(ssid, password);
 Serial.print("Connecting to WiFi...");
 while (WiFi.status() != WL_CONNECTED) {
  delay(1000);
  Serial.print(".");
 }
 Serial.println("\nWiFi connected.");
 Serial.print("Web Server IP: ");
 Serial.println(WiFi.localIP());

 // 3. Setup Web Server
 server.on("/", handleRoot);
 server.begin();

 // Perform initial data read
 readSensorData();
}

void loop() {
 // Handle web client requests
 server.handleClient();

 // The HTML meta refresh tag handles periodic data display.
 // We keep reading in the loop to ensure the global variables are always fresh
 // for the next request.
 readSensorData();
 delay(100); // Small delay to prevent I2C bus congestion
}
4. Source Code
The entire code for an easier copy and paste:
					#include <WiFi.h>
#include <WebServer.h>
#include <Wire.h>
#include <HTS221Sensor.h>// STM32Duino HTS221 Sensor Library

// --- Network Credentials ---
const char* ssid = "SSID";
const char* password = "PASSWORD";

WebServer server(80);

// STM32Duino library approach often requires creating a pointer to the sensor object.
// The default address for the HTS221 is 0x5F (1011111 binary)
#define I2C2_SCL    22
#define I2C2_SDA    21

// Components.
HTS221Sensor  hts(&Wire);


// Global variables to hold sensor readings
float temperatureC = 0.0;
float humidity = 0.0;

void setupHTS221() {
 Wire.begin(I2C2_SDA, I2C2_SCL); // Initialize I2C: GPIO 21 (SDA), GPIO 22 (SCL)


 // Power up the sensor and set output data rate (ODR)
 hts.begin();
 hts.Enable();
 // HTS221_ODR_1HZ (default) to HTS221_ODR_7HZ are common settings.
 hts.SetODR(HTS221_ODR_7HZ);

 Serial.println("HTS221 sensor initialized.");
}

void readSensorData() {
 // The HTS221 library does not require a dataReady() check for simple reads.
 // The library functions handle the I2C read and conversion internally.
 // Note: ST libraries typically return a status code (0 = OK)

  hts.GetHumidity(&humidity);
  hts.GetTemperature(&temperatureC);
  Serial.print("Hum[%]: ");
  Serial.print(humidity, 2);
  Serial.print(" | Temp[C]: ");
  Serial.println(temperatureC, 2);
}
// --- UPDATED HTML Generation Function with Custom Styles and Logo ---
String getHtmlPage() {
 String html = R"rawliteral(
<!DOCTYPE HTML>
<html>
<head>
 <meta http-equiv="refresh" content="1">
 <meta name="viewport" content="width=device-width, initial-scale=1">
 <style>
  body {
    font-family: Arial, sans-serif;
    text-align: center;
    margin-top: 30px;
    background-color: #121212; /* Dark Background */
    color: #d1d5db; /* Light Gray Text */
  }
  .container {
    background-color: #121212;
    padding: 25px;
    border-radius: 10px;
    box-shadow: 0 4px 12px rgba(0,0,0,0.5);
    display: inline-block;
  }
  .logo {
    margin-bottom: 20px;
  }
  .logo img {
    max-width: 250px; /* Logo Size */
    height: auto;
  }
  h1 { color: #00f5a0; } /* Primary Green Accent for Heading */
  p { color: #d1d5db; }
  .metric {
    display: inline-block;
    margin: 15px;
    padding: 20px;
    border-radius: 8px;
    font-size: 1.5em;
    background-color: #00f5a0; /* Green Accent Background */
    color: #121212; /* Dark text for high contrast */
    border: 1px solid #d1d5db;
  }
  .value { font-size: 2.5em; font-weight: bold; margin-top: 10px; }
 </style>
 <title>HTS221 Dashboard</title>
</head>
<body>
 <div class="container">
   <div class="logo">
     <img decoding="async" src="https://raw.githubusercontent.com/hackerembedded/STM32/main/Logo%20Hacker%20Embedded.png" alt="Hacker Embedded Logo">
   </div>
   <h1>HTS221 Live Sensor Readings</h1>

   <div class="metric">
     Temperature
     <div class="value">TEMP_VALUE C</div>
   </div>

   <div class="metric">
     Humidity
     <div class="value">HUMI_VALUE %</div>
   </div>

   <p style="margin-top: 30px;">Update Count: REFRESH_TIME</p>
 </div>
</body>
</html>
)rawliteral";

 // Format the float values to 2 decimal places
 String tempStr = String(temperatureC, 2);
 String humiStr = String(humidity, 2);
 String timeStr = String(millis() / 1000); // Simple time since boot

 // Replace placeholders with current data
 html.replace("TEMP_VALUE", tempStr);
 html.replace("HUMI_VALUE", humiStr);
 html.replace("REFRESH_TIME", timeStr + " seconds ago");

 return html;
}

void handleRoot() {
 readSensorData(); // Read data just before serving the page
 server.send(200, "text/html", getHtmlPage());
}

void setup() {
 Serial.begin(115200);

 // 1. Setup HTS221 (I2C)
 setupHTS221();

 // 2. Connect to Wi-Fi
 WiFi.begin(ssid, password);
 Serial.print("Connecting to WiFi...");
 while (WiFi.status() != WL_CONNECTED) {
  delay(1000);
  Serial.print(".");
 }
 Serial.println("\nWiFi connected.");
 Serial.print("Web Server IP: ");
 Serial.println(WiFi.localIP());

 // 3. Setup Web Server
 server.on("/", handleRoot);
 server.begin();

 // Perform initial data read
 readSensorData();
}

void loop() {
 // Handle web client requests
 server.handleClient();

 // The HTML meta refresh tag handles periodic data display.
 // We keep reading in the loop to ensure the global variables are always fresh
 // for the next request.
 readSensorData();
 delay(100); // Small delay to prevent I2C bus congestion
}
4.1 Code Explanation and Logic Breakdown
The code orchestrates the communication between the ESP32’s two main roles: the I²C Master reading the HTS221, and the Web Server displaying the data.
4.1.1 I2C Sensor Setup (Wire and HTS221Sensor)
Libraries: The standard
Wire.hlibrary is used to manage the low-level I²C communication bus, while the specificHTS221Sensor.hlibrary handles the sensor’s complex register reading and data calibration.Wire.begin(I2C2_SDA, I2C2_SCL): This initializes the ESP32’s default I²C pins. On the ESP32 Arduino core, these are typically GPIO 21 (SDA) and GPIO 22 (SCL), though they can be mapped to any free GPIO pins.hts.begin()andhts.Enable(): These calls power up the HTS221 sensor and prepare it for communication.hts.SetODR(HTS221_ODR_7HZ): Sets the Output Data Rate (ODR), which dictates how frequently the sensor updates its internal readings. A higher rate (like 7Hz) provides fresher data, which is desirable for a “live” dashboard.
4.1.2 Data Acquisition (readSensorData)
This function handles the critical step of requesting and processing the measured data.
					void readSensorData() {
     hts.GetHumidity(&humidity);
     hts.GetTemperature(&temperatureC);
     // ... (Serial output)
}
- Simplified Reading: The HTS221 library simplifies the process by handling the I²C burst reads and the complex internal math (calibration tables) needed to convert raw sensor values into meaningful floating-point results.
- Global Variables: The sensor data is written directly to the global variables (
humidityandtemperatureC), which act as the central source of truth for the entire program.
4.1.3 Web Server Handler (handleRoot)
The web handler is configured to read the data immediately before composing and sending the HTML page.
					void handleRoot() {
    readSensorData(); // Read data just before serving the page
    server.send(200, "text/html", getHtmlPage());
}
Real-time Update Logic: By placing
readSensorData()inside the handler, the ESP32 ensures that every time a browser requests the root page (/), it receives the absolute latest sensor reading, not stale data.
4.1.4 Auto-Refreshing HTML
The dynamic nature of the dashboard relies on a single line in the HTML header:
<meta http-equiv="refresh" content="1">
- Meta Refresh Tag: This tag instructs the client browser to automatically reload the page every 1 second (as specified by
content="1"). This eliminates the need for JavaScript or WebSockets for simple periodic updates and automatically triggers thehandleRootfunction (and thusreadSensorData) on the ESP32 every second. - Data Injection: The
getHtmlPage()function usesString.replace()to substitute placeholders (TEMP_VALUE,HUMI_VALUE) in the raw HTML string with the current, formatted values from the global sensor variables.
5. Hands-On Lab Recap
You’ve successfully created an I²C sensor web dashboard:
- The Wire Library initializes the ESP32’s I²C interface on GPIO 21 (SDA) and GPIO 22 (SCL).
- The STM32Duino HTS221 Library simplifies the complex I²C communication, handling register reads and calibration internally to provide floating-point temperature and humidity values.
- The ESP32 hosts a web page with a simple dashboard format.
- A <meta http-equiv=”refresh” content=”1″> tag in the HTML forces the client browser to refresh the page every 5 seconds, ensuring the displayed sensor data is nearly live.
The Humidity and Temperature is shown on the Serial Monitor:
As well as on the dashboard created in the webserver: