
ESP32 Tutorial: Hall Effect Sensor | Internal Magnetic Field Sensing
Abstract
The ESP32 microcontroller features a unique built-in Hall Effect Sensor located internally on the silicon chip. This sensor detects changes in the magnetic field in its surroundings, eliminating the need for external components for basic magnetic sensing applications. This tutorial demonstrates how to access and read the raw magnetic field data using the standard Arduino core function hallRead() and discusses the sensor’s characteristics and limitations.
1. Introduction: The Internal Hall Sensor
A Hall Effect Sensor operates on the principle that when a current-carrying conductor is placed in a magnetic field, a voltage difference (Hall voltage) is generated across the conductor perpendicular to both the current and the field.
The ESP32’s internal Hall Sensor exploits this phenomenon to measure the nearby magnetic field strength.
Key Characteristics
- Location: The sensor is internal to the chip, situated behind the metal shield (WROOM module). It is not connected to any specific GPIO pin that you can wire externally.
- Function: Readings are taken using the dedicated, built-in function hallRead().
- Output: The function returns a raw integer value.
- Values near 0 (e.g., ±50) indicate no significant magnetic field.
- A positive value indicates one magnetic pole (e.g., North).
- A negative value indicates the opposite magnetic pole (e.g., South).
- The absolute magnitude of the value (how far it is from zero) is proportional to the strength of the magnetic field.
- Limitations: The sensor is uncalibrated and highly sensitive to external noise, temperature fluctuations, and the proximity of other electronic components. It is best suited for simple presence detection (e.g., is a magnet nearby?) rather than high-precision measurements.
Note on ADC Pins
Historically, the Hall sensor was accessed internally via channels 0 and 3 of ADC1 (GPIO 36 and GPIO 39). Therefore, you should avoid using GPIO 36 and GPIO 39 for external applications if you plan to use the internal Hall sensor, as this can severely interfere with the measurement.
Note API version support
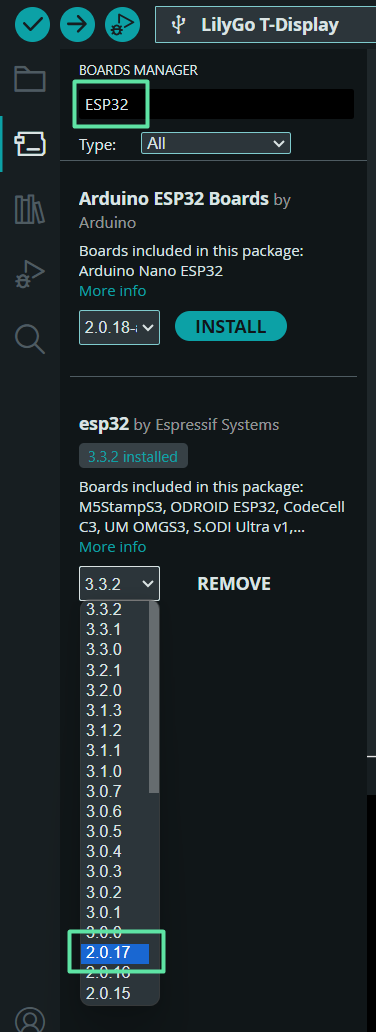
The hallRead function was removed from the current ESP32 API 3.0, so you’d have to downgrade to API 2.x to use it.
2. Core Function for ESP32 Interrupts
The Arduino Core for ESP32 simplifies access to the internal sensor through a single, dedicated function.
2.1 Using hallRead()
int magneticMeasurement = hallRead();
- hallRead(): Takes no arguments and returns the raw 16-bit measurement of the internal Hall Effect Sensor as an int.
- Usage: No prior setup (like pinMode) is required for the Hall Sensor, just call the function inside the loop().
3. Hands-On Lab: Reading Magnetic Field Strength
This lab demonstrates how to read the raw data from the built-in sensor and display the measurements, observing how they change based on magnet proximity and polarity.
3.1 Hardware Required
- ESP32 Dev Board (Classic or WROOM-32 module).
- A strong small magnet (neodymium magnets work well).
3.2 ESP32 Hall Effect Sensor Code Example
					/*
 * ESP32 Internal Hall Sensor Reader
 * Reads the raw magnetic field strength from the built-in sensor.
 */

void setup() {
  // Initialize Serial communication at a fast baud rate
  Serial.begin(115200);
  Serial.println("ESP32 Internal Hall Sensor Test");
}

void loop() {
  // Read the raw value from the internal Hall sensor
  int hallValue = hallRead();

  Serial.print("Raw Hall Value: ");
  Serial.println(hallValue);

  // A small delay to keep the readings readable
  delay(500);
}
3.3 Execution Steps
- Upload the code to your ESP32 board.
- Open the Serial Monitor (or Serial Plotter) at a baud rate of 115200.
- Observe the baseline value with no magnet nearby. It should hover close to zero (e.g., between -50 and 50).
- Bring one pole (e.g., North) of the magnet close to the metal shield of the ESP32 chip.
- The value will likely jump to a large positive number (e.g., > 100).
- Flip the magnet over (exposing the South pole) and bring it to the same spot.
- The value will change to a large negative number (e.g., < -100).
- Move the magnet closer: the absolute value will increase. Move it farther away: the absolute value will decrease.
4. Lab Recap
You’ve learned how to leverage the ESP32’s internal magnetic sensing capability:
- The ESP32 features a built-in, uncalibrated Hall Effect Sensor.
- The raw magnetic field data is accessed using the simple, dedicated function hallRead().
- The sensor returns an integer whose magnitude indicates field strength and whose sign indicates polarity.
- For proper operation, you should avoid using GPIO 36 and GPIO 39 for external signals, as these pins are used internally by the Hall sensor’s circuitry.

