STM32 Tutorial: Managing FreeRTOS Sempahores
Abstract
In multitasking environments, timing is everything. While queues handle data, semaphores handle signals. This guide strips away the complexity of task synchronization, focusing on how to use Binary and Counting semaphores to manage shared resources and interrupt-to-task signaling. We compare the Native FreeRTOS API with CMSIS-RTOS v1/v2 and demonstrate how to use the CubeIDE RTOS Awareness plugin to debug your OS state in real-time.
1. Introduction
In our last article: – Hacker Embedded FreeRTOS Queues: Master Inter-Task Communication on STM32, we used Queues to pass data between tasks. but what if you don’t need to send a value? What if you just need to tell a task, “The DMA transfer is finished, you can process the buffer now”?
Semaphores are the “stoplights” of the RTOS world. They allow tasks to synchronize their execution based on events or the availability of limited resources. Using semaphores correctly prevents “polling” (wasting CPU cycles checking a flag) and ensures your high-priority tasks run exactly when they are needed.
2. Prerequisites
To get the most out of this tutorial, you should have a few tools ready:
- STM32CubeIDE & CubeMX: Basic familiarity with project generation.
- FreeRTOS Task Management: Understanding how to create tasks and set priorities. (See our FreeRTOS Tasks & Heap Methods Tutorial for a refresher).
- C Programming: Comfort with pointers and custom struct types.
- Hardware: Any STM32 development board (e.g., Nucleo boards or BluePill).
3. What is a FreeRTOS Semaphore
A semaphore is essentially a “token” or “permit” system. They are used for synchronization between tasks or between an interrupt and a task. There are two types of semaphores:
- Binary Semaphore: Think of this as a single key. A task (or ISR) “Gives” the key, and another task “Takes” it. It has only one ‘token’. If the key isn’t there, the task stays in a Blocked state. It is primarily used for Synchronization to synchronize one action.
- Counting Semaphore: Think of this as a bowl containing multiple keys. It is used to manage a pool of resources (e.g., three available UART ports) or to count events (e.g., how many times a button was pressed before the handler task woke up). It has multiple ‘tokens’ and is used to synchronize multiple actions.
The context below shows the behavior between two tasks, where Task1 releases the semaphore before it is asked by Task2, so Task2 never enters in the Blocked state:
Now, if Task2 were to ask the semaphore before it is released by Task1, it will be Blocked, until Task1 provides it:
4. API Comparison: Native vs. CMSIS
STM32 developers often get lost in the transition from HAL-generated code to native RTOS logic. Here is the mapping for the main functions, depending on the selected API:
Action | Native FreeRTOS | CMSIS-RTOS v1 | CMSIS-RTOS v2 |
Handle | SemaphoreHandle_t | osSemaphoreId | osSemaphoreId_t |
Create (Binary) | xSemaphoreCreateBinary() | osSemaphoreCreate() | osSemaphoreNew(1, …) |
Create (Counting) | xSemaphoreCreateCounting() | osSemaphoreCreate() | osSemaphoreNew(max, initial, …) |
Give (Signal) | xSemaphoreGive() | osSemaphoreRelease() | osSemaphoreRelease() |
Take (Wait) | xSemaphoreTake() | osSemaphoreWait() | osSemaphoreAcquire() |
From ISR | xSemaphoreGiveFromISR() | (Same as above) | osSemaphoreRelease() |
Regardless of the selection, the use is quite straightforward, with these usual relevant parameters:

5. Hands-On Lab 1: Binary Semaphore (Task Sync)
Step 1:
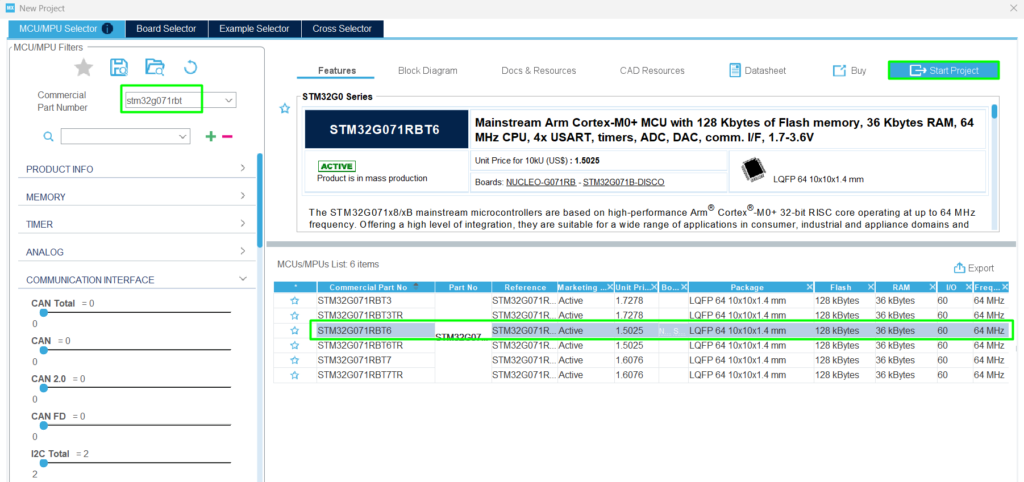
Create a new project: Select the STM32G071RB, the one available on the NUCLEO-G071RB
Step 2:
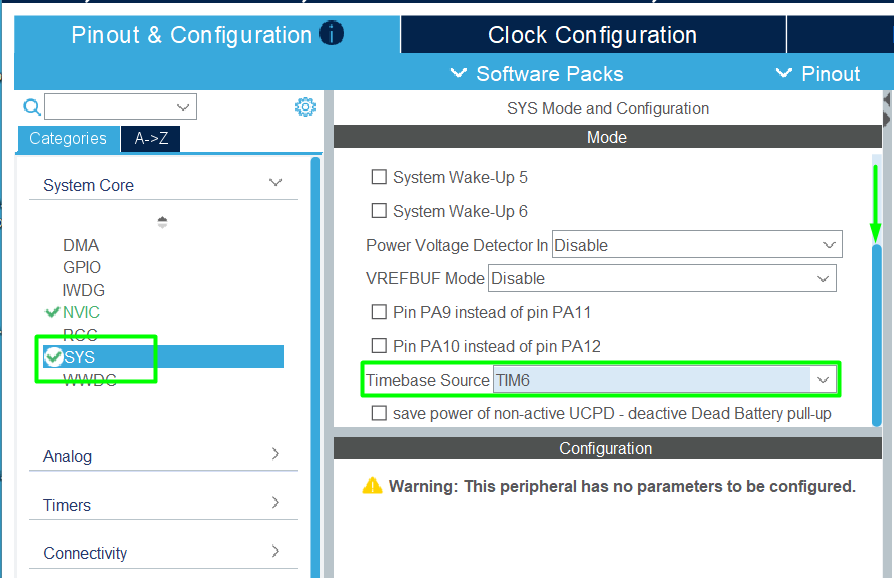
Change the timebase for the HAL driver, leaving the Systick for the FreeRTOS kernel:
Step 3:
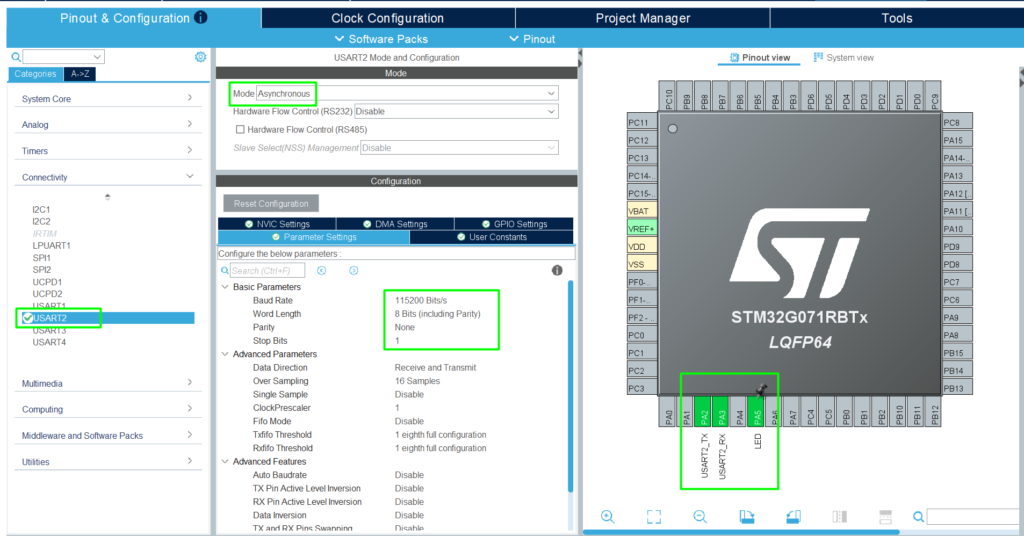
Add the USART2 (PA2 and PA3) for simple printf and PA5 for the LED available on the board:
Step 4:
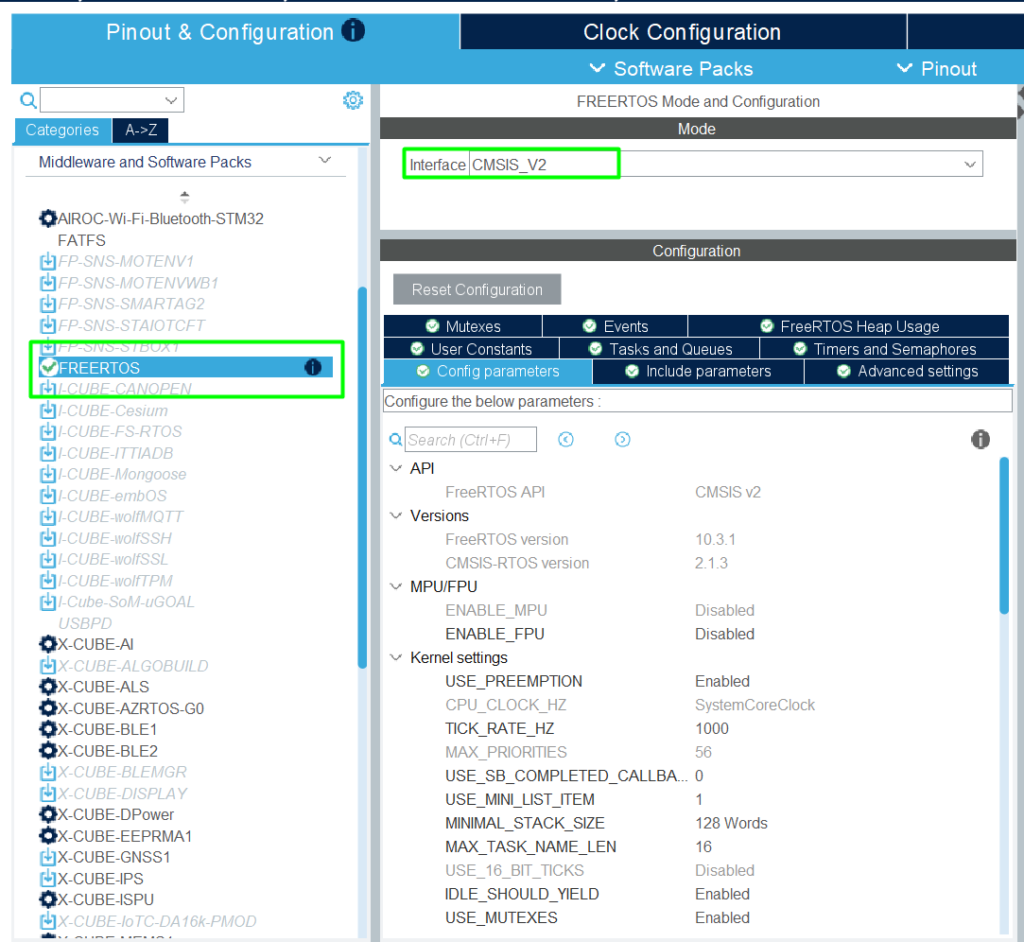
Add the FreeRTOS Middleware and select the API, in this case, CMSIS-V2:
Step 5:
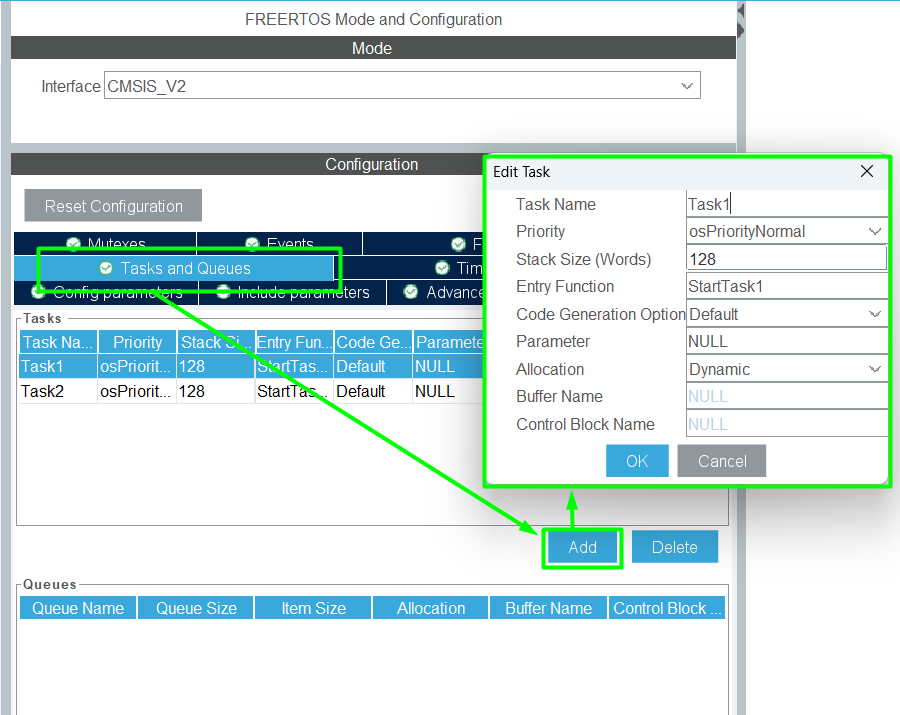
Let’s create two tasks, following the example used in the previous chapter, with Task1 and Task2:
Step 6:
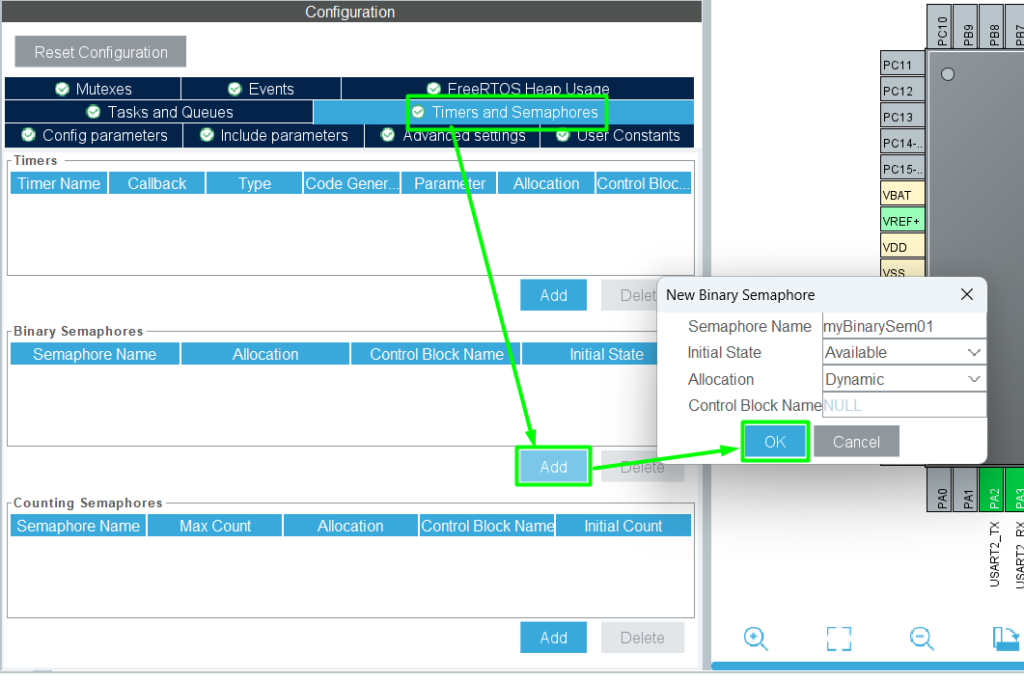
Create the binary:
Step 7:
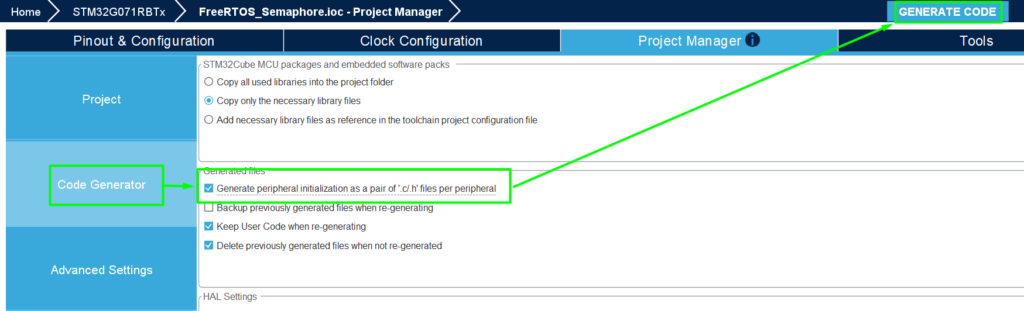
Generate the code and Open it in STM32CubeIDE.
In this case, make the generated code split between .c and .h, which makes it simpler and cleaner:
Step 8: Code Implementation:
This code implements a simple pattern using CMSIS-RTOS v2 wrapper, where it uses printf with UART2 via macro (__io_putchar), as detailed here> – Hacker Embedded How to implement printf with STM32: Setup for STM32CubeIDE and VS Code.
In the app_freertos.c, use the USER CODE regions to add the needed code:
					/* USER CODE BEGIN Includes */
#include "stdio.h"
#include "usart.h"
/* USER CODE END Includes */
					/* USER CODE BEGIN PM */
int __io_putchar(int ch)
{
	HAL_UART_Transmit(&huart2,(uint8_t *)&ch, 1, 100);
	return ch;
}
/* USER CODE END PM */
					/* USER CODE BEGIN Header_StartTask1 */
/**
 * @brief  Function implementing the Task1 thread.
 * @param  argument: Not used
 * @retval None
 */
/* USER CODE END Header_StartTask1 */
void StartTask1(void *argument)
{
	/* USER CODE BEGIN StartTask1 */
	/* Infinite loop */
	for(;;)
	{
		osDelay(2000);
		printf("Task1 Release Semaphore\n");
		osSemaphoreRelease(myBinarySem01Handle);
	}
	/* USER CODE END StartTask1 */
}

/* USER CODE BEGIN Header_StartTask2 */
/**
 * @brief Function implementing the Task2 thread.
 * @param argument: Not used
 * @retval None
 */
/* USER CODE END Header_StartTask2 */
void StartTask2(void *argument)
{
	/* USER CODE BEGIN StartTask2 */
	/* Infinite loop */
	for(;;)
	{
	    osSemaphoreAcquire(myBinarySem01Handle, 4000);
	    printf("Task2 Synchronized\n");
	    osDelay(500);
	}
	/* USER CODE END StartTask2 */
}
Step 9: Validation:
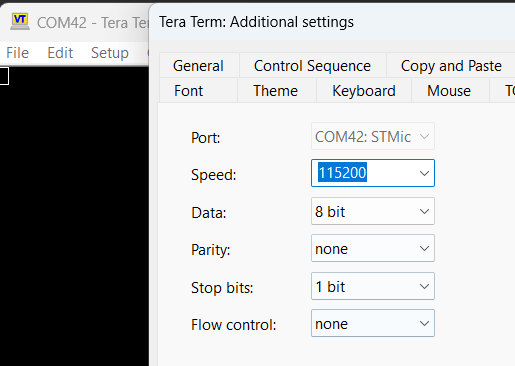
Build your application and enter in debug mode. Remember to open your preferred terminal with the UART settings 115200/8/N/1:
You don’t have to guess if your semaphore is taken or if a task is stuck. STM32CubeIDE includes a powerful RTOS Awareness tool.
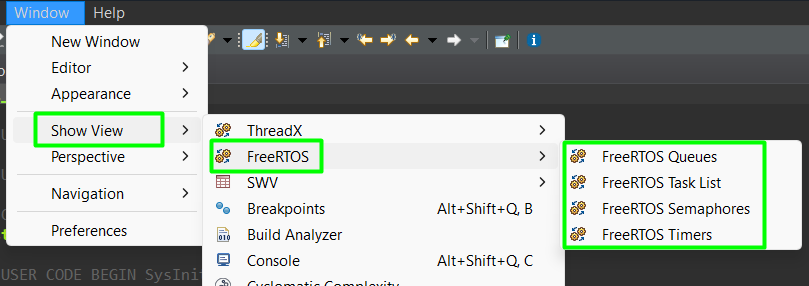
- Start a Debug session.
- Go to Window -> Show View -> Other….
- Select FreeRTOS -> FreeRTOS Task List and FreeRTOS Queues and Semaphores.
- You can now see the current count of your semaphores and which tasks are currently blocked waiting for them.
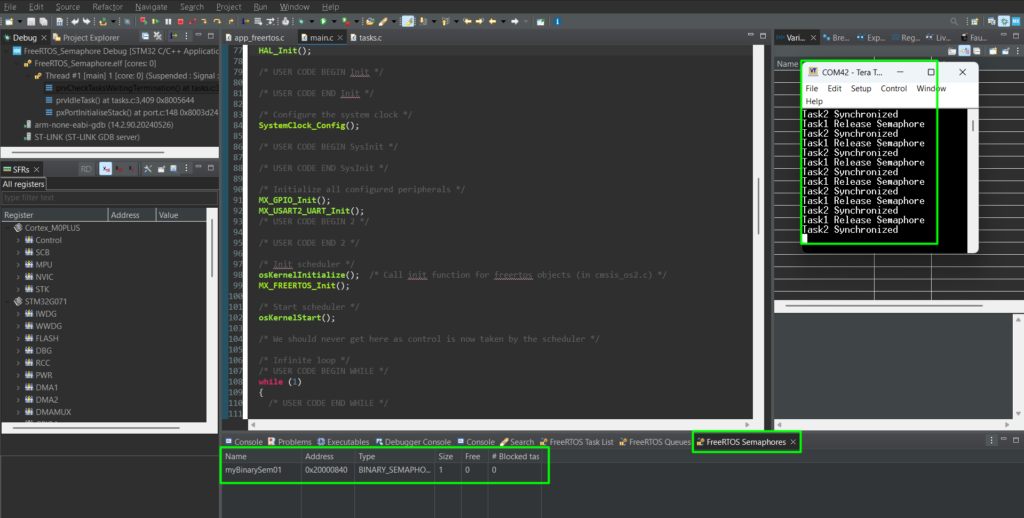
You can run the application and see the behavior and, whenever pausing it, the FreeRTOS viewers will update:
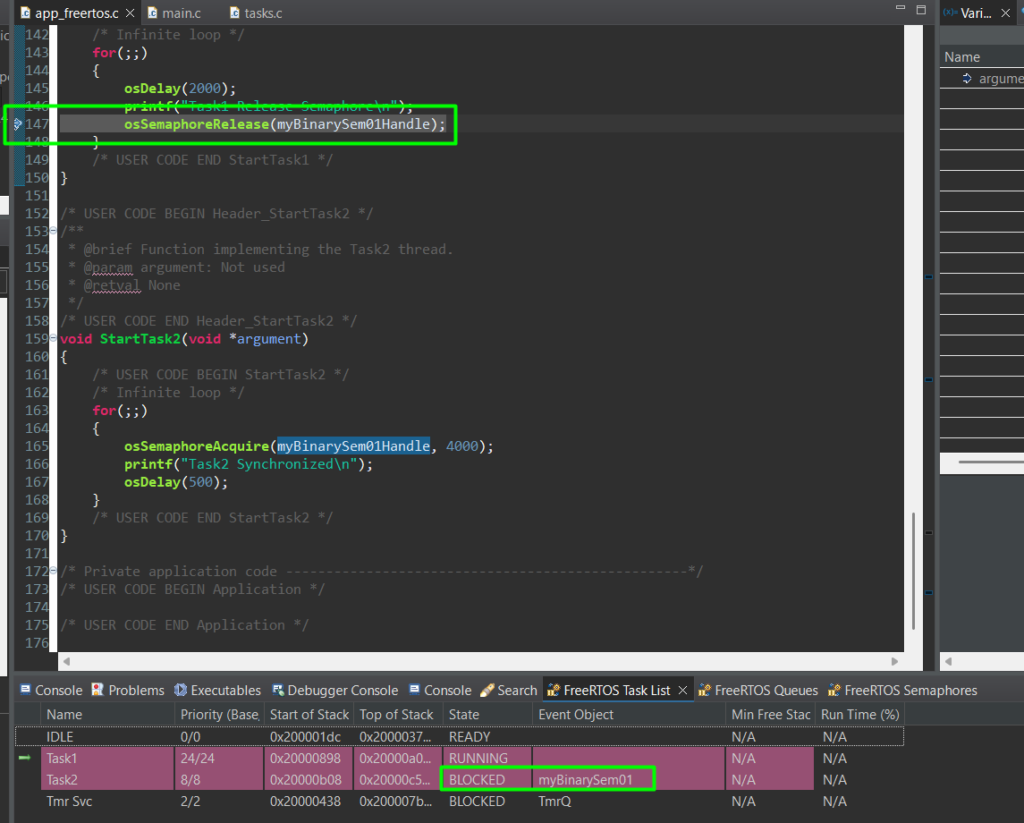
You can use a breakpoint placed at Task1, before the semaphore is released, to check the blocked state:
Same with the Semaphore View:

6. Hands-On Lab 2: Counting Semaphore (Resource Limit)
Imagine you have a limited buffer or a specific number of allowed concurrent actions. A Counting Semaphore acts as a guard.
This time around, let’s explore manually creating the semaphore, without a code re-generation from CubeMX. For this example, we’ll create a new task, called Task3 as well as a new count semaphore, creatively called as myCountingSem01.
At app_freertos.c, add the count semaphore:
					/* USER CODE BEGIN FunctionPrototypes */
/* Definitions for Task3 */
osThreadId_t Task3Handle;
const osThreadAttr_t Task3_attributes = {
		.name = "Task3",
		.priority = (osPriority_t) osPriorityLow,
		.stack_size = 128 * 4
};
void StartTask3(void *argument);

osSemaphoreId_t myCountingSem01Handle;
const osSemaphoreAttr_t myCountingSem01_attributes = {
.name = "myCountingSem01"
};

/* USER CODE END FunctionPrototypes */
In MX_FREERTOS_Init function, you can add the count semaphore:
					/* USER CODE BEGIN RTOS_SEMAPHORES */
	/* add semaphores, ... */
	/* creation of myCountingSem01 */
	myCountingSem01Handle = osSemaphoreNew(2, 2, &myCountingSem01_attributes);

	/* USER CODE END RTOS_SEMAPHORES */
As well as the creation of Task3:
						/* USER CODE BEGIN RTOS_THREADS */
	/* add threads, ... */
	/* creation of Task3 */
	Task3Handle = osThreadNew(StartTask3, NULL, &Task3_attributes);
	/* USER CODE END RTOS_THREADS */
Now, edit Task1 and Task2 as shown below:
					/* USER CODE END Header_StartTask1 */
void StartTask1(void *argument)
{
	/* USER CODE BEGIN StartTask1 */
	/* Infinite loop */
	for(;;)
	{
		osDelay(2000);
		printf("Task1 Release counting semaphore\n");
		osSemaphoreRelease(myCountingSem01Handle);
	}
	/* USER CODE END StartTask1 */
}

/* USER CODE BEGIN Header_StartTask2 */
/**
 * @brief Function implementing the Task2 thread.
 * @param argument: Not used
 * @retval None
 */
/* USER CODE END Header_StartTask2 */
void StartTask2(void *argument)
{
	/* USER CODE BEGIN StartTask2 */
	/* Infinite loop */
	for(;;)
	{
		osDelay(2000);
		printf("Task2 Release counting semaphore\n");
		osSemaphoreRelease(myCountingSem01Handle);
	}
	/* USER CODE END StartTask2 */
}
And finally, create the StartTask3:
					/* USER CODE BEGIN Application */
void StartTask3(void *argument)
{
	/* USER CODE BEGIN StartTask2 */
	/* Infinite loop */
	for(;;)
	{
	    osSemaphoreAcquire(myCountingSem01Handle, 4000);
	    osSemaphoreAcquire(myCountingSem01Handle, 4000);
	    printf("Task 3 Synchronized\n");
	}
	/* USER CODE END StartTask2 */
}
/* USER CODE END Application */
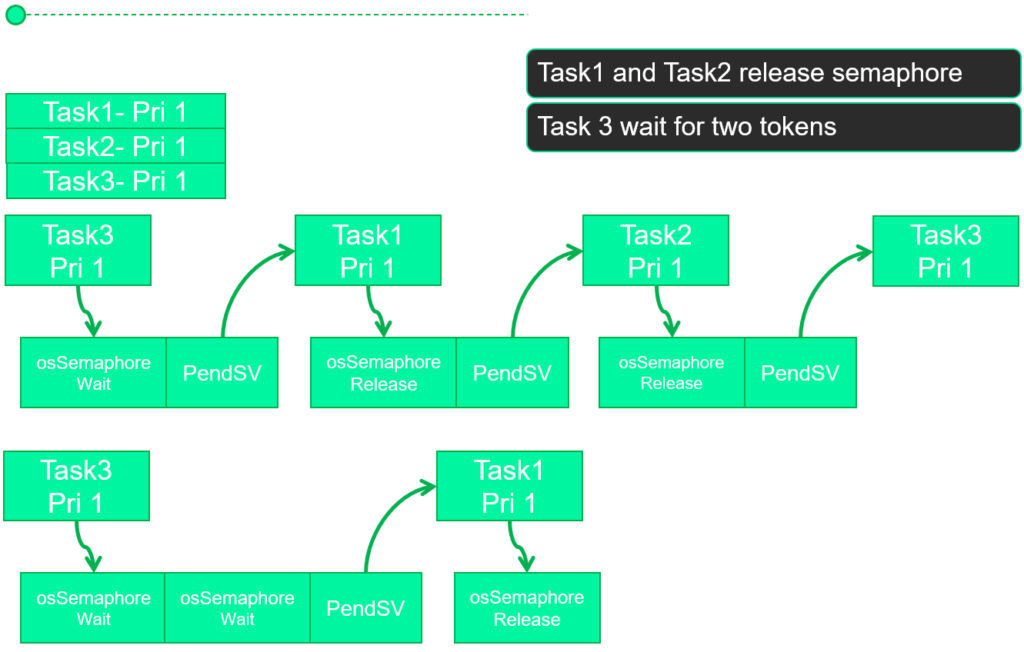
As you might have noticed, the flow will be slightly different than before, as Task3 might be blocked 2 times, waiting for the semaphores provided by Task1 and Task2 to be released. The simplified workflow is shown below:
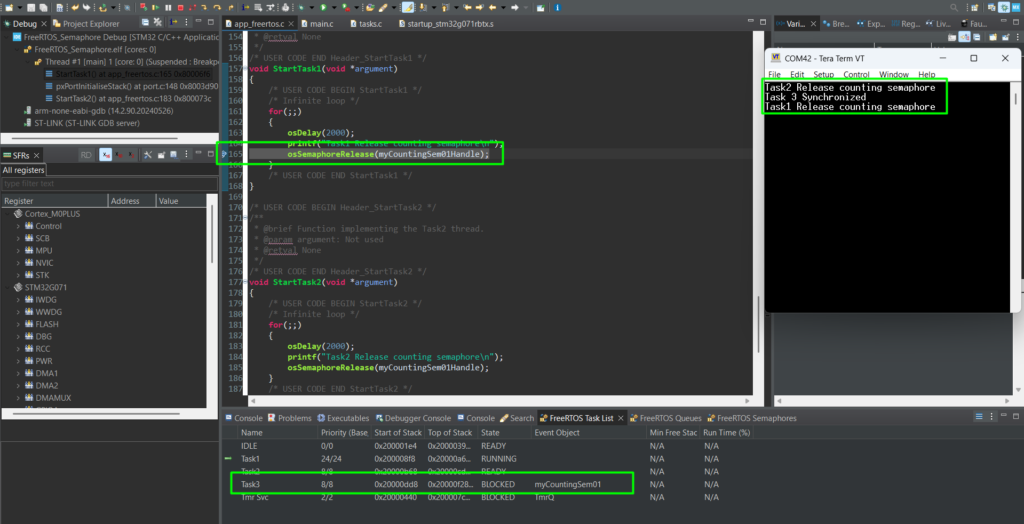
Debugging: CubeIDE FreeRTOS Monitoring
7. Conclusion
Semaphores are quite useful for event-driven firmware. By using Binary Semaphores for task synchronization and Counting Semaphores for resource management, you eliminate the need for “spinning” CPUs and unpredictable global flag, no more endless polling for flags.
The most common pitfall? Priority Inversion, so be aware of that in your code implementation. In our next episode, we will look at Mutexes, the specialized cousin of the semaphore designed specifically to prevent priority issues when sharing data.