STM32 Tutorial: Protecting Resources and Synchronizing Tasks
Abstract
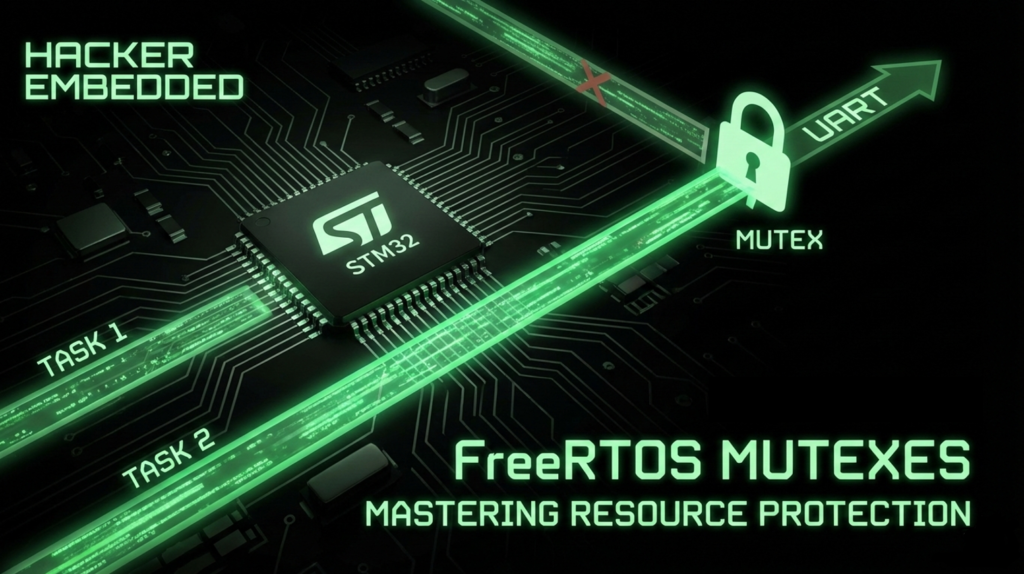
In a multitasking environment like FreeRTOS, resource contention is an inevitable challenge. When two tasks attempt to access the same peripheral simultaneously, be it a UART port, an I2C bus, or a shared memory buffer, the result is often data corruption or system instability. This article explores Mutexes (Mutual Exclusion) as the primary mechanism for resource protection on STM32. We will cover the fundamental differences between Mutexes and Binary Semaphores, the critical concept of Priority Inheritance, and provide a hands-on implementation to ensure your concurrent tasks play nice with shared hardware.
1. Introduction
Imagine you are writing a complex firmware where Task A handles sensor data logging via UART, and Task B reports system health status over the same UART line. Without any coordination, Task A might be halfway through printing “Temperature: 25C” when Task B interrupts to print “System OK.” The output becomes a garbled mess: “TempSysatutem OKre: 25C.”
This is a classic Race Condition. In the world of embedded systems, hardware peripherals are usually “single-user” entities. To prevent chaos, we need a “talking stick” or a key.
A Mutex is a specialized object that acts as this key. When a task wants to use a resource, it must “Take” the Mutex. If another task currently holds it, the requesting task is blocked until the key is returned (“Given”). While Mutexes are technically a type of semaphore, they are uniquely designed for Ownership. Unlike a standard Binary Semaphore, a Mutex includes a mechanism called Priority Inheritance to solve one of the most dangerous problems in RTOS: Priority Inversion.
- Mutex (Mutual Exclusion) = special type of semaphore
- Ensures only one task at a time accesses a resource
- Prevents race conditions and data corruption
- Typically used for shared peripherals like UART, I2C, SPI
Difference vs Binary Semaphore: Mutex includes priority inheritance to avoid priority inversion. The animation below shows how Thread1 and Thread2, that uses the same Resource, can benefit from Mutex to avoid any race condition:
2. Prerequisites
To get the most out of this tutorial, you should have a few tools ready:
- STM32CubeIDE & CubeMX: Basic familiarity with project generation.
- FreeRTOS Task Management: Understanding how to create tasks and set priorities. (See our FreeRTOS Tasks & Heap Methods Tutorial for a refresher).
- C Programming: Comfort with pointers and custom struct types.
- Hardware: Any STM32 development board (e.g., Nucleo boards or BluePill).
3. Creating a STM32 FreeRTOS Mutex
Creating a Mutex in FreeRTOS is straightforward, but it must be done before the scheduler starts and before any tasks try to access it. We use the SemaphoreHandle_t type to store the reference.
The pseudo code shows the usual settings:
					SemaphoreHandle_t xMutex;

int main(void)
{
    HAL_Init();
    SystemClock_Config();
    MX_GPIO_Init();
    MX_USART2_UART_Init();

    xMutex = xSemaphoreCreateMutex();

    xTaskCreate(Task1, "Task1", 128, NULL, 2, NULL);
    xTaskCreate(Task2, "Task2", 128, NULL, 1, NULL);

    vTaskStartScheduler();
    while (1) {}
}
- Use xSemaphoreCreateMutex()
- Returns a handle to the mutex
- Initialize before creating tasks
3.1 Using Mutex in Tasks
Let’s say we want to protect the UART as our Resource, to use the Mutex, tasks must wrap the code accessing the shared resource between a Take and a Give function.
The pseudo code below shows a simple usage of it, considering two tasks in an equivalent arrangement as the earlier animation.
					void Task1(void *pvParameters)
{
    for(;;)
    {
        if(osMutexAcquire (xMutex, portMAX_DELAY) == osOK)
        {
            // Access shared resource (UART)
            printf("Task1 using UART\n");
            HAL_Delay(100);
            osMutexRelease (xMutex); // Release mutex
        }
        osDelay(200);
    }
}

void Task2(void *pvParameters)
{
    for(;;)
    {
        if(osMutexAcquire (xMutex, portMAX_DELAY) == osOK)
        {
            // Access same shared resource
            printf("Task2 using UART\n");
            HAL_Delay(100);
            osMutexRelease (xMutex); // Release mutex
        }
        osDelay(300);
    }
}
Key considerations:
- Only one task can access the resource at a time
- Other tasks wait for mutex availability
- Prevents simultaneous UART writes or conflicts
- Release: Always ensure xSemaphoreGive is called, or the resource will be “deadlocked” forever.
4. FreeRTOS Mutex Priority Inheritance
Basically the “secret sauce”, the most significant advantage of a Mutex over a Binary Semaphore is Priority Inheritance.
Consider this scenario:
- Low Priority Task (L) takes the Mutex.
- High Priority Task (H) pre-empts (L) and tries to take the Mutex. (H) is now blocked because (L) still has it.
- Medium Priority Task (M) wakes up. Since (M) is higher priority than (L), it starts running, preventing (L) from finishing and releasing the Mutex.
- Now, (H) is waiting for (L), but (L) can’t run because of (M). This is Priority Inversion.
The Solution: FreeRTOS recognizes this. It temporarily “boosts” the priority of Task (L) to match Task (H). This allows (L) to finish its work quickly and get out of the way, so (H) can take over. Once (L) gives back the Mutex, its priority drops back to normal.
5. Hands-On Lab: STM32 FreeRTOS Mutex
To truly see this in action on your STM32, we can implement a simple application that will contain:
- Setup: Connect your board to a Serial Monitor (115200 baud).
- Contention: Set Task 1 to run every 100ms and Task 2 to run every 110ms.
- Simulation: Use HAL_Delay() inside the Mutex-protected area to simulate “busy” time.
- Observation: Notice how the strings in your terminal are never mixed together. If you comment out the xSemaphoreTake and Give lines, you will immediately see the characters from both tasks overlapping and corrupting the output.
Here is the step by step, considering STM32CubeMX as the starting point:
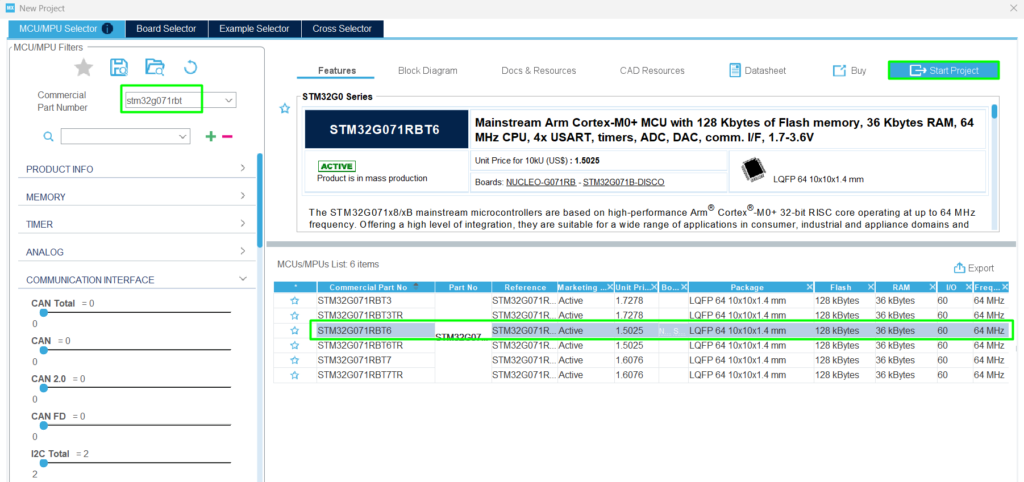
Step 1:
Create a new project: Select the STM32G071RB, the one available on the NUCLEO-G071RB
Step 2:
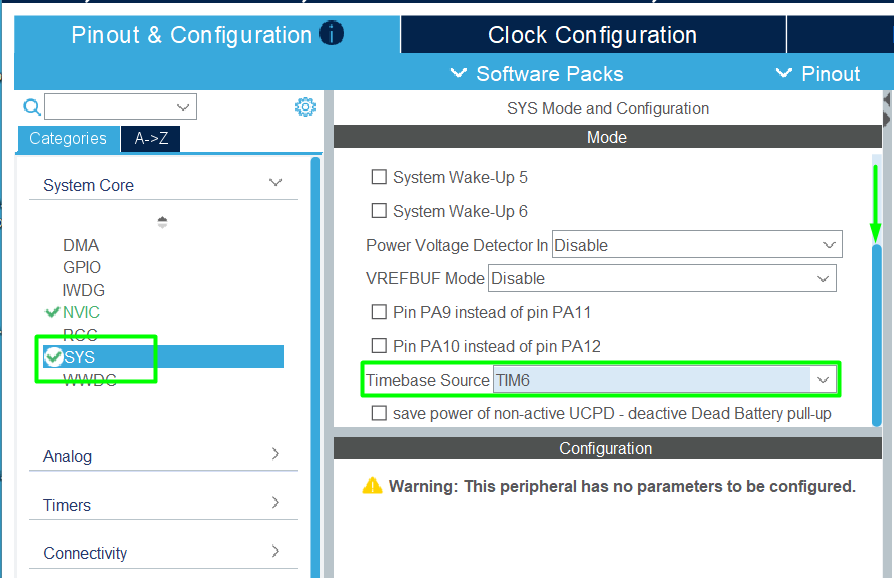
Change the timebase for the HAL driver, leaving the Systick for the FreeRTOS kernel:
Step 3:
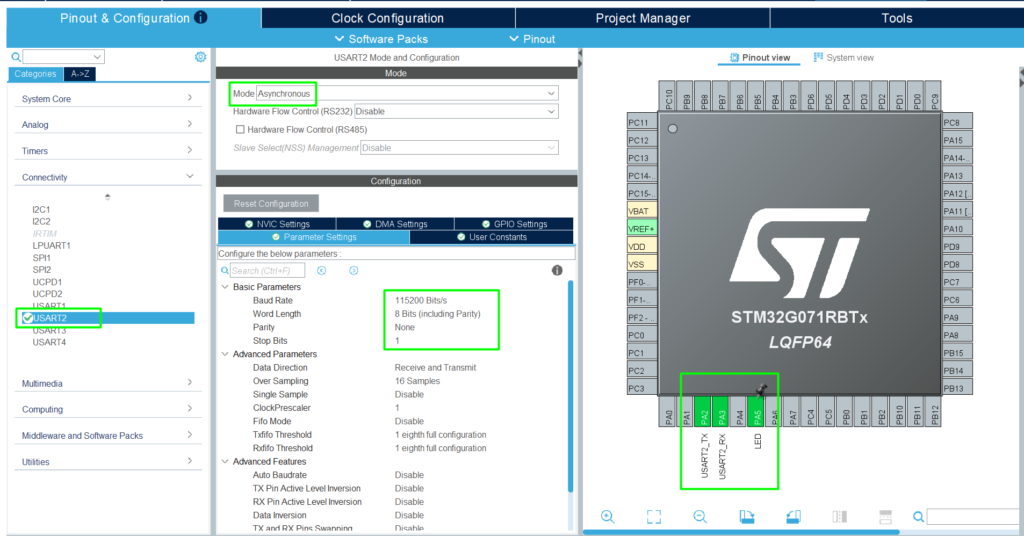
Add the USART2 (PA2 and PA3) for simple printf and, optionally, the PA5 for the LED available on the board:
Step 4:
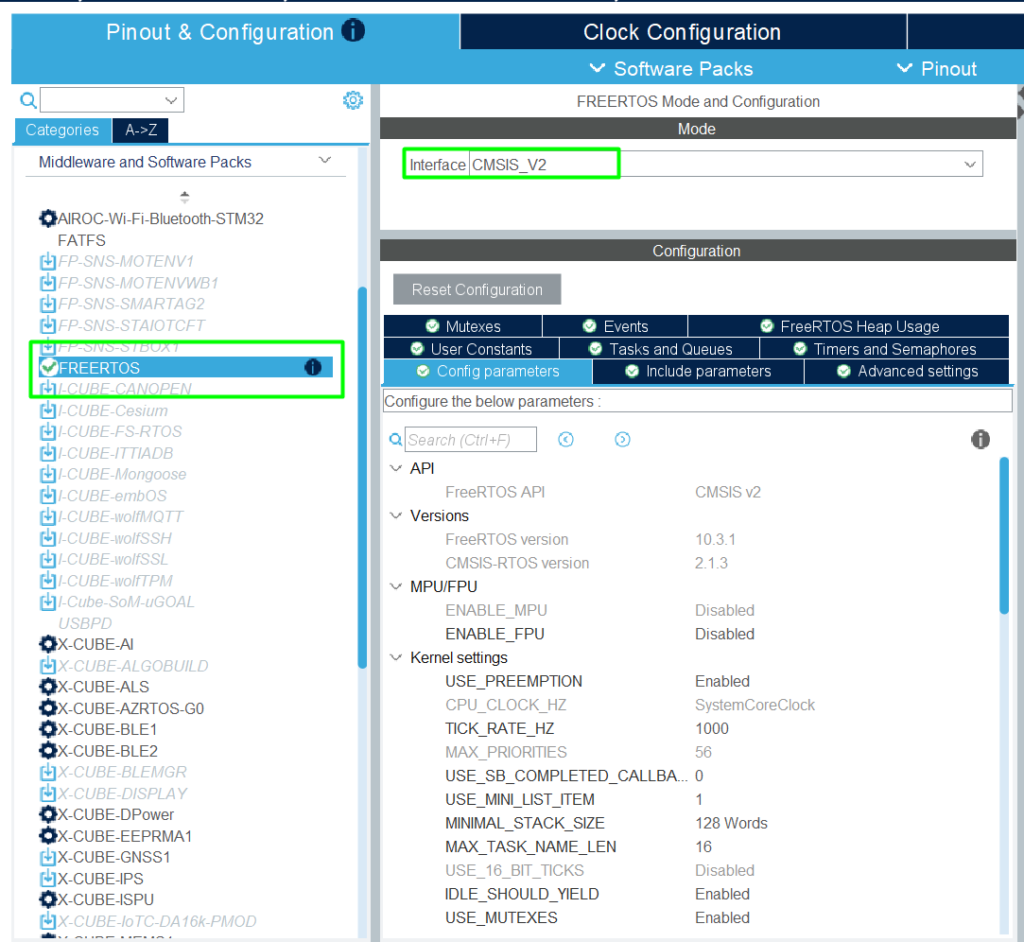
Add the FreeRTOS Middleware and select the API, in this case, CMSIS-V2:
Step 5:
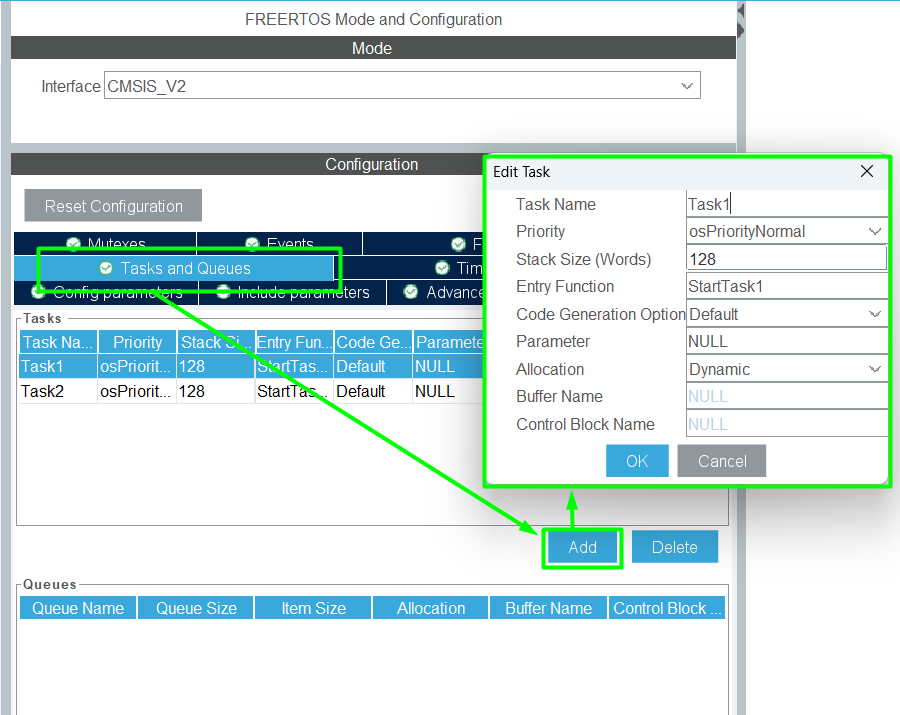
Let’s create two tasks, following the example used in the previous chapter, with Task1 and Task2, note Task2 will have a lower priority than Task1:
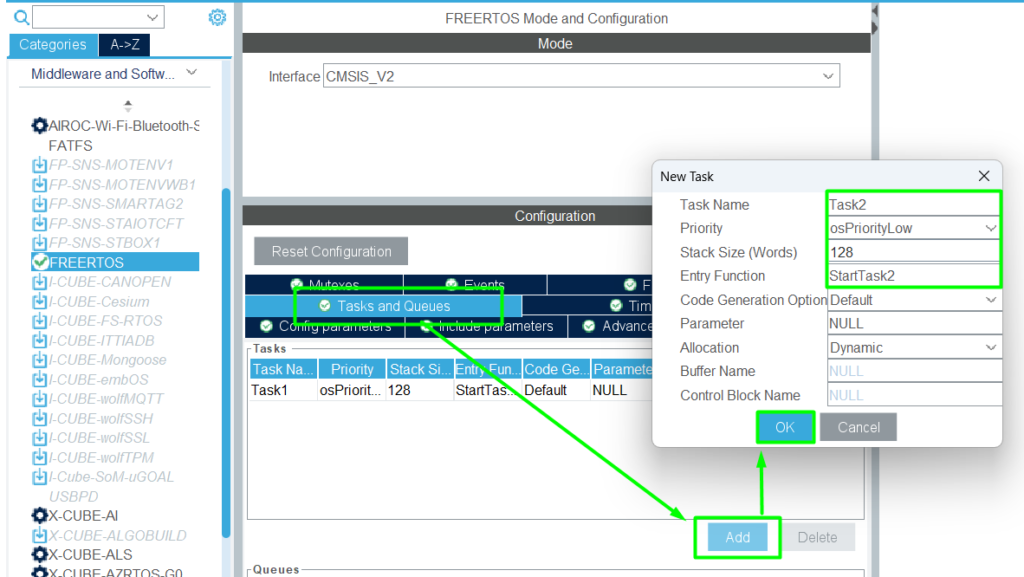
Step 6:
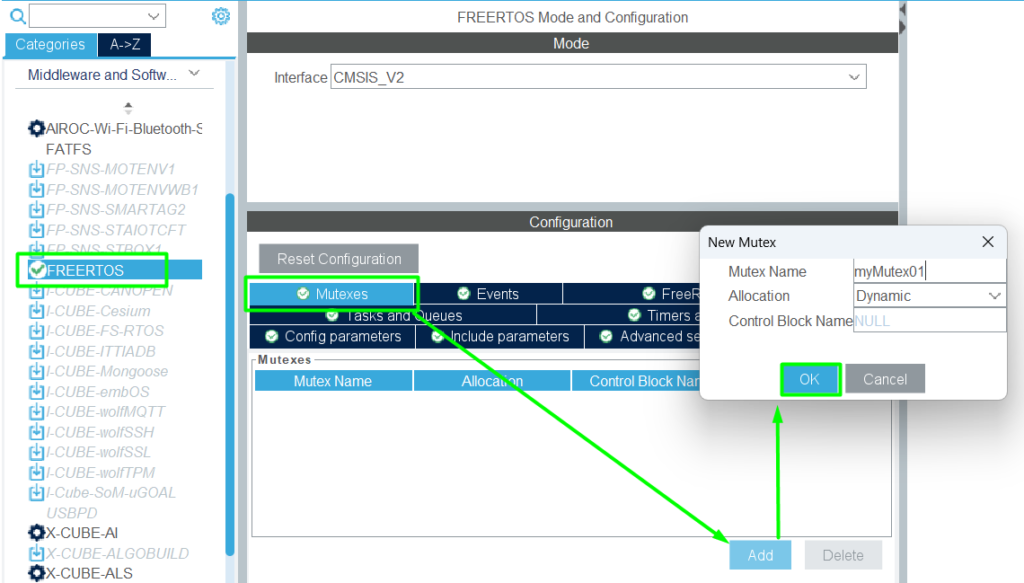
Create the FreeRTOS Mutex:
Step 7:
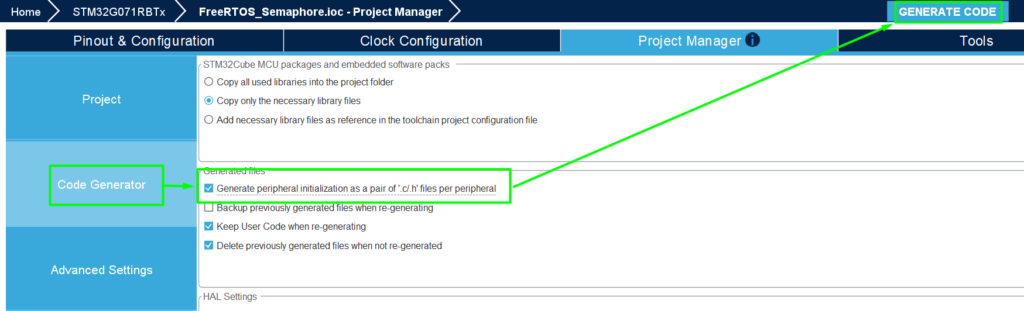
Generate the code and Open it in STM32CubeIDE.
In this case, make the generated code split between .c and .h, which makes it simpler and cleaner:
Step 8: Code Implementation:
This code implements a simple pattern using CMSIS-RTOS v2 wrapper, where it uses printf with UART2 via macro (__io_putchar), as detailed here> – Hacker Embedded How to implement printf with STM32: Setup for STM32CubeIDE and VS Code.
In the app_freertos.c, use the USER CODE regions to add the needed code:
					/* USER CODE BEGIN Includes */
#include "stdio.h"
#include "usart.h"
/* USER CODE END Includes */
					/* USER CODE BEGIN PM */
int __io_putchar(int ch)
{
	HAL_UART_Transmit(&huart2,(uint8_t *)&ch, 1, 100);
	return ch;
}
/* USER CODE END PM */
					/* USER CODE BEGIN Header_StartTask1 */
//#define FORCE_RACE_CONDITION
/**
  * @brief  Function implementing the Task1 thread.
  * @param  argument: Not used
  * @retval None
  */
/* USER CODE END Header_StartTask1 */
void StartTask1(void *argument)
{
  /* USER CODE BEGIN StartTask1 */
  /* Infinite loop */
  for(;;)
  {
#ifndef FORCE_RACE_CONDITION
      if(osMutexAcquire(myMutex01Handle, portMAX_DELAY) == osOK)
#endif
      {
          // Access shared resource (UART)
          printf("Task1 using UART \n");
#ifndef FORCE_RACE_CONDITION
          osMutexRelease(myMutex01Handle); // Release mutex
#endif
      }
	  osDelay(100);
  }
  /* USER CODE END StartTask1 */
}

/* USER CODE BEGIN Header_StartTask2 */
/**
* @brief Function implementing the Task2 thread.
* @param argument: Not used
* @retval None
*/
/* USER CODE END Header_StartTask2 */
void StartTask2(void *argument)
{
  /* USER CODE BEGIN StartTask2 */
  /* Infinite loop */
  for(;;)
  {
#ifndef FORCE_RACE_CONDITION
      if(osMutexAcquire(myMutex01Handle, portMAX_DELAY) == osOK)
#endif
      {
          // Access shared resource (UART)
          printf("Task2 using UART\n");
#ifndef FORCE_RACE_CONDITION
          osMutexRelease(myMutex01Handle); // Release mutex
#endif
      }
	  osDelay(100);
  }
  /* USER CODE END StartTask2 */
}
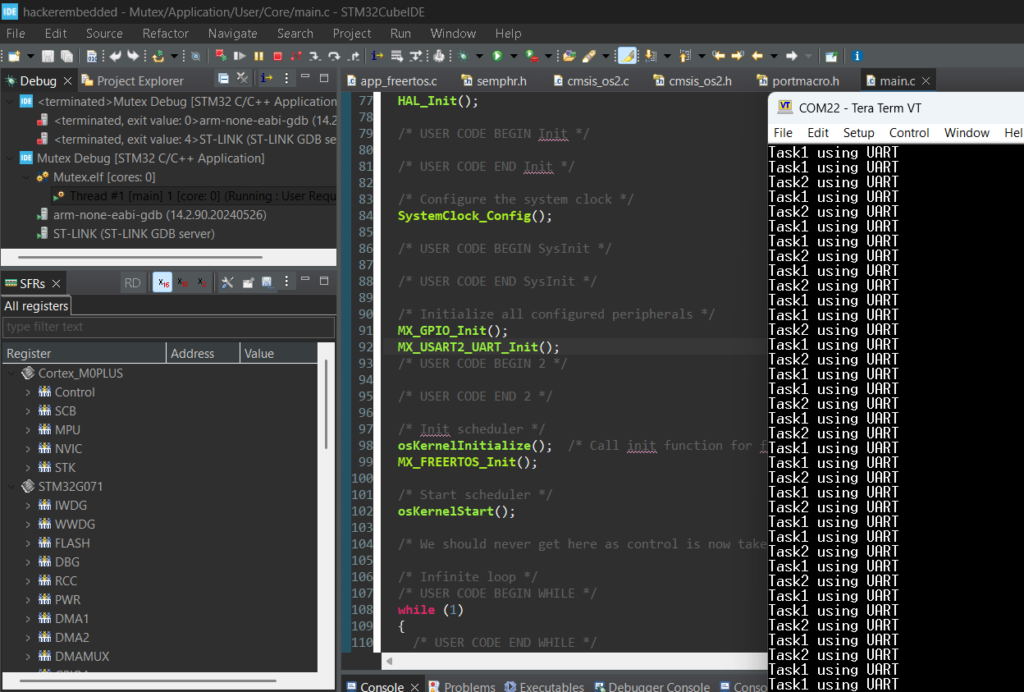
Step 9: Validation:
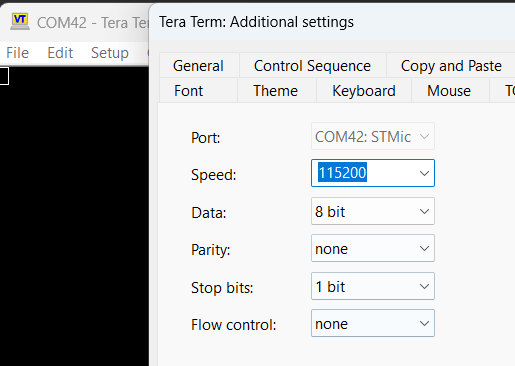
Build your application and enter in debug mode. Remember to open your preferred terminal with the UART settings 115200/8/N/1:
You can run the application and see the behavior:
If you want to cause the race condition, a few things need to be changed. The main reason behind it is that printf is a blocking function, so unless one task has a higher priority than the other AND the osDelay is faster than the printf, no race condition will happen. To force it, we can make these changes, including a change on the message, to make it easier to spot:
					/* USER CODE BEGIN Header_StartTask1 */
#define FORCE_RACE_CONDITION
/**
  * @brief  Function implementing the Task1 thread.
  * @param  argument: Not used
  * @retval None
  */
/* USER CODE END Header_StartTask1 */
void StartTask1(void *argument)
{
  /* USER CODE BEGIN StartTask1 */
  /* Infinite loop */
  for(;;)
  {
#ifndef FORCE_RACE_CONDITION
      if(osMutexAcquire(myMutex01Handle, portMAX_DELAY) == osOK)
#endif
      {
          // Access shared resource (UART)
          printf("AAAAAA\n");
#ifndef FORCE_RACE_CONDITION
          osMutexRelease(myMutex01Handle); // Release mutex
#endif
      }
	  osDelay(1);
  }
  /* USER CODE END StartTask1 */
}

/* USER CODE BEGIN Header_StartTask2 */
/**
* @brief Function implementing the Task2 thread.
* @param argument: Not used
* @retval None
*/
/* USER CODE END Header_StartTask2 */
void StartTask2(void *argument)
{
  /* USER CODE BEGIN StartTask2 */
  /* Infinite loop */
  for(;;)
  {
#ifndef FORCE_RACE_CONDITION
      if(osMutexAcquire(myMutex01Handle, portMAX_DELAY) == osOK)
#endif
      {
          // Access shared resource (UART)
          printf("BBBBBB\n");
#ifndef FORCE_RACE_CONDITION
          osMutexRelease(myMutex01Handle); // Release mutex
#endif
      }
	  osDelay(1);
  }
  /* USER CODE END StartTask2 */
}
And then observe the printf being taken from task2 to task1 and interrupting the sequence of Bs:

6. Advantages of FreeRTOS Mutexes
Using Mutexes is non-negotiable for robust STM32 applications. They provide:
- Data Integrity: No more garbled communication or corrupted sensor registers.
- Predictability: Priority inheritance ensures that your most critical tasks aren’t held hostage by medium-priority background tasks.
- Code Cleanliness: It creates a clear logical boundary around shared hardware drivers.
Important Note: Never use Mutexes inside an Interrupt Service Routine (ISR). Mutexes can block (suspend) a task, and interrupts are not allowed to block. For ISR-to-Task synchronization, use Binary Semaphores or Task Notifications instead.
7. Conclusion
Mastering Mutexes is a rite of passage for any embedded developer moving from simple “super-loop” designs to professional RTOS-based architecture. By treating your shared peripherals, whether it’s a simple UART, an I2C bus or an LCD, as protected resources, you eliminate the “ghost in the machine” bugs that are notoriously difficult to debug.
While Mutexes add a small amount of overhead compared to raw hardware access, the safety they provide via Priority Inheritance is invaluable. They ensure that your high-priority tasks remain responsive even when competing for resources with lower-priority background processes.
Key Takeaways
To wrap up, keep these three rules in your Hacker toolkit:
- Ownership Matters: Only use a Mutex when a task needs to “own” a resource for a period. If you just need to signal that an event happened, use a Binary Semaphore or Task Notification.
- The Golden Rule: Never, ever use xSemaphoreTake or xSemaphoreGive for a Mutex inside an Interrupt Service Routine (ISR). It will crash your system because Mutexes can block, and ISRs cannot.
- Keep it Short: Minimize the time spent holding a Mutex. The longer a task holds the “key,” the longer other tasks are stuck in the Blocked state, potentially hurting your system’s real-time performance.
Feature | Mutex | Binary Semaphore |
Primary Use | Mutual Exclusion (Resource Protection) | Synchronization (Signaling) |
Ownership | Yes (Task that takes it must give it) | No (One task/ISR can give, another can take) |
Priority Inheritance | Yes (Prevents Priority Inversion) | No |
Safe for ISRs? | No | Yes |
By implementing these patterns, you’re not just writing code that “works”, you’re writing firmware that is predictable, scalable, and professional.
Happy Coding =)