STM32 HAL Tutorial: Reading Analog Sensors
Abstract
Learn how to configure ADC (Analog-to-Digital Converter) on STM32 using CubeMX and HAL drivers. Step-by-step guide to read analog sensors and channels to display values via UART or LEDs.
1. Introduction
In previous episodes, we explored SPI communication.
Now it’s time to handle analog signals from sensors like:
- Potentiometers
- Temperature sensors (LM35, TMP36)
- Light sensors (LDR)
The ADC converts these analog voltages (0–Vref) into digital values the MCU can process.
By the end of this episode, you’ll be able to:
- Configure ADC peripheral using CubeMX.
- Read analog values using HAL functions.
Send the readings via UART or use them to control LEDs.
2. Prerequisites
- STM32 board with exposed ADC pins (e.g., PA0, PA1).
- Analog temperature sensor (embedded on the STM32).
- STM32CubeIDE installed.
- Knowledge of GPIO, UART, and SPI.

This image was made using Fritizing
3. Configuring ADC in CubeMX
Step 1 – Open Project
- Create a new project in STM32CubeMX.
Step 2 – Enable ADC Peripheral
- Go to Pinout & Configuration.
- Select ADC1.
- Assign the analog pin (e.g., PA0) for your sensor.
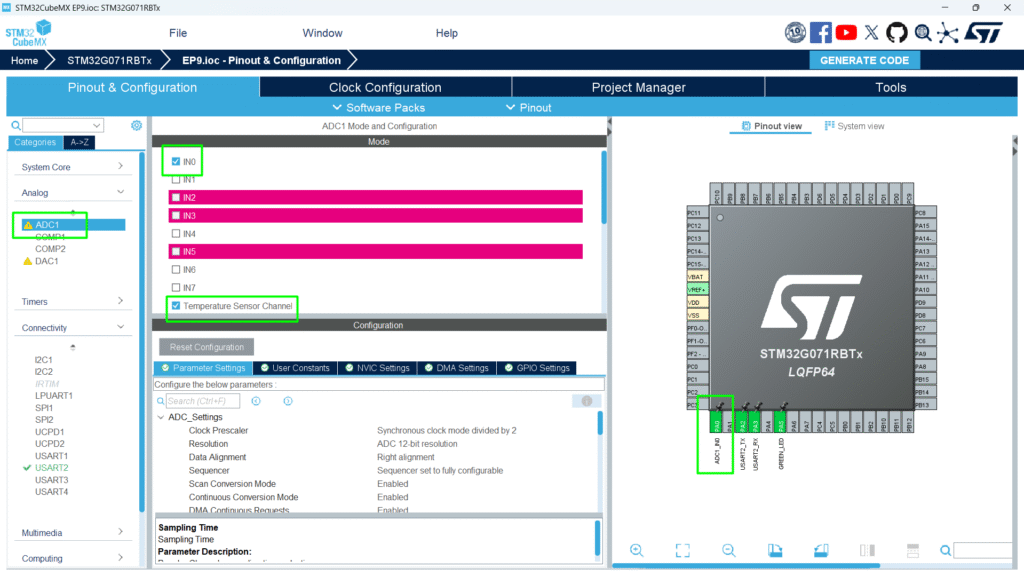
Step 3 – Configure Parameters
- Click ADC1 → Parameter Settings:
- Resolution: 12-bit (0–4095 digital values)
- Data Alignment: Right
- Scan Conversion Mode: Disabled (single channel)
- Continuous Conversion Mode: Optional, enable for continuous readings
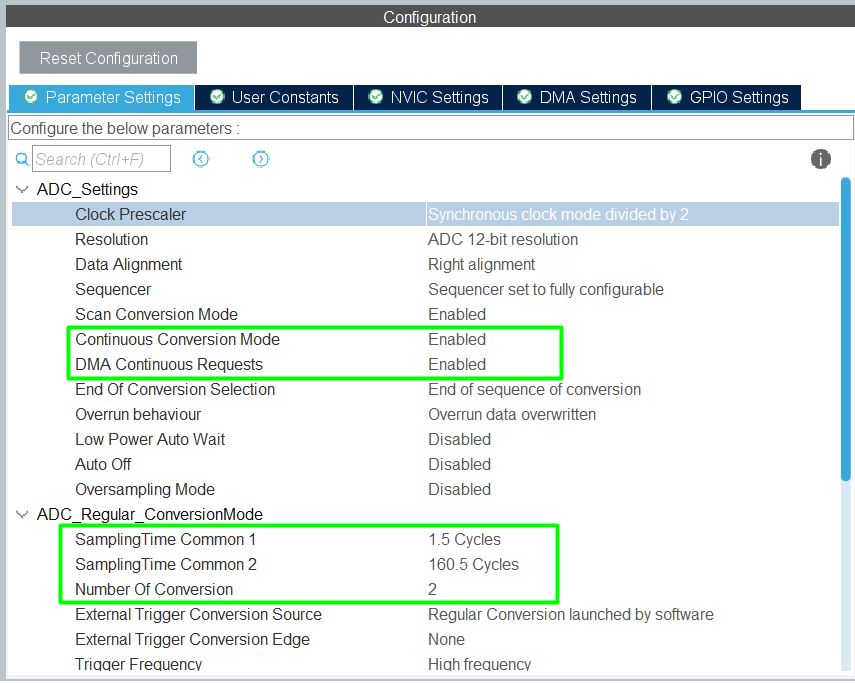
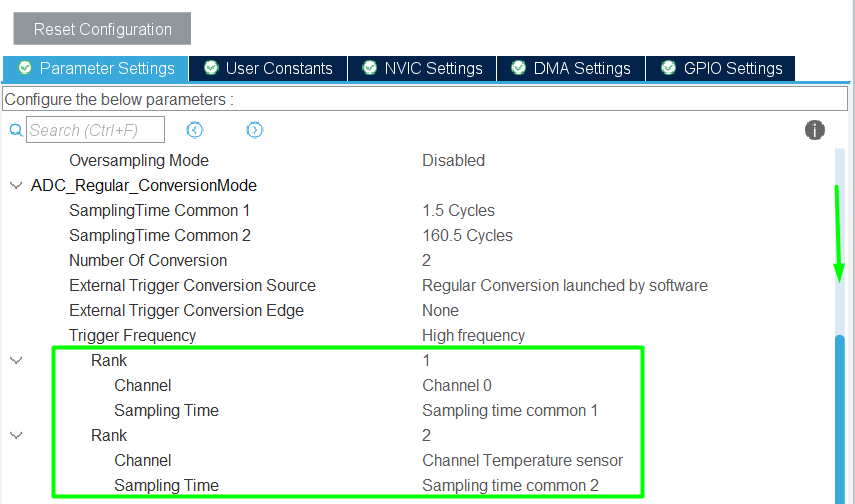
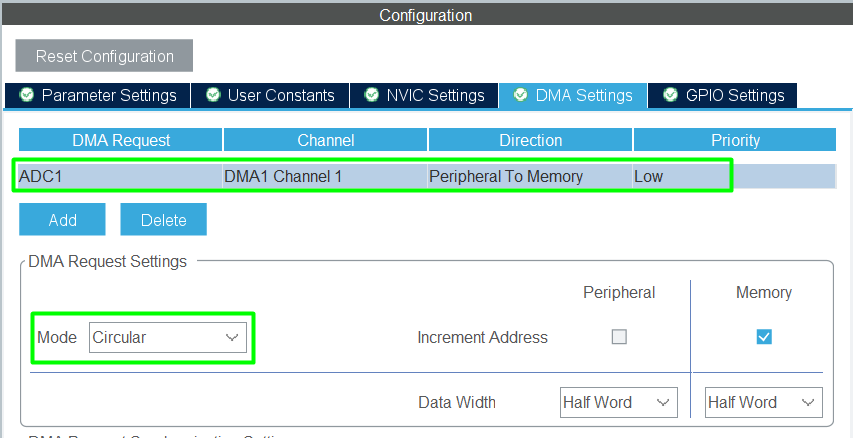
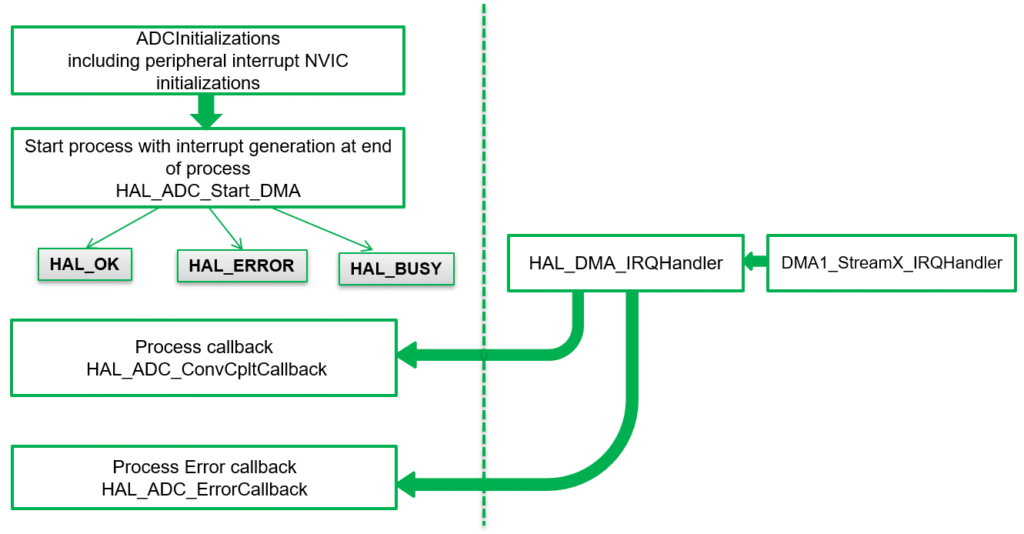
Step 4 – Enable DMA
- For DMA-based ADC, enable ADC DMA interrupt
Step 5 – Generate Code
Click Project → Generate Code to initialize HAL ADC structures.
4. Reading Analog Values via HAL
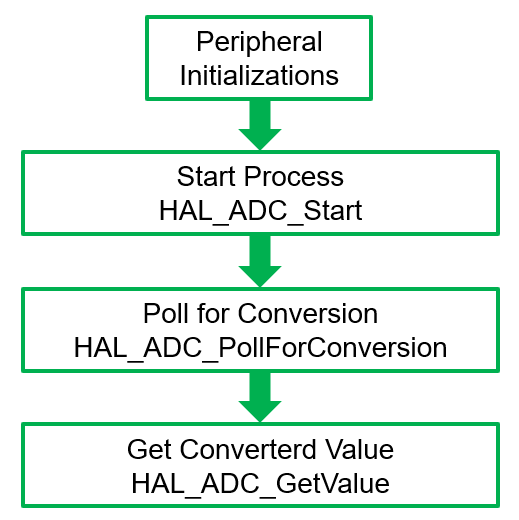
4.1 Polling Method:
4.2 DMA method:
4.3 Single Conversion Mode
					uint32_t adcValue = 0;

HAL_ADC_Start(&hadc1);                   // Start ADC
HAL_ADC_PollForConversion(&hadc1, HAL_MAX_DELAY);  // Wait for conversion
adcValue = HAL_ADC_GetValue(&hadc1);    // Read digital value
HAL_ADC_Stop(&hadc1);                    // Stop ADC
4.4 Continuous Mode
					HAL_ADC_Start(&hadc1);
while(1)
{
    if(HAL_ADC_PollForConversion(&hadc1, 10) == HAL_OK)
    {
        adcValue = HAL_ADC_GetValue(&hadc1);
    }
}
- adcValue ranges from 0 to 4095 (for 12-bit ADC).
- Convert to voltage if needed: float voltage = (adcValue * 3.3) / 4095.0; // For 3.3V reference
5. Sending ADC Values via UART
/* Private macro -------------------------------------------------------------*/
/* USER CODE BEGIN PM */
int __io_putchar(int ch)
{
HAL_UART_Transmit(&huart2, (uint8_t*)&ch, 1, 10);
return ch;
}
/* USER CODE END PM */
/* Private variables ---------------------------------------------------------*/
/* USER CODE BEGIN PV */
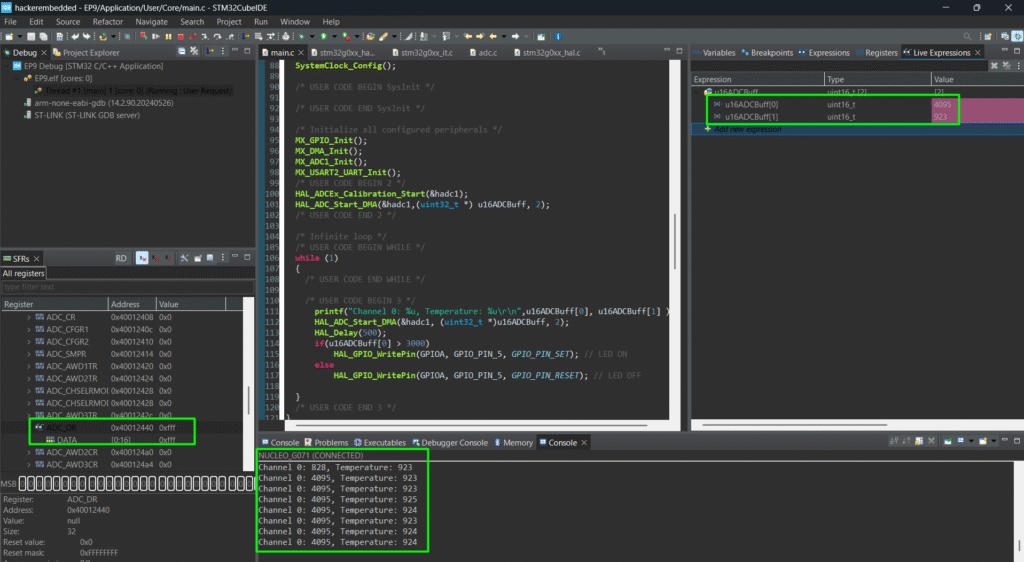
uint16_t u16ADCBuff[2];
/* USER CODE END PV */
					 /* USER CODE BEGIN 2 */
 HAL_ADCEx_Calibration_Start(&hadc1);
 HAL_ADC_Start_DMA(&hadc1,(uint32_t *) u16ADCBuff, 2);
 /* USER CODE END 2 */
 /* Infinite loop */
 /* USER CODE BEGIN WHILE */
 while (1)
 {
   /* USER CODE END WHILE */
   /* USER CODE BEGIN 3 */
	  printf("Channel 0: %u, Temperature: %u\r\n",u16ADCBuff[0], u16ADCBuff[1] );
	  HAL_ADC_Start_DMA(&hadc1, (uint32_t *)u16ADCBuff, 2);
	  HAL_Delay(500);
 }
 /* USER CODE END 3 */
Full Source Code: hackerembedded/STM32_EP9
6. Using ADC to Control LEDs
Example: Light up LEDs based on analog value thresholds:
					/* USER CODE BEGIN WHILE */
 while (1)
 {
   /* USER CODE END WHILE */
   /* USER CODE BEGIN 3 */
	  printf("Channel 0: %u, Temperature: %u\r\n",u16ADCBuff[0], u16ADCBuff[1] );
	  HAL_ADC_Start_DMA(&hadc1, (uint32_t *)u16ADCBuff, 2);
	  HAL_Delay(500);
	  if(u16ADCBuff[0] > 3000)
	      HAL_GPIO_WritePin(GPIOA, GPIO_PIN_5, GPIO_PIN_SET); // LED ON
	  else
	      HAL_GPIO_WritePin(GPIOA, GPIO_PIN_5, GPIO_PIN_RESET); // LED OFF
 }
 /* USER CODE END 3 */
7. Compiling and Running
- Build Project → Click hammer icon or press [Ctrl+B].
- Flash Project → Connect STM32 and run or enter in Debug mode.
- Test ADC:
- Open Serial Monitor to view values.
- Adjust potentiometer or sensor to observe changes.
- Test LED Control → LED reacts based on analog thresholds.
8. Hands-On Lab Recap
You learned:
- How to configure ADC peripheral in CubeMX.
- How to read analog values using HAL.
- How to convert ADC readings to voltage.
- How to use ADC to control LEDs or send data via UART.
ADC is essential for sensor-based applications and opens the door for analog signal processing.
8. Common Issues & Fixes
| Issue | Cause | Solution |
|---|---|---|
| ADC value always zero | Wrong pin configured | Verify CubeMX pinout |
| Values out of expected range | Vref mismatch | Check MCU reference voltage |
| UART output garbled | Baud rate mismatch | Set Serial Monitor to correct baud rate |
| Continuous reading fails | Polling timeout | Increase HAL_ADC_PollForConversion timeout |