
AI Tutorial: TinyML Optimization with Python & X-Cube-AI using IRIS dataset
Abstract
This article provides a hands-on guide for training a simple Multi-Layer Perceptron (MLP) classifier using the full 4 features of the Iris dataset. We focus on preparing a resource-efficient model suitable for resource-constrained embedded systems, specifically STM32 microcontrollers. We demonstrate how to train the model using Python and scikit-learn, and discuss the essential role of tools like ONNX and ST’s X-Cube-AI in deploying this model to the edge using the STM32CubeMX environment.
1. Introduction
Machine Learning (ML) is increasingly migrating from the cloud to the “edge”—devices like IoT sensors and microcontrollers. Microcontrollers such as the STM32 family have limited Flash, RAM, and processing power. To deploy even a simple Neural Network, proper data standardization and model selection are crucial. By focusing on a minimalist model structure, we aim to decrease the model’s complexity, memory footprint, and inference time, making deployment feasible on resource-limited STM32 devices.
2. Prerequisites
For the Python Hands On section, you will need:
- Python 3.x
- scikit-learn: For the classifier and data standardization.
- pandas and numpy: For data manipulation.
- matplotlib and seaborn: (Optional) For visualization.
- skl2onnx and onnx: For model export.
- micromlgen: For C code export (optional illustration).
For the embedded deployment discussion, general familiarity with STM32 microcontrollers and the STM32CubeMX environment is helpful.
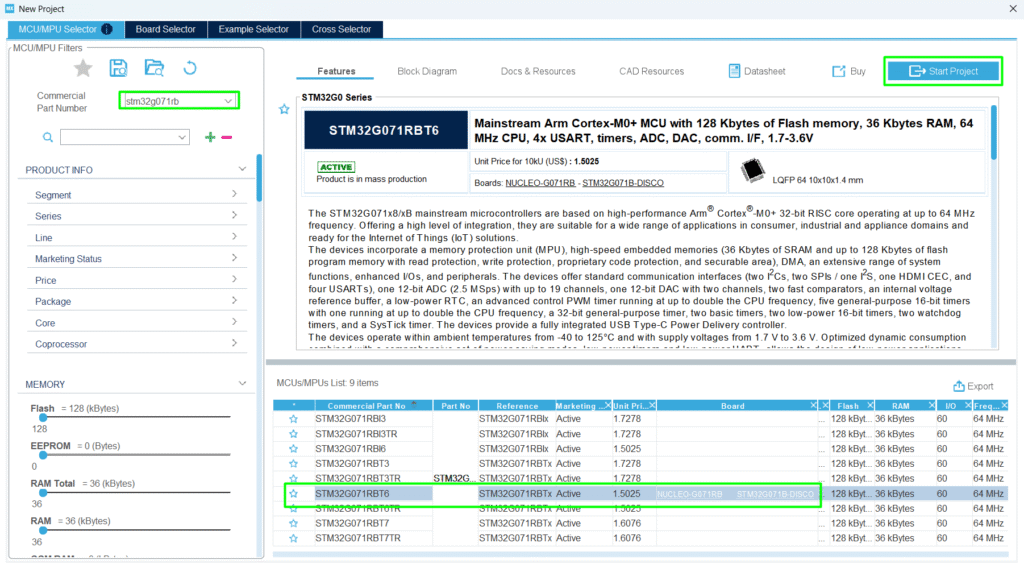
Several boards can be used; this article will focus on a simple NUCLEO-G071RB board.
3. Model and Standardization
The Iris dataset is a classic and highly influential multivariate dataset first introduced by statistician Ronald Fisher in 1936. It is perhaps the most famous dataset used in pattern recognition and machine learning literature, serving as a fundamental benchmark for classification algorithms. The dataset contains 150 instances, with 50 samples from each of three species of Iris: Iris setosa, Iris versicolor, and Iris virginica. For each sample, four features are measured in centimeters: sepal length, sepal width, petal length, and petal width, allowing models to learn the distinct patterns associated with each flower species for the purpose of accurate classification.
Model and Standardization
Standard Scaler
Usually, a first step for training any Neural Network is data standardization. This process transforms the features (like sepal length or petal width) so they all share a similar scale, typically by ensuring they have a mean of 0 and a standard deviation of 1.
Standardization is relevant because it prevents features with naturally larger numeric ranges (e.g., petal length measured in centimeters) from disproportionately influencing the neural network’s learning process.
When all features contribute more equally, the model can learn the true relationships between variables more effectively, leading to faster convergence of the optimization algorithm and ultimately, better performance and higher accuracy for the Multi-Layer Perceptron (MLP).
⚠️ Note on Simplification
To simplify the deployment process for this specific project, the standardization step will be skipped and removed from the generated code. This is possible given the range of value for the selected dataset.
Multi-Layer Perceptron (MLP) Classifier
For this example, the classifier used is a simple Multi-Layer Perceptron (MLP) model from scikit-learn.
For tinyML applications, minimizing the model complexity is key. This simple Neural Network structure is highly efficient.
ONNX and TFlite and X-Cube-AI Usage
TensorFlow Lite for Microcontrollers (TFLite Micro) is an open-source library designed to run ML models on microcontrollers. To deploy a model on an STM32, the trained model is converted into the optimized format (such as ONNX or TFLite). STMicroelectronics offers the X-CUBE-AI tool, which provides optimization specifically tailored for STM32 hardware.
4. Hands On: MLP Classification with Iris Dataset
The IRIS dataset is considered the “hello world” for AI, so we’ll use it as base for the article.
The Iris dataset contains four features (sepal length, sepal width, petal length, petal width) for 150 samples across three species. We will use all 4 features to train the classifier.
# The following lines are installation commands, they are not part of the core script logic
%pip install micromlgen
%pip install skl2onnx
import pandas as pd
import numpy as np
import matplotlib.pyplot as plt
from mpl_toolkits.mplot3d import Axes3D
from sklearn.datasets import load_iris
from sklearn.model_selection import train_test_split
from sklearn.preprocessing import StandardScaler
# PCA is removed from imports
from sklearn.neural_network import MLPClassifier
from sklearn.metrics import accuracy_score, confusion_matrix, ConfusionMatrixDisplay
# --- External Libraries for Embedded Export ---
import onnx
from skl2onnx import convert_sklearn
from skl2onnx.common.data_types import FloatTensorType
from micromlgen import port # Kept for potential C export of the MLP itself
# 1. Load Data
iris = load_iris()
X = iris.data
y = iris.target
feature_names = iris.feature_names
target_names = iris.target_names
# 2. Standardize the data (Crucial for Neural Networks) - left out
#scaler = StandardScaler()
#X_scaled = scaler.fit_transform(X) # X_scaled now has 4 features
# --- VISUALIZATION: 3D Plot of Original Data (using 3 of 4 features) ---
# This plot remains useful to visualize the complexity of the 4D space.
fig = plt.figure(figsize=(10, 8))
ax = fig.add_subplot(111, projection='3d')
for i, target_name in enumerate(target_names):
# Using the first three features for 3D plot
ax.scatter(X[y == i, 0], X[y == i, 1], X[y == i, 2], label=target_name)
ax.set_xlabel(feature_names[0])
ax.set_ylabel(feature_names[1])
ax.set_zlabel(feature_names[2])
ax.set_title(f'Iris Dataset (3 of 4 features) - Original Data')
ax.legend()
plt.tight_layout()
plt.show() # Display the plot
# -------------------------------------------------------------
# 4. Split Data (using the full 4 standardized features)
# NOTE: X and not X_scaled is used here
X_train, X_test, y_train, y_test = train_test_split(
X, y, test_size=0.3, random_state=42, stratify=y
)
# 5. Train Simple Neural Network (MLP)
# The input layer is now implicitly 4 neurons (matching X_scaled)
mlp = MLPClassifier(
hidden_layer_sizes=(10,),
max_iter=1000,
activation='relu',
solver='adam',
random_state=42
)
mlp.fit(X_train, y_train)
# 6. Evaluate
y_pred = mlp.predict(X_test)
accuracy = accuracy_score(y_test, y_pred)
print("--- Results with Simple Neural Network (MLP) on 4 Features ---")
print(f"Classifier Accuracy (on 4 features): {accuracy:.4f}")
# PCA related print statements are removed
# -----------------------------------------
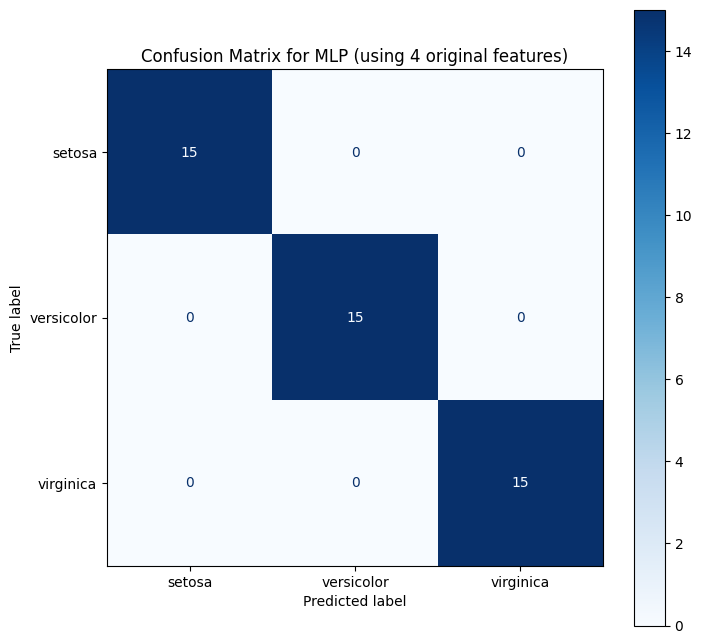
# --- VISUALIZATION: Confusion Matrix ---
cm = confusion_matrix(y_test, y_pred)
disp = ConfusionMatrixDisplay(confusion_matrix=cm, display_labels=target_names)
fig, ax = plt.subplots(figsize=(8, 8))
disp.plot(ax=ax, cmap=plt.cm.Blues)
plt.title("Confusion Matrix for MLP (using 4 original features)")
plt.show() # Display the plot
# -----------------------------------------
# --- EXPORT 1: Neural Network Model to ONNX ---
try:
# Define the input type: 4 input features (Sepal/Petal) with float type
# IMPORTANT: Changed input size from 2 to 4
initial_type = [('float_input', FloatTensorType([None, 4]))]
# Export the MLP model
onnx_model = convert_sklearn(mlp, initial_types=initial_type, target_opset=13)
# Save to file
with open("iris_mlp_4f.onnx", "wb") as f: # Renaming the output file
f.write(onnx_model.SerializeToString())
print("\n✅ Exported MLP model to ONNX format: 'iris_mlp_4f.onnx' (4 features)")
except Exception as e:
print(f"\n⚠️ Skipping ONNX export: Error during conversion: {e}")
# --- EXPORT 2: MLP Model to C Code using micromlgen ---
# The original request was to export PCA, but since PCA is removed,
# we can use micromlgen to export the MLP model itself (which includes the Standard Scaler).
try:
# Export the MLP model (it will include the Standard Scaler logic if provided)
# Note: micromlgen is best suited for simpler models like Decision Trees,
# but it can port the scaler and the MLP parameters.
c_code = port(mlp, classmap={
0: 'SETOSA',
1: 'VERSICOLOR',
2: 'VIRGINICA'
}, scaler=scaler) # Passing the scaler ensures input data is standardized in C code
# Save to C file
with open('iris_mlp_model.c','w') as f:
f.write(c_code)
print("✅ Exported MLP model + Standard Scaler to C format: 'iris_mlp_model.c'")
except Exception as e:
print(f"\n⚠️ Skipping C export: Error during conversion or import: {e}")
Explanation of the Neural Network
The MLPClassifier used here is configured as follows:
- Input Layer: Automatically set to 4 neurons, matching our four standardized features.
- Hidden Layer: A single layer with 10 neurons (hidden_layer_sizes=(10,)). This is a small, efficient size for an embedded device.
- Activation Function: ReLU (activation=’relu’). This non-linear function is computationally light and is the standard for modern NNs.
- Output Layer: Automatically set to 3 neurons (for the three Iris species) with a softmax activation implicitly handled by the classifier for multi-class problems.
This simple 4-10-3 architecture is much more representative of the type of model that would be converted to ONNX/TFLite and deployed to an STM32. The goal is not to achieve the best in class classifier, so no real effort was used to achieve higher accuracy.
Once the model is to your liking, you can export the content using the ONNX framework, which is compatible with X-Cube-AI. The exported file, iris_mlp_4f.onnx, contains the weights and biases of the neural network.
This is not the article objective, but just to share, this is the accuracy:100% and confusion matrix of the simple MLP implementation:
5. X-Cube-AI Deployment
STMicroelectronics’ X-CUBE-AI is an expansion package for the STM32CubeMX environment that optimizes and deploys trained ML models (including those from frameworks like scikit-learn, TensorFlow, and PyTorch) onto STM32 microcontrollers.
- Model Conversion and Optimization: X-CUBE-AI converts the trained model (e.g., an ONNX file) into highly optimized, platform-independent C code tailored for the target STM32 device.
- Analysis and Profiling: The tool provides detailed reports on the model’s memory footprint (Flash/RAM) and estimated execution time, which is critical for selecting the right microcontroller and ensuring real-time performance.
X-CUBE-AI simplifies the process of getting the Python-trained MLP model onto the STM32, automatically managing the necessary C implementation of the mathematical operations.
Deployment via STM32CubeMX
To integrate the model:
1. Generate a Project: Start your embedded project using the STM32CubeMX tool.
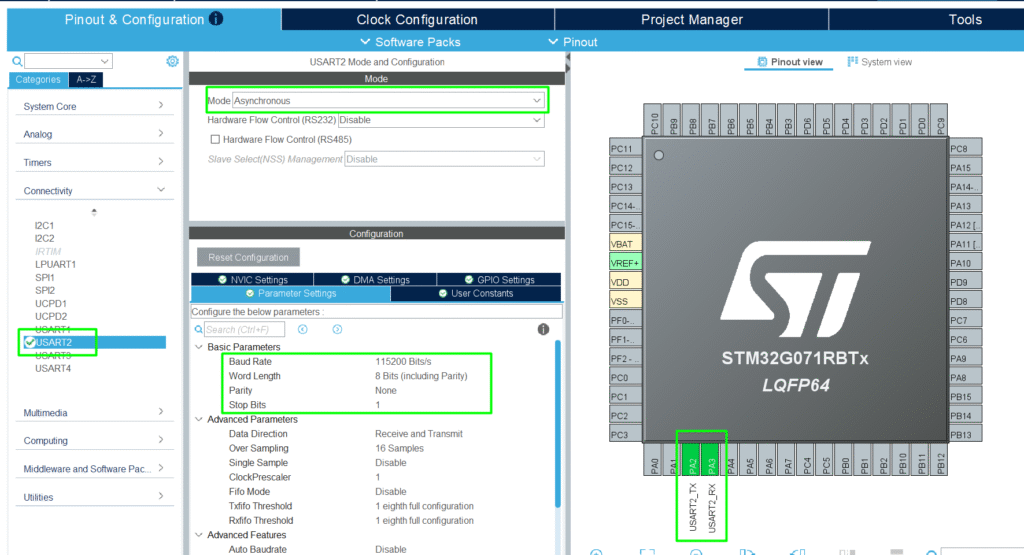
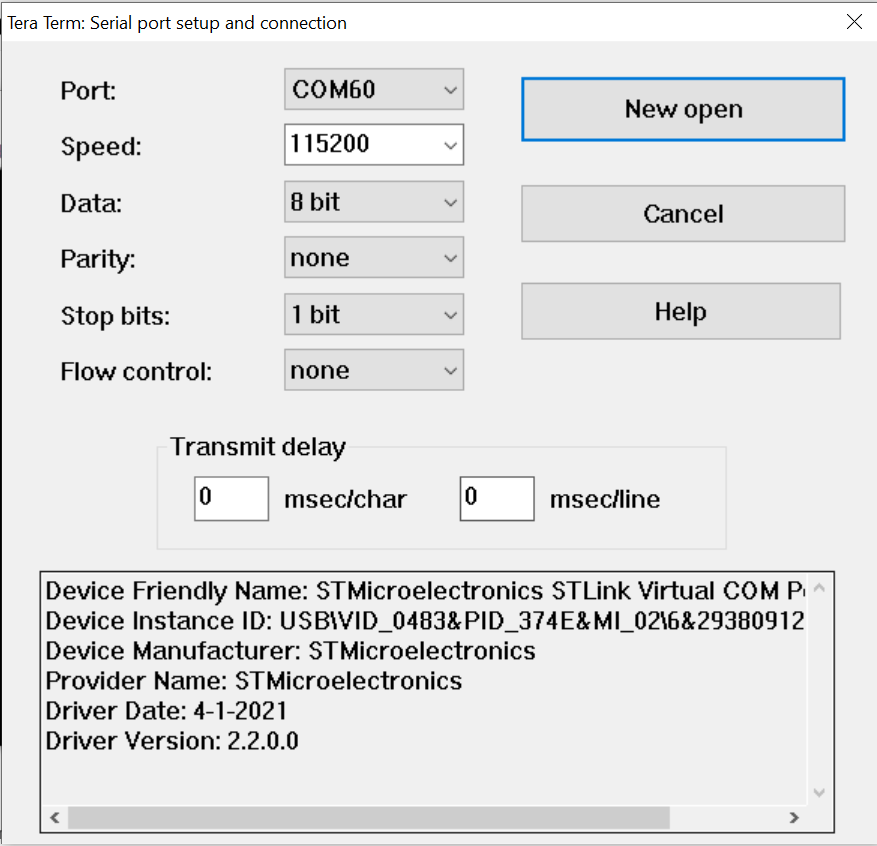
Add the UART on PA2/PA3 for a simple debug logging:
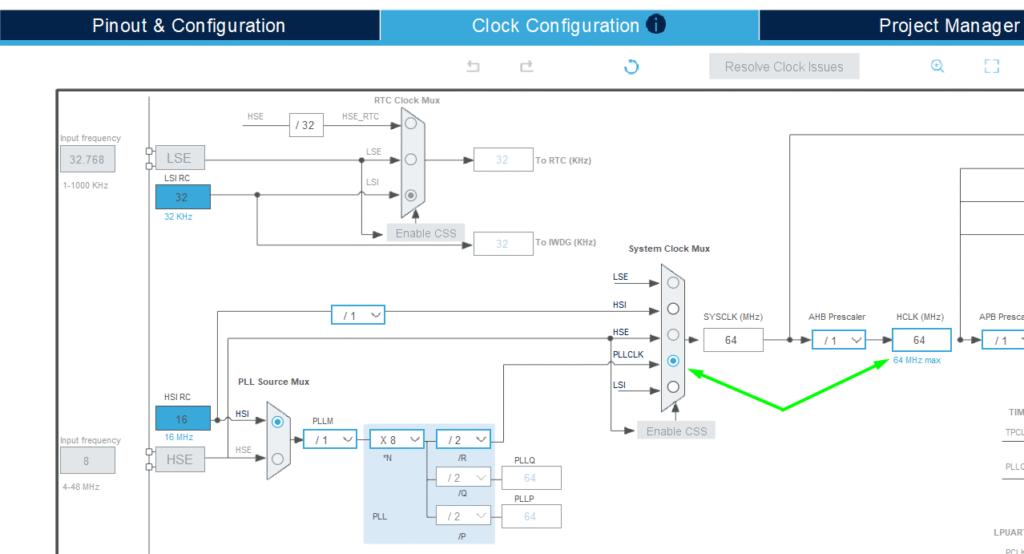
Adjust the clock for improved performance:
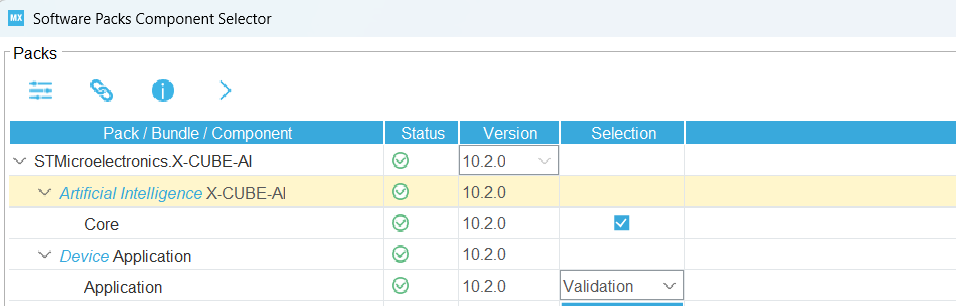
2. Activate X-CUBE-AI: Within STM32CubeMX, select the X-CUBE-AI software package.
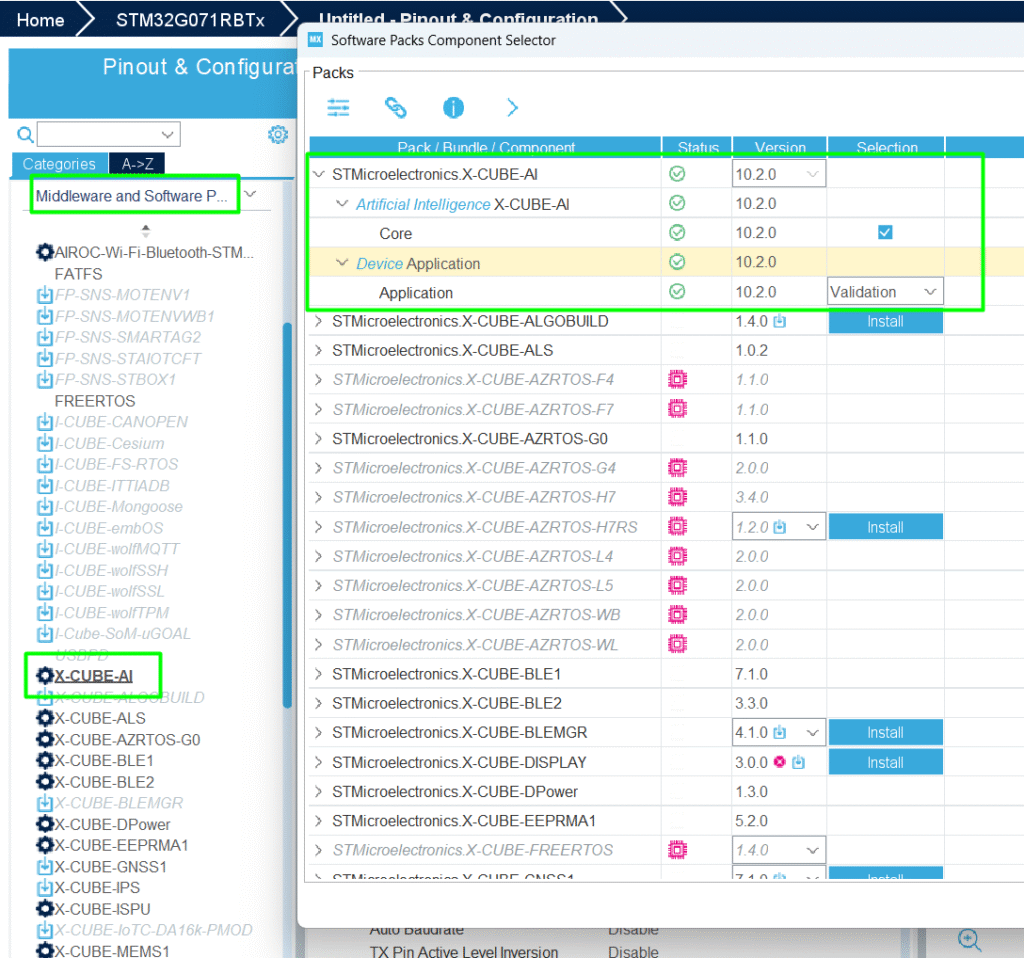
Change from Validation to Application Template:

Import the Model: Import your optimized model file (iris_mlp_4f.onnx) into the X-CUBE-AI configuration:
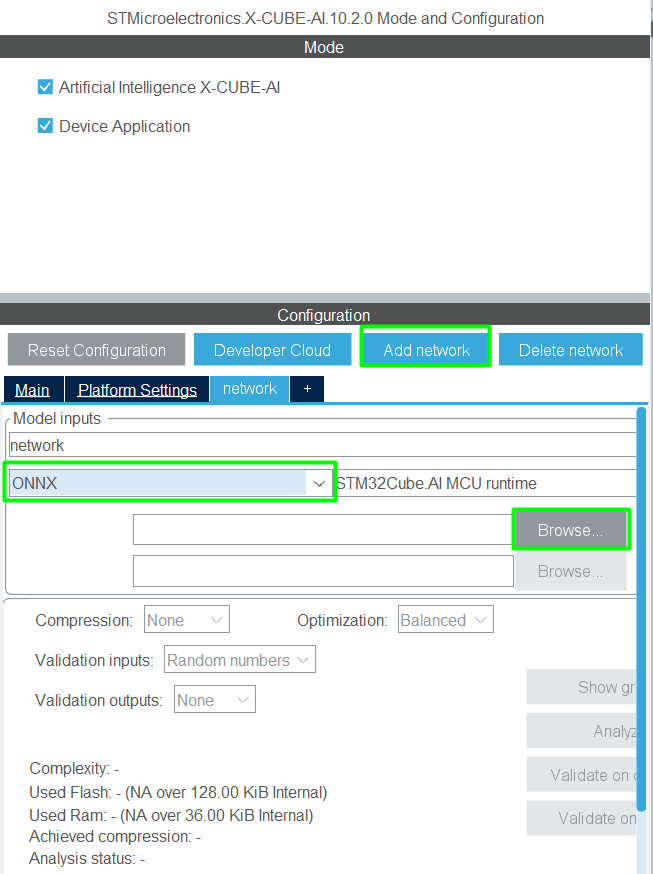
Once loaded, Configure and Analyze: X-CUBE-AI will analyze the model, provide memory and performance estimates, and allow you to select the desired optimization and quantization options:

3. Generate Code: Generate the project code for the desired IDE, in this case, STM32CubeIDE, and X-CUBE-AI will output the necessary C files (ai_platform.c, ai_network.c, etc.) containing the model and inference functions, ready to be compiled and run on the STM32.
6. Code editing
X-Cube-AI generates its one syscalls.c, but for STM32CubeIDE, that is not the ideal one, so the recommendation is to create your custom and name it as syscalls_.c, adding it in the User/Core’s folder:
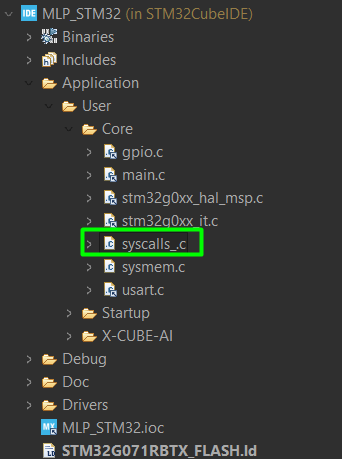
This is a good example of the syscalls_.c> STM32_EP2/STM32CubeIDE/Application/User/Core/syscalls.c at main · hackerembedded/STM32_EP2
Now the project should be built properly and it’s time to create our minor adjustments. Since the objective is to simply showcase the model running, add the small code that fills the buffer with one of the flowers and check the output.
main.c
Add the needed base for printf(). For more details, refer to this article> – Hacker Embedded How to implement printf with STM32: Setup for STM32CubeIDE and VS Code
					/* USER CODE BEGIN Includes */
#include <stdio.h>
/* USER CODE END Includes */
					/* USER CODE BEGIN PFP */
int _write(int fd, char * ptr, int len)
{
 HAL_UART_Transmit(&huart2, (uint8_t *) ptr, len,    HAL_MAX_DELAY);
 return len;
}
/* USER CODE END PFP */
app_x-cube-ai.c
Create a buffer to pass the input data and another one that contains the classes names:
					float aiInData[AI_NETWORK_IN_1_SIZE];
const char* classes[3] = {
"setosa", "veriscolor", "virginica"
};
/* USER CODE END includes */
Call the ai_bootstrap() function inside the initiation MX_X_CUBE_AI_Init:
					void MX_X_CUBE_AI_Init(void)
{
   /* USER CODE BEGIN 5 */
	ai_boostrap(data_activations0);
   /* USER CODE END 5 */
}
And in the process function, add the following, to validate the class and model:
					void MX_X_CUBE_AI_Process(void)
{
   /* USER CODE BEGIN 6 */
	// A given flower to be evaluated: [7.3, 2.9, 6.3, 1.8] - virginica
//	aiInData[0] = (float) 7.3f;
//	aiInData[1] = (float) 2.9f;
//	aiInData[2] = (float) 6.3f;
//	aiInData[3] = (float) 1.8f;
	// A given flower to be evaluated: 	6.1, 2.9, 4.7, 1.4 - versicolor
	aiInData[0] = (float) 6.1f;
	aiInData[1] = (float) 2.9f;
	aiInData[2] = (float) 4.7f;
	aiInData[3] = (float) 1.4f;
	ai_input[0].data = AI_HANDLE_PTR(aiInData);
	ai_run();
	// Check if the pointer is valid before dereferencing
	if (data_outs[0] != NULL) {
	    // Dereference data_outs[0] to get the predicted class index (0, 1, or 2)
	    // and cast it to an int to index the 'classes' array safely.
	    int predicted_index = (int)*data_outs[0];
	    if (predicted_index >= 0 && predicted_index < 3) {
	        printf("Class: %s\n", classes[predicted_index]);
	    } else {
	        printf("Error: Invalid class index (%d) returned.\n", predicted_index);
	    }
	} else {
	    printf("Error: Output data pointer is NULL.\n");
	}
   /* USER CODE END 6 */
}
7. Results
The Python code demonstrates that the simple 4-feature MLP achieves high accuracy (typically over 95%) on the classification task. This small, efficient model structure, combined with the optimization offered by X-CUBE-AI, translates to ultra-low-power, fast inference suitable for battery-powered edge devices.
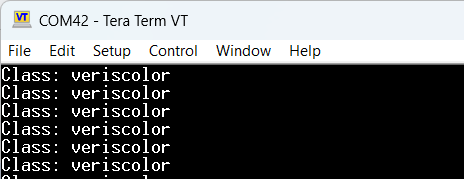
Running the code with a terminal open, a print showing the class is displayed:
Conclusion
Focusing on a lightweight MLP model trained on standardized data, and exporting it via ONNX for use with STMicroelectronics’ highly optimized X-CUBE-AI, provides a robust and efficient path for deploying machine learning solutions to memory and power-constrained STM32 microcontrollers.


Pingback: - Hacker Embedded Baby Steps into TinyML: Your First Embedded AI Project on STM32