
Getting started with Zephyr and STM32!
Abstract
Zephyr is a open-source and vendor neutral proven RTOS ecosystem, with a small memory footprint, usually less than 8KB FLASH and 5KB RAM and it’s made to be scalable, from small MCUs to complex multi-core systems. In this article series we’ll explore the Zephyr with STM32.
1. Introduction
This tutorial assumes you have already installed the Zephyr and its dependencies. You can follow the official installation guide:
Getting Started Guide — Zephyr Project Documentation
In this tutorial, we will use Ubuntu 25.10 and the B-U585I-IOT02A development board, but a similar flow is possible on MAC and Windows. One of the main benefits from the recent releases is that the Windows installation is now as simple as Linux, as mentioned in the official documentation:
On modern versions of Windows (10 and later), install Windows Terminal from the Microsoft Store. The instructions below work in either cmd.exe or PowerShell.
These instructions use Windows’ official package manager, winget. If winget isn’t an option, install the dependencies from their respective websites and make sure their command line tools are on your PATH environment variable.
- In modern Windows versions, winget is already pre-installed by default. You can verify that this is the case by typing winget in a terminal window. If that fails, you can then install winget.
- Open a Command Prompt (cmd.exe) or PowerShell terminal window. To do so, press the Windows key, type cmd.exe or PowerShell and click on the result.
- Use winget to install the required dependencies:
winget install Kitware.CMake Ninja-build.Ninja oss-winget.gperf Python.Python.3.12 Git.Git oss-winget.dtc wget 7zip.7zip
4. Close the terminal window.
Another key point to mention is that if you are using a different board, check the list of supported boards in the Zephyr documentation. You will also need to know the board name used by Zephyr (for example, b_u585i_iot02a) to do so, check here:
Supported Boards and Shields — Zephyr Project Documentation
Be aware that Zephyr will rely on the STM32CubeCLT, so for newer devices, such as the STM32C5, make sure to have the latest one installed:STM32CubeCLT | Software – STMicroelectronics
2. Flashing the Blinky Example
2.1 How to activate the virtual environment
Before building any application, activate the Zephyr Python virtual environment:
source ~/zephyrproject/.venv/bin/activate
To deactivate the virtual environment, simply run:
deactivate
2.2 Creating an Alias
Since you’ll be activating the virtual environment frequently, it is convenient to create an alias.
Open your .bashrc file:
nano ~/.bashrc
At the end of the file, add the following line:
alias activate="source ~/zephyrproject/.venv/bin/activate"
If you prefer a different command name, replace activate with your desired alias.
Save the file and reload it by running:
source ~/.bashrc
From now on, you can activate the virtual environment simply by typing:
activate
3. Building the Blinky Sample
Navigate to the Zephyr directory:
cd ~/zephyrproject/zephyr
Build the Blinky sample for the B-U585I-IOT02A board:
west build -p always -b b_u585i_iot02a samples/basic/blinky
4. Flashing the Board
Flash the application to the board:
west flash
The LED should start blinking once the flashing process is complete.
It’s also possible to open the tty and monitor the print message or, if using Windows, open your preferred terminal.
As an exercise, try building and flashing another sample application from the Zephyr repository, such as blinky_pwm.
5. Opening the Project in Visual Studio Code
To open the current directory in Visual Studio Code, run:
code .
The VS Code will open and show all the projects. The sample projects can be found under this directory:
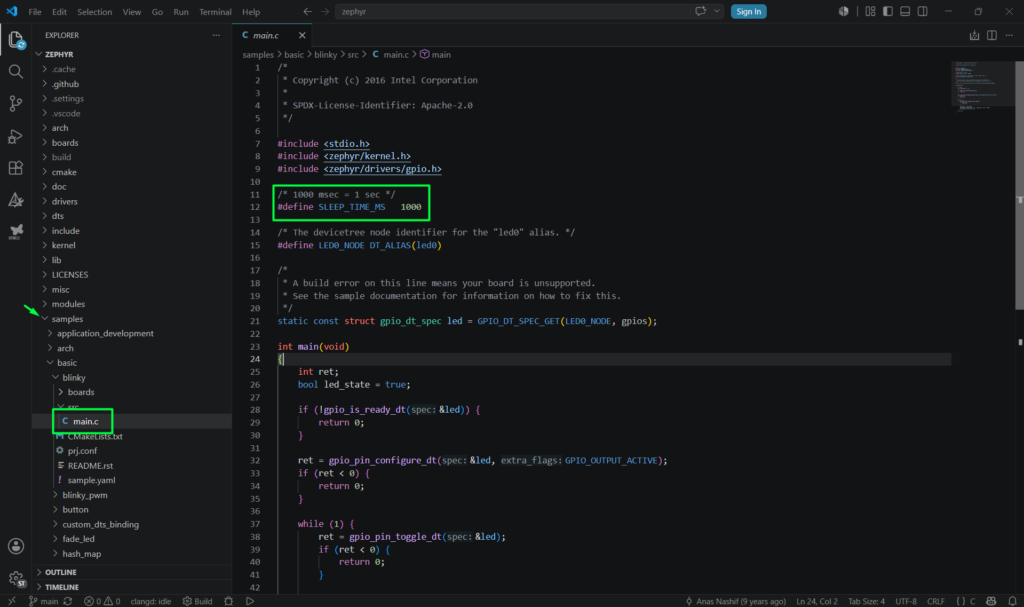
A quick edit can be done to change the delay from 1second to 500ms, to ensure all is working as intended as well. Once the change is made, use the simple command> west flash to issue a rebuild and reprogramming. The LED should be blinking at 500ms now.
6. Conclusion
This quick guide shows how to get started with Zephyr and STM32 and ensure your installation is properly done as well as show the basics, including selecting the board, building, programming and making minor code changes.
Happy Coding =)
Pingback: - Hacker Embedded How to create your own Zephyr application with STM32